

Need to add a horizontal line to separate sections of your Microsoft Word document? Word actually includes several ways to insert a line, depending on whether you want the fastest option, a customizable divider, or complete control over its appearance.
In this tutorial, you’ll learn three simple methods for inserting a line across the page, along with when each method works best. You’ll also find downloadable reference guides to help you remember the different line styles and settings available in Word.
What You’ll Learn
- How to quickly insert a horizontal line using Word’s AutoFormat feature
- How to insert a customizable horizontal line using the Borders menu
- How to draw a perfectly straight line using Shapes
- How to change a line’s color and thickness
- Where to enable or disable Word’s automatic line feature
Common Uses
- Separate sections of a document
- Create professional-looking reports
- Add dividers to letters or forms
- Improve document readability
- Create custom page layouts
Requirements / Compatibility
- Microsoft Word for Microsoft 365
- Word 2021
- Word 2019
- Word 2016
The steps are nearly identical across modern desktop versions of Microsoft Word. Some menus may look slightly different depending on your version.
Practice & Resources
Download the included reference guides to follow along and keep for future reference.
Included resources:
- How to Insert a Line Across the Page in Word (step-by-step guide)
- Word Automatic Line Styles Reference Guide (all AutoFormat line styles and settings)
These guides summarize each method shown in the video and include the location of the AutoFormat settings if you ever need to enable or disable automatic border lines.
Video Tutorial
Breaking Down the Concepts
AutoFormat Border Lines
Word can automatically convert certain character combinations into horizontal lines. When you type three matching characters (such as hyphens or underscores) and press Enter, Word replaces them with a formatted border line that spans the width of the paragraph.
Different characters create different styles, making this the fastest method for adding dividers.
Horizontal Line (Borders)
The Horizontal Line option found under the Borders button inserts a graphic line instead of a paragraph border. Because it’s an object, you can double-click it to customize its size and color.
Shapes
Using the Line shape gives you the greatest flexibility. Since it’s a drawing object, you can control its exact position, length, thickness, color, and other formatting options.
Holding Shift while drawing keeps the line perfectly horizontal.
Step-by-Step Instructions
Method 1: Use the AutoFormat Shortcut
- Click on a blank line in your document.
- Type three hyphens (
---). - Press Enter.
- Word automatically inserts a horizontal line.
You can also create other line styles:
| Characters | Result |
|---|---|
| — | Thin solid line |
| ___ | Thick solid line |
| *** | Dotted line |
| ### | Triple line |
| === | Double line |
| ~~~ | Wavy line |
If you accidentally insert a line, press Ctrl + Z immediately or press Backspace to remove it.
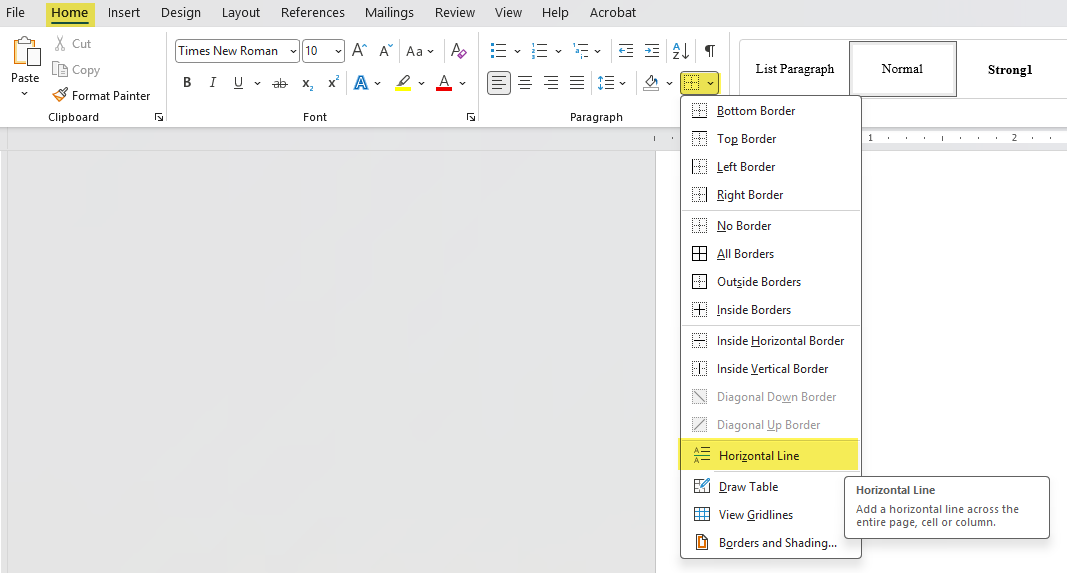
Method 2: Use the Borders Button
- Select the Home tab.
- Click the arrow next to Borders.
- Choose Horizontal Line.
- Double-click the inserted line to customize it.
- Change the:
- Width
- Height
- Color
Click OK to apply your changes.
Method 3: Draw a Line
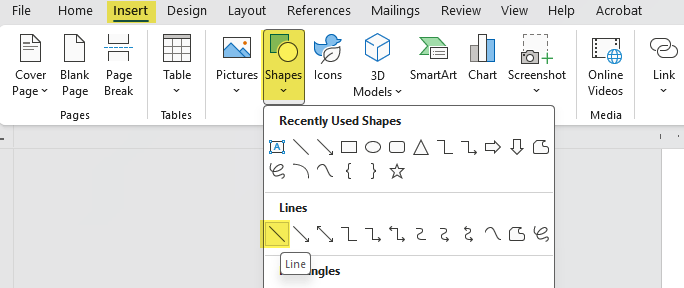
- Select the Insert tab.
- Choose Shapes.
- Select the Line tool.
- Hold Shift while clicking and dragging to keep the line perfectly horizontal.
- Use the Shape Format tab to:
- Change the color
- Increase the line weight
- Apply additional formatting
Additional Tips
Helpful Shortcut
If you accidentally trigger Word’s automatic line feature, press Ctrl + Z immediately to remove it.
Alternative Method
If you want complete control over the line’s placement and appearance, use the Shapes method instead of AutoFormat.
Common Mistake
Many users think the AutoFormat line is a drawing object. It isn’t—it’s actually a paragraph border. That’s why clicking directly on it won’t select it like a shape.
Version Differences
The AutoFormat feature and Borders menu have remained largely unchanged across recent versions of Microsoft Word, so these methods work similarly in Word 2016, 2019, 2021, and Microsoft 365.
Related Feature
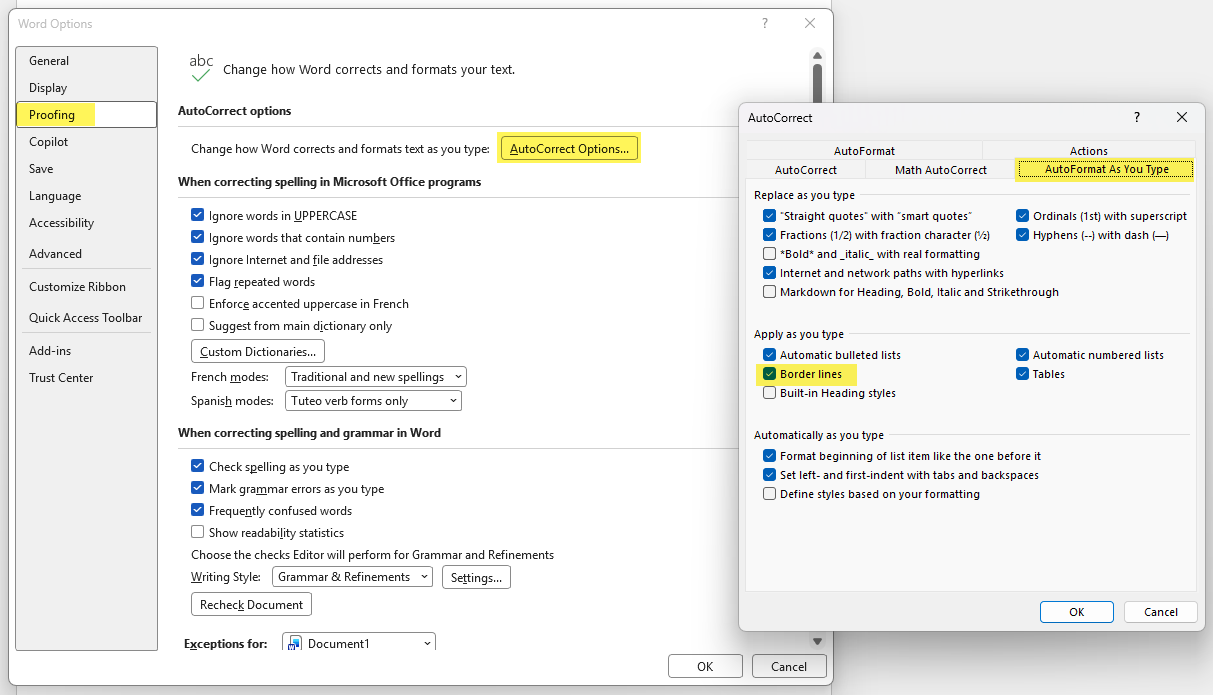
If Word automatically creates lines when you don’t want it to, you can disable the feature by going to:
File → Options → Proofing → AutoCorrect Options → AutoFormat As You Type → Border Lines
Related Tutorials
How to Remove the Thick Black Line (Horizontal Line) in Word
Learn how to remove the thick black line that sometimes appears in Microsoft Word after pressing Enter. This tutorial explains why it happens, how to remove it using paragraph borders, how to prevent it from happening again, and includes a quick reference guide for Word’s automatic line styles.
Stay Updated
There are two easy ways to get notified when new tutorials are published:
Subscribe on YouTube for new video tutorials: @SimpleSoftwareTutorials
or enter your email below to receive new blog posts directly in your inbox:

