
Have you ever typed a few characters in Microsoft Word, pressed Enter, and suddenly ended up with a thick black line across your document that won’t delete? You’re not alone – this is one of Word’s most common (and confusing) automatic formatting features.
In this tutorial, you’ll learn how to quickly remove the thick black line and understand why it appears in the first place. You’ll also discover how Word automatically creates several different horizontal line styles, along with a downloadable quick reference guide showing each option.
What You’ll Learn
- Why the thick black line appears in Microsoft Word
- Why pressing Delete or Backspace often doesn’t remove it
- How to remove the line using paragraph borders
- How to undo the line immediately after it’s created
- How to prevent Word from creating automatic border lines in the future
- How to create different automatic horizontal line styles intentionally
Common Uses
Although this tutorial focuses on removing unwanted lines, Word’s automatic borders can also be useful for:
- Separating sections of a document
- Creating visual dividers
- Formatting reports
- Building templates
- Creating professional-looking documents
- Adding emphasis between sections
Follow Along
This tutorial doesn’t require a practice document.
The written instructions below include screenshots showing exactly where to find the Border options in Microsoft Word.
You can also download the Automatic Line Styles Quick Reference Guide, which shows the different character combinations Word recognizes (such as hyphens, underscores, equals signs, and more) along with examples of the line each one creates.
Requirements / Compatibility
This tutorial was originally recorded using Microsoft Word 2010, but the steps remain accurate in current versions of Microsoft Word, including Microsoft 365, Word 2016, Word 2019, Word 2021, and newer.
While the interface has been updated slightly, Word still creates automatic paragraph borders using the same AutoFormat feature, and the removal process remains the same.
Video Tutorial
Breaking Down the Concept
The “thick black line” isn’t actually a drawing or shape – it’s a paragraph border that Word automatically inserts when it recognizes certain character patterns.
For example:
___+ Enter creates a thick line---+ Enter creates a thin horizontal line===+ Enter creates a double line
Because it’s a paragraph border rather than a line object, pressing Delete usually won’t remove it. Instead, you’ll need to remove the border formatting from the paragraph.
Understanding this difference makes the problem much easier to fix—and lets you intentionally create decorative horizontal lines when you want them.
Step-by-Step Instructions
Method 1: Undo Immediately
If you just created the line:
- Press Ctrl + Z
- Or click Undo on the Quick Access Toolbar.
This is the fastest solution.
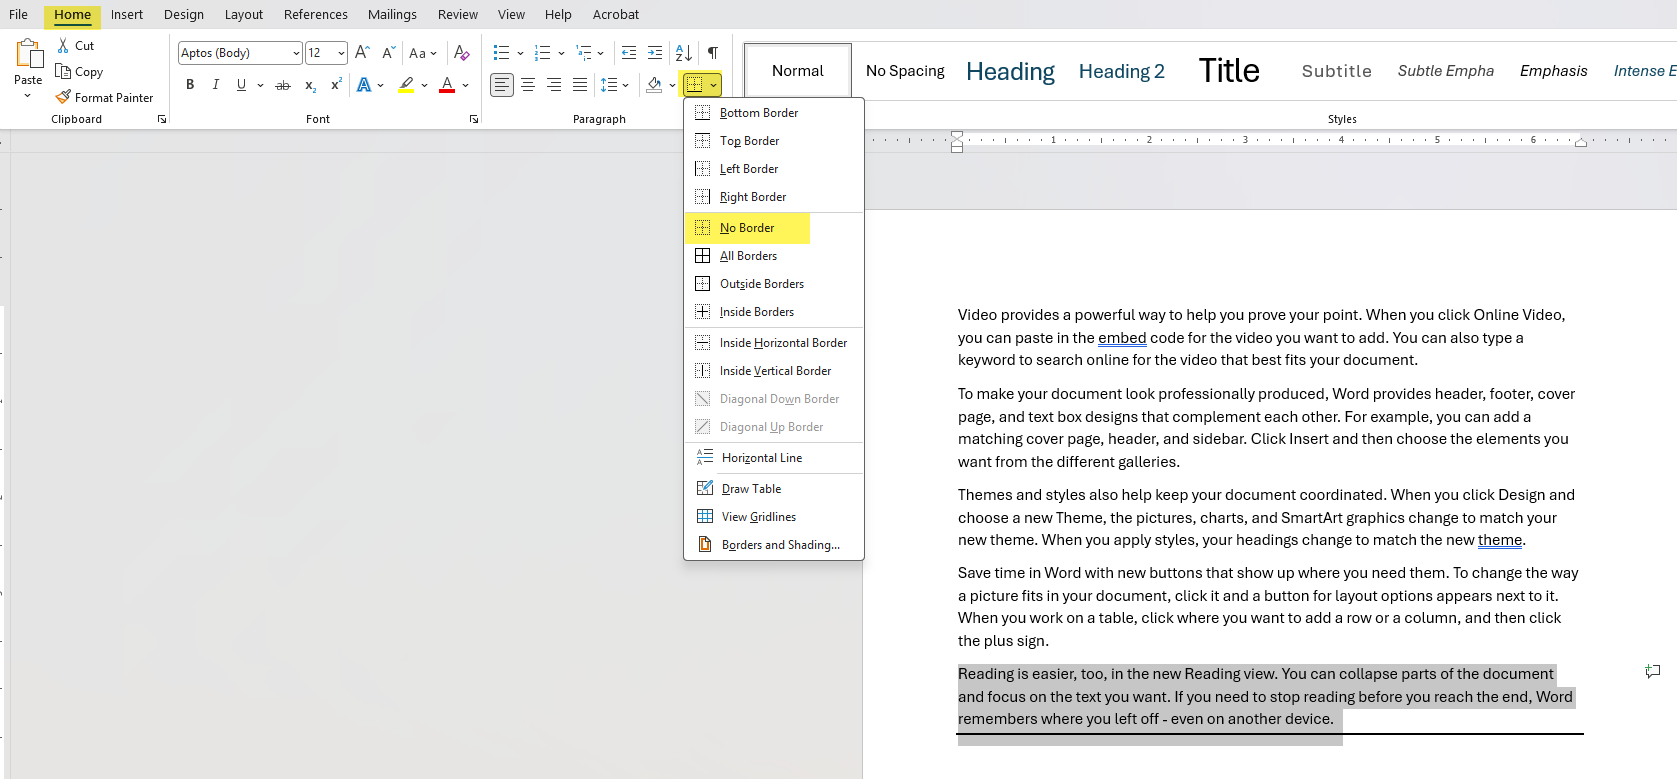
Method 2: Remove the Border
- Select the paragraph above the line (or the affected text).
- On the Home tab, locate the Borders button in the Paragraph group.
- Click the Borders drop-down arrow.
- Select No Border.
The thick black line disappears immediately.
Optional: Prevent It From Happening Again
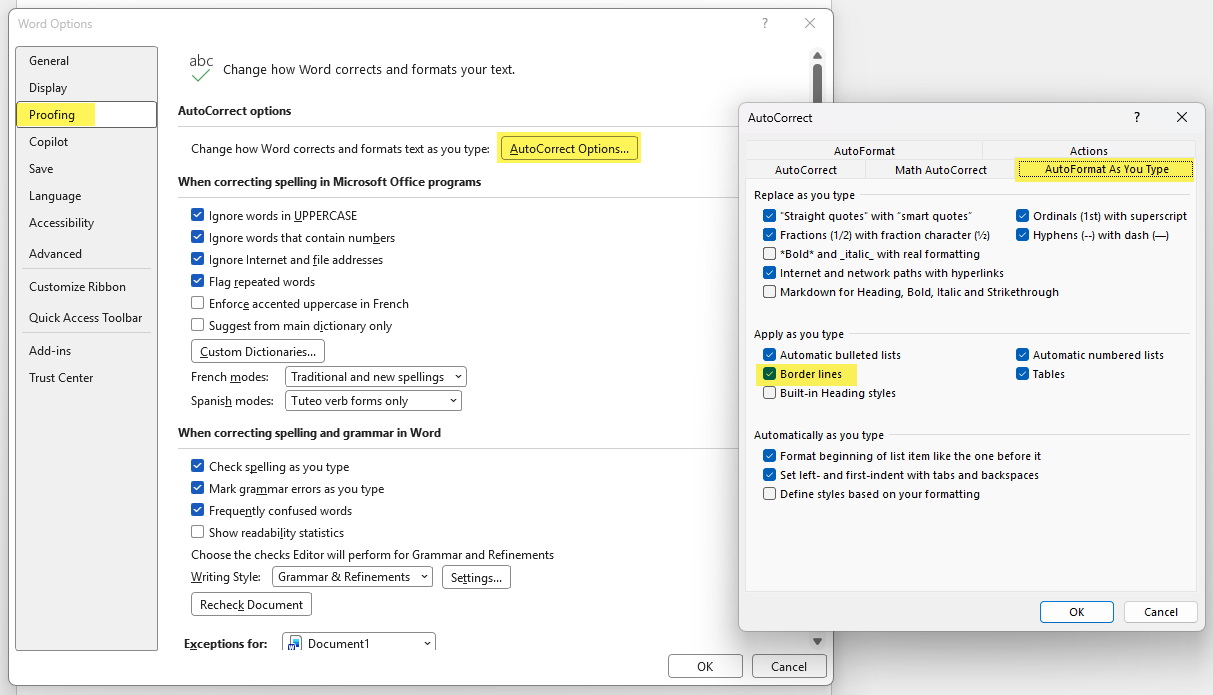
If you never use automatic border lines:
- Go to File → Options
- Select Proofing
- Click AutoCorrect Options
- Open the AutoFormat As You Type tab
- Uncheck Border lines
- Click OK
Word will no longer automatically create these horizontal lines.
Automatic Line Styles Quick Reference
Want to create horizontal lines on purpose?
The thick black line is just one of several automatic line styles built into Microsoft Word. Download this quick reference guide to see six different horizontal line styles, what they look like, and the keyboard shortcuts used to create each one.
Note: If you change the autoformat as you type settings in the optional instructions above, the lines in this quick reference guide will not work – you will need to ensure the border lines option is checked as in the screenshot above.
Additional Tips
- The line is actually attached to the paragraph above it, so selecting only the line itself often doesn’t work.
- If you create the line accidentally, Ctrl + Z is the quickest fix.
- If you frequently use sequences of hyphens or underscores, consider disabling Word’s automatic Border lines feature.
- You can also intentionally use these shortcuts to create attractive section dividers instead of inserting shapes.
Related
How to Set Default Margins in Microsoft Word
Learn how to set default margins in Microsoft Word so new documents automatically use your preferred margin sizes. This quick tutorial shows how to create custom margins, save them as the default for future documents, and restore Word’s standard one-inch margins if you change your mind later.
Microsoft Word Basics: Features, Tools, and Functions Explained
Get familiar with Microsoft Word and learn what its most common tools and features do. This guide explains Word’s main tabs, formatting options, styles, tables, images, page layout tools, headers and footers, saving files, and more, with a guided video walkthrough and detailed training manual for additional help.
How to Insert a Horizontal Line Across the Page in Word (3 Easy Methods)
Learn three easy ways to insert a horizontal line across the page in Microsoft Word. This tutorial covers the AutoFormat shortcut, the Borders button, and drawing lines with Shapes, plus how to customize line styles, colors, and thickness for professional-looking documents.
Stay Updated
There are two easy ways to get notified when new tutorials are published:
Subscribe on YouTube for new video tutorials: @SimpleSoftwareTutorials
or enter your email below to receive new blog posts directly in your inbox:

