
Google Forms makes it easy to collect information, but the real power comes from automatically organizing every response into a Google Sheet.
In this tutorial, you’ll learn how to create a Google Form, connect it to Google Sheets, and automatically capture every submission in a spreadsheet. This makes it easy to collect, organize, analyze, and reuse information without manually copying responses.
What You’ll Learn
In this tutorial, you’ll learn how to:
- How to create a Google Form
- How to add and customize questions
- How to connect a form to Google Sheets
- How responses are automatically recorded
- How to enable email notifications
- How to test your form
- How to delete test responses
- Best practices for managing your response spreadsheet
Common Uses
- Collect customer contact information
- Create event registrations
- Gather RSVPs for weddings, birthdays, or reunions
- Build a mailing list for holiday cards or announcements
- Collect addresses to create mailing labels in Microsoft Word
- Send an “Update Your Contact Information” form to friends, family, or clients
- Accept appointment requests
- Create employee request forms
- Gather survey or feedback responses
- Collect information for small business orders or inquiries
Requirements & Compatibility
This tutorial uses:
- Google Forms
- Google Sheets
- A free Google account
The workflow works the same whether you begin from:
- Google Drive
- forms.google.com
Google Forms and Google Sheets are available in any modern web browser.
Video Tutorial
How Google Forms and Google Sheets Work Together
Think of Google Forms as the front door and Google Sheets as the filing cabinet:
- People fill out your form.
- Google automatically places every response into a new row in the spreadsheet.
- That means you never have to copy and paste responses yourself.
Why Connect a Spreadsheet?
Once responses are stored in Google Sheets, you can:
- Sort information
- Filter responses
- Search for specific records
- Create charts
- Analyze trends
- Share data with others
- Build formulas
- Create pivot tables
- Export information to Excel
The form collects the data and the spreadsheet helps you organize and work with it.
Automatic Timestamps
Every submission automatically receives a timestamp.
This lets you know:
- when someone submitted the form
- the order responses were received
- how recently information was updated
No extra setup is required.
Why Keep the Response Sheet Untouched?
Google creates a worksheet called Form Responses 1.
Think of this as your master data.
Instead of editing that worksheet directly, create another sheet for:
- reports
- charts
- formulas
- summaries
- dashboards
This keeps your incoming responses clean while giving you complete freedom to analyze the data elsewhere.
Real-World Example
Imagine you’re planning a bridal shower and need everyone’s mailing address.
Instead of asking everyone individually:
- Send a Google Form.
- Everyone fills it out.
- Addresses appear automatically in Google Sheets.
- Use that spreadsheet later to create mailing labels in Microsoft Word.
The same process works for customer information, employee forms, volunteer signups, surveys, and many other situations.
Step-by-Step Instructions
I like to start from my Google Drive since that’s where the form and sheet will be stored, but this can also be done from forms.google.com.
Step 1: Create a new form
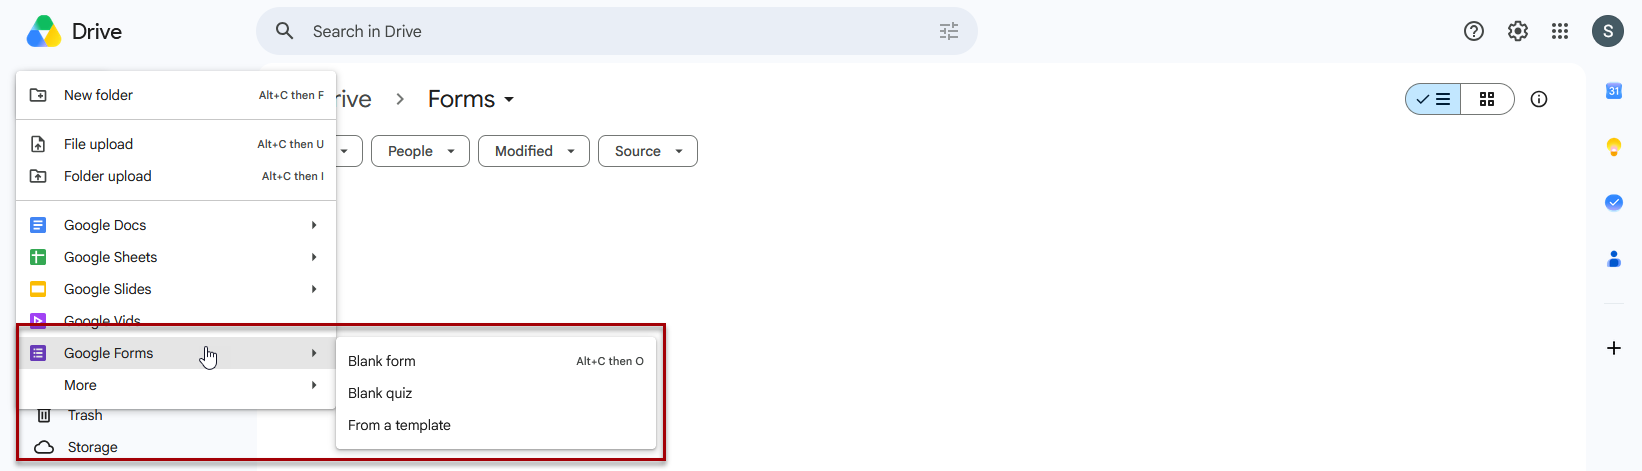
From your Google Drive:
- Click on New
- Hover over Google Forms and select:
- Blank form – to create a form from scratch
- Blank quiz – to create a quiz
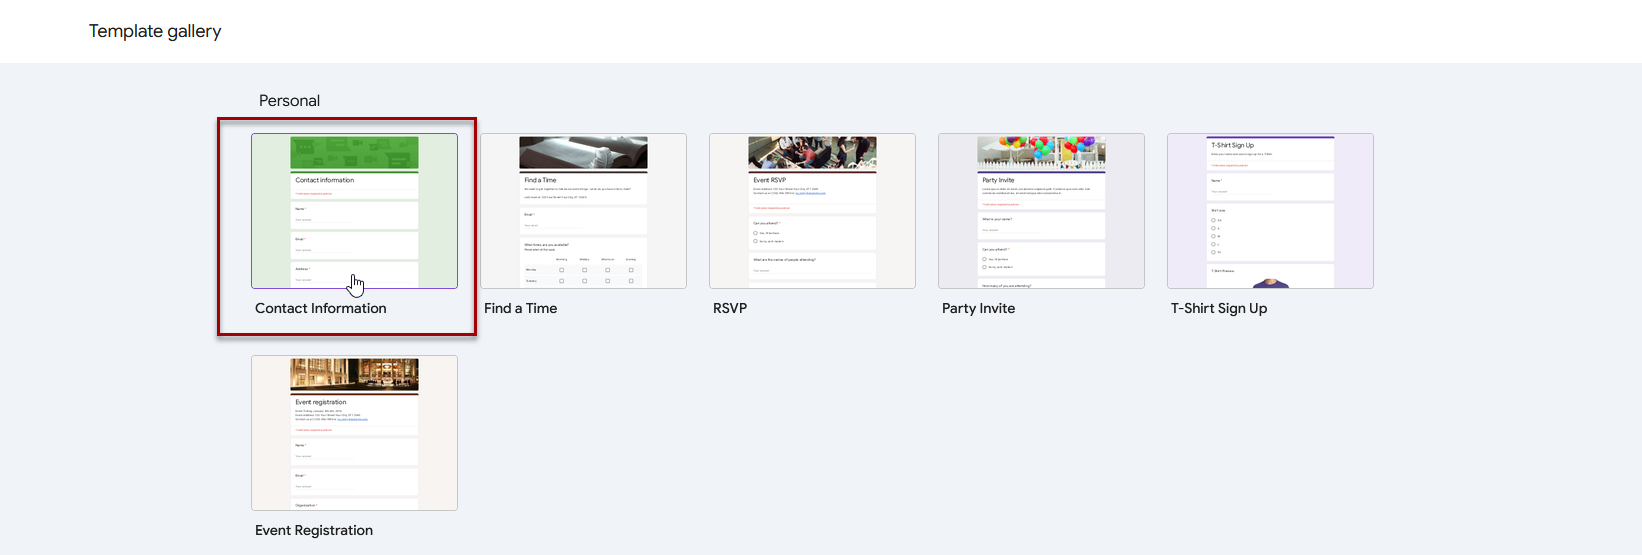
- From a template – to use a pre-built template
For this example, I opted to use a template and selected the contact information form, but any of the above options will work similarly.

Step 2: Add/edit your questions
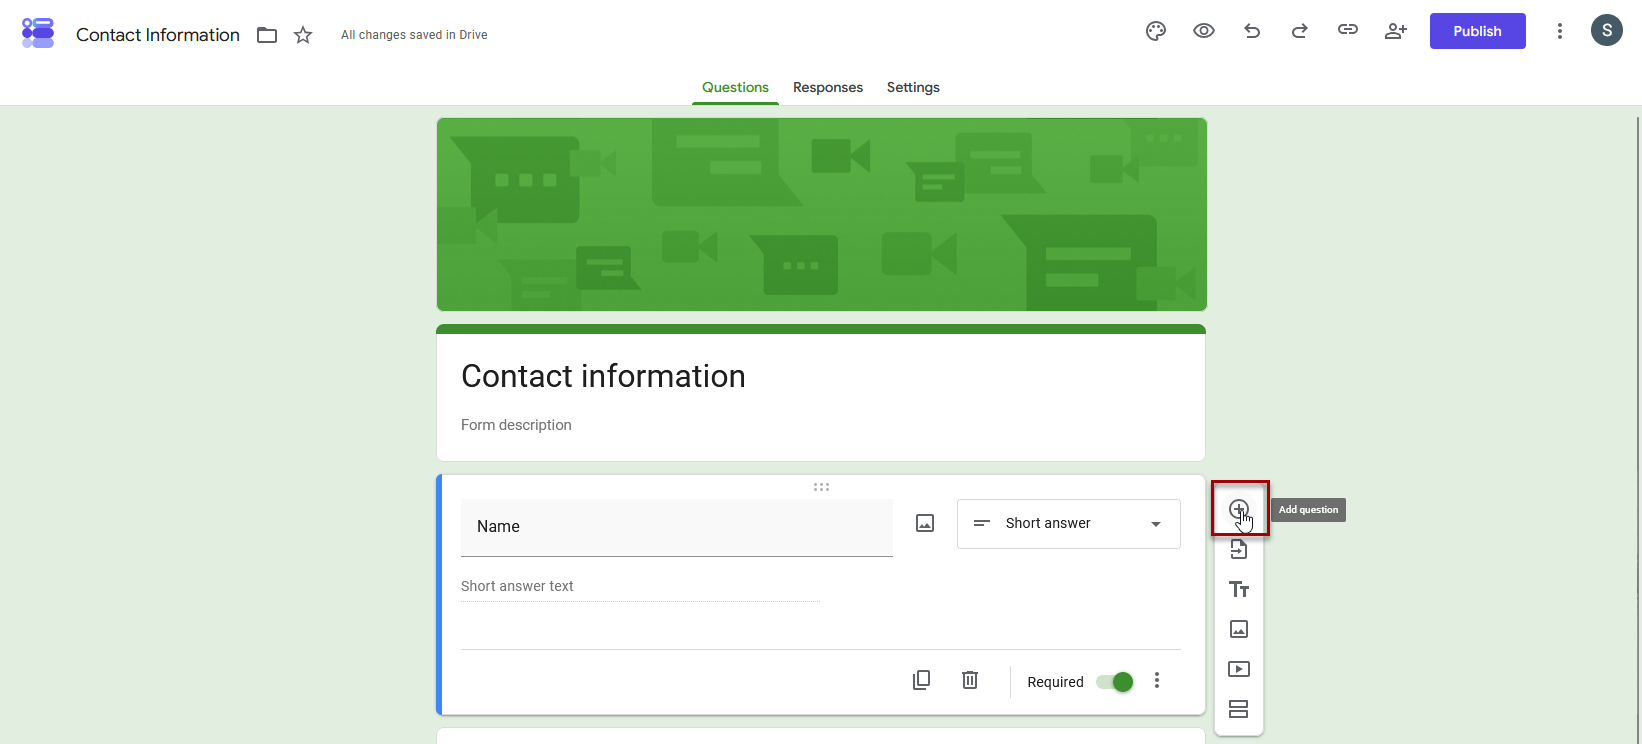
Click on a question to edit it.
To add a new question:
- Click on a section and a menu will appear on the right side
- Click on the + sign and a new question will be added below that section
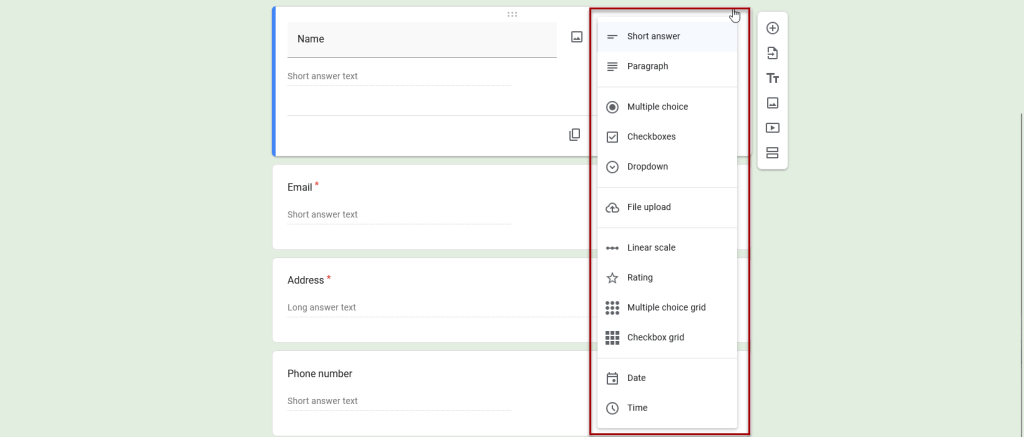
To change the question type:
- Use the drop-down menu on the right to choose the question type (e.g., Short answer, Multiple choice, Dropdown, or Checkbox).
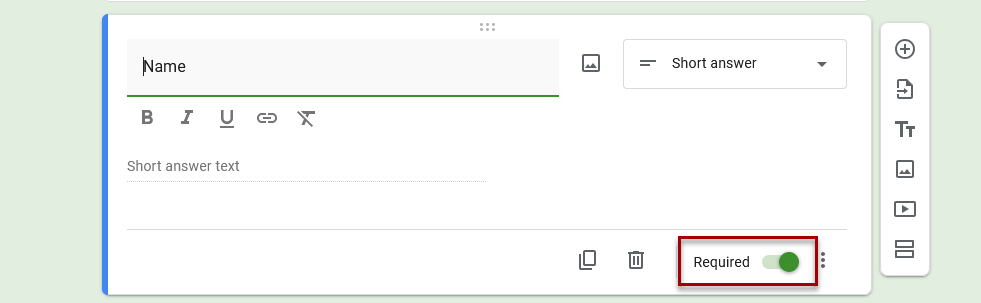
To make a question required/not required:
- Toggle the Required switch at the bottom right of any question you don’t want respondents skipping.
Step 3: Customize your form
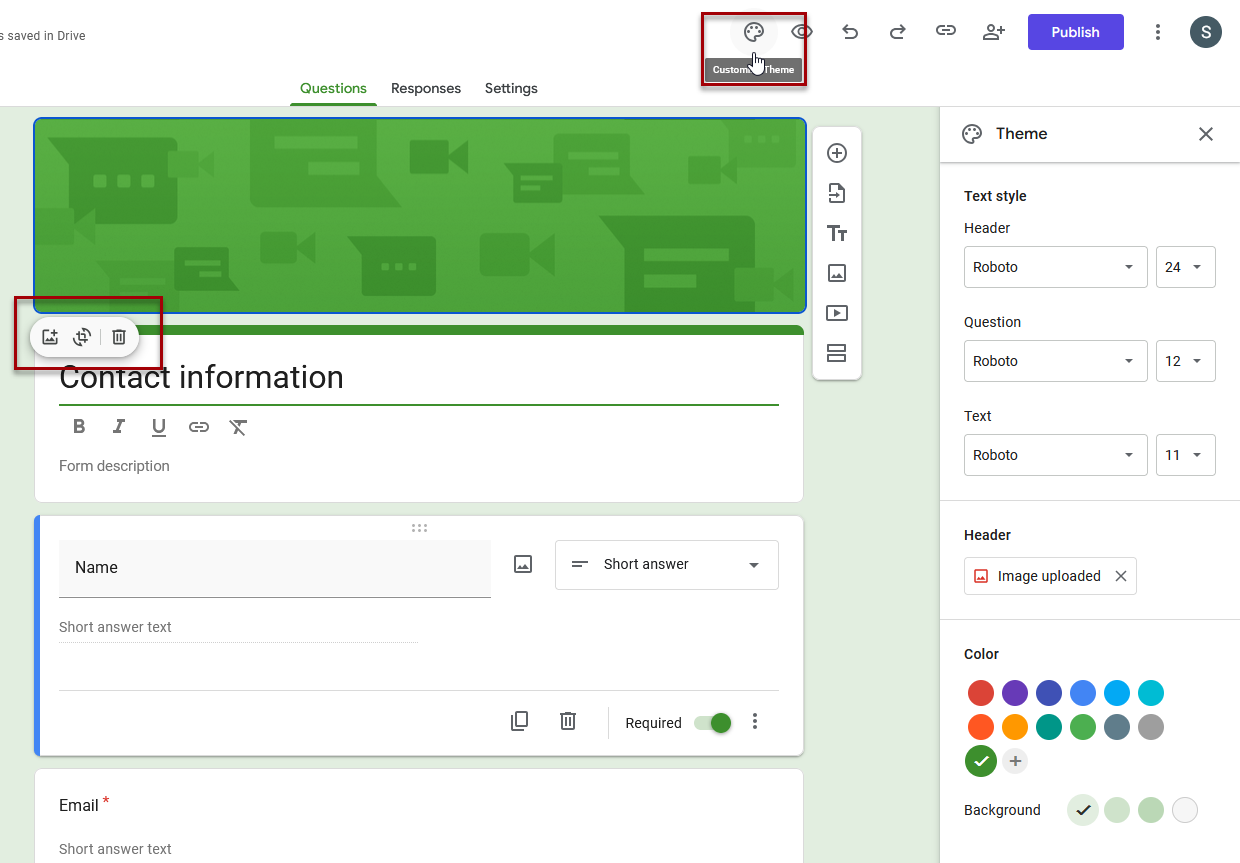
You have the option to change the appearance of your form, such as colors, header image, or font.
- Click on the form title to change the name.
- Click on the customize theme icon next to the eye icon to change the text style, header, color, or background.
- Click on the header image to change, reposition, or delete the image.
- Use the arrow icons to undo or redo changes.
- Click the eye icon in the top right corner to preview your form.
Step 4: Link your form to Google Sheets
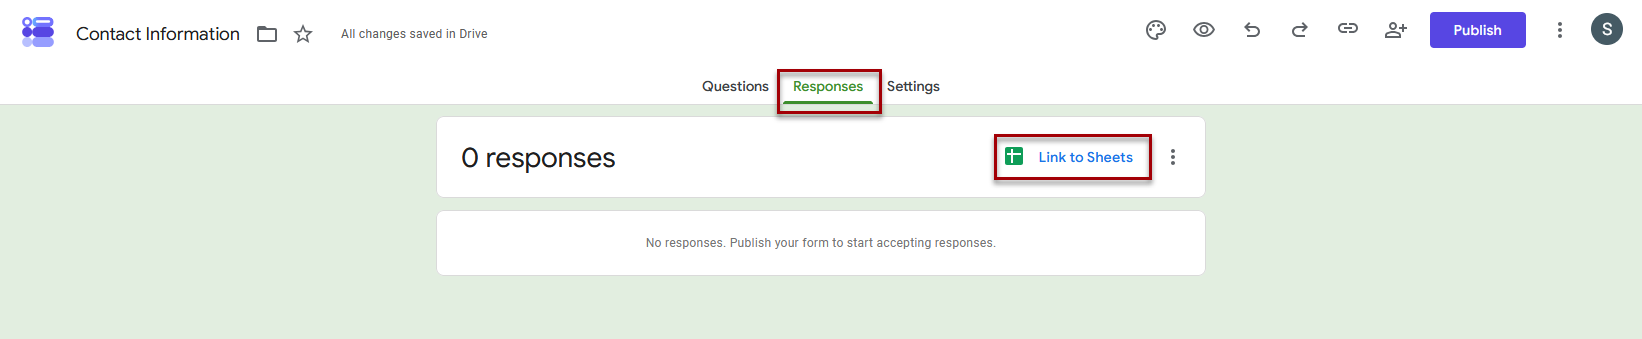
- Click the Responses tab at the top center of the page.
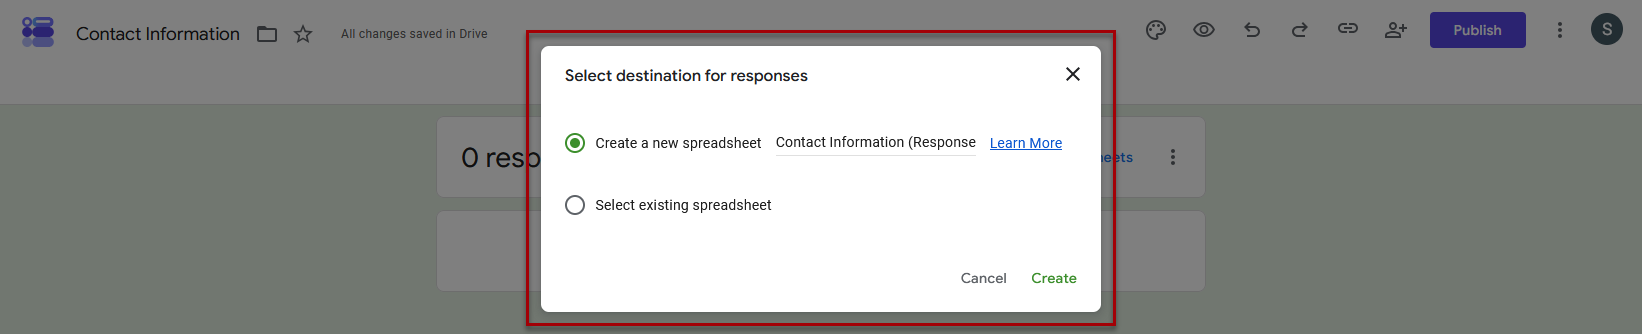
- Click the green Link to Sheets button (or click the three dots icon ⋮ and select Select response destination).
- Choose Create a new spreadsheet (or select an existing one) and click Create.
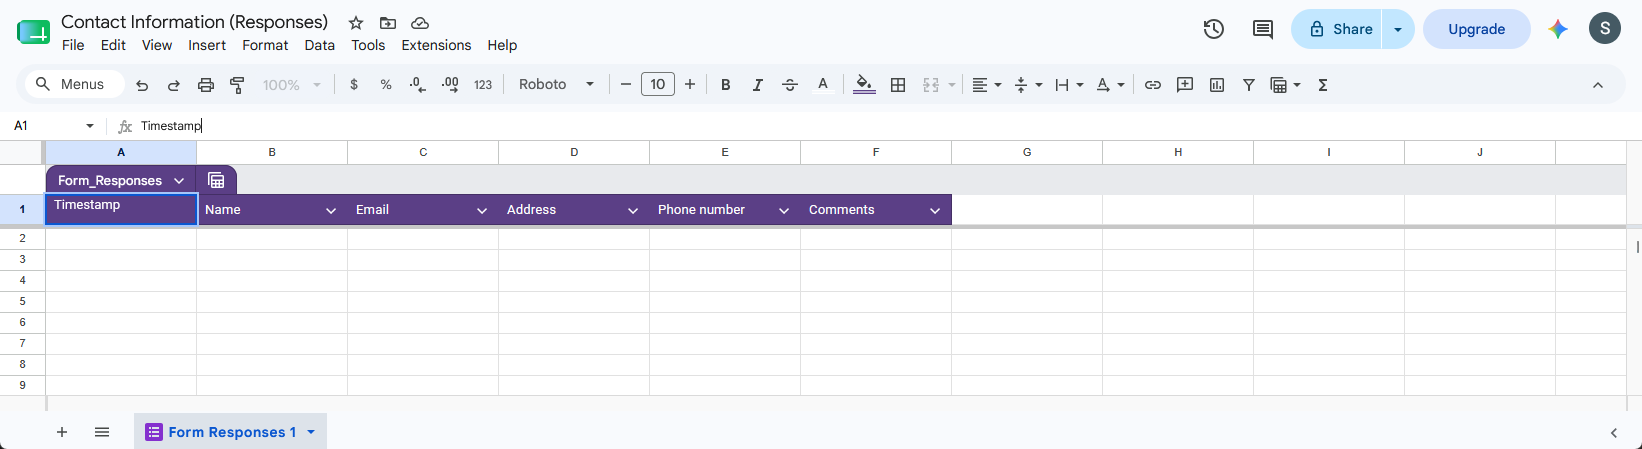
- A new spreadsheet will open in a new tab, already formatted with column headers matching your questions.
Step 5: Turn on email notifications
To receive an email alert every time someone submits your form:
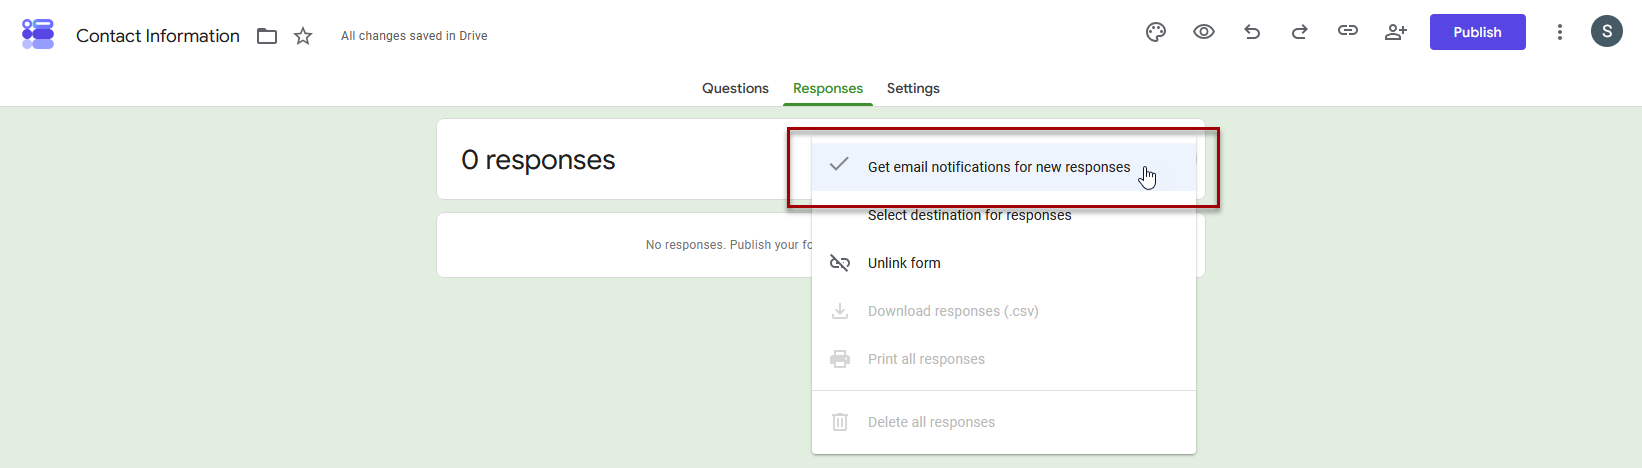
- Click on the responses tab
- Click on the 3 dots on the right, next to view in sheets
- Click on get email notifications for new responses

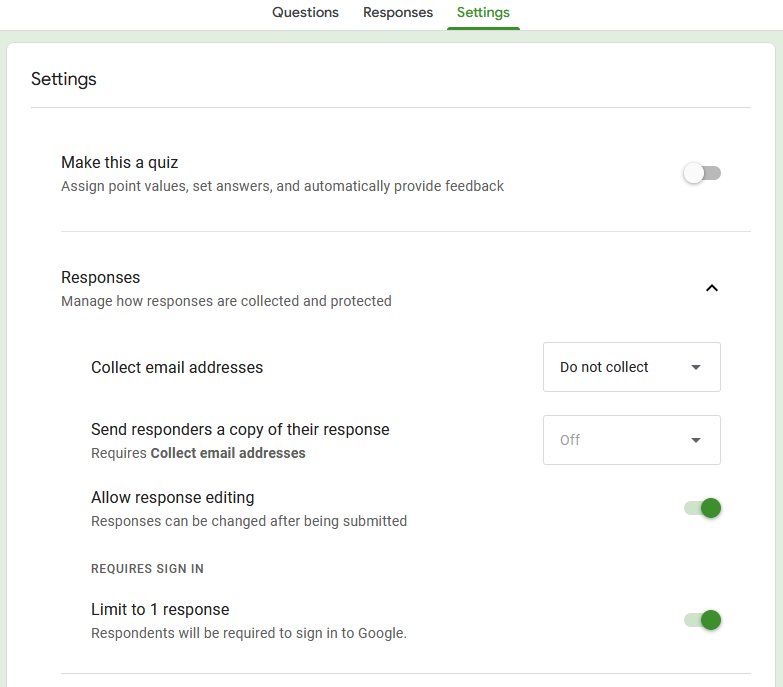
Step 6: Review Settings
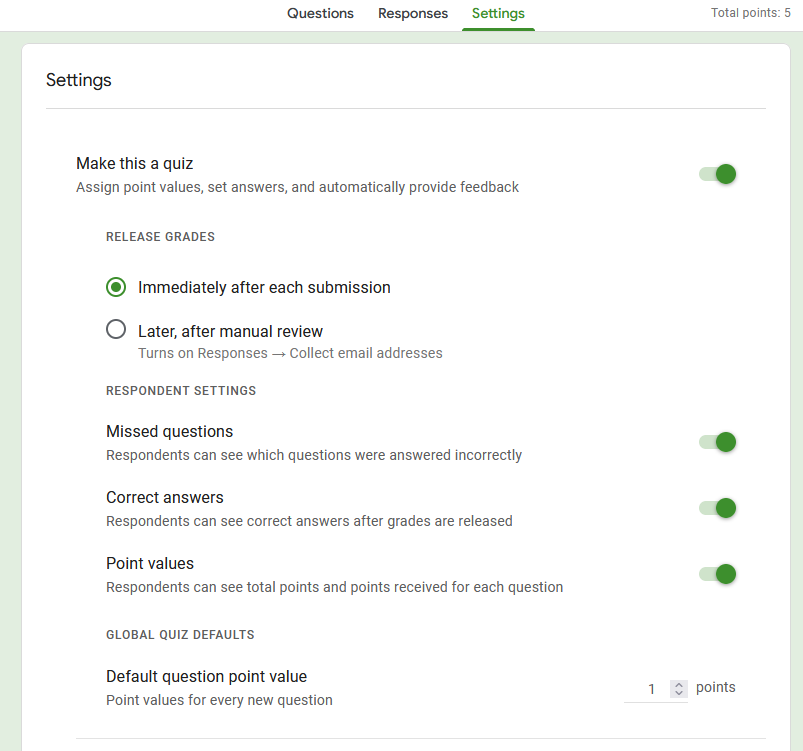
Click on the settings tab to review whether you want to update any of the options.
Make this a quiz: Assign point values, set answers, and automatically provide feedback
- Choose when and how to release quiz grades
- Manage settings for missed questions, correct answers, and point values
- Set a default question point value
Responses: Manage how responses are collected and protected
- Opt to collect email addresses
- Send respondents a copy of their response
- Allow respondents to edit their answers after submitting
- Limit to 1 response
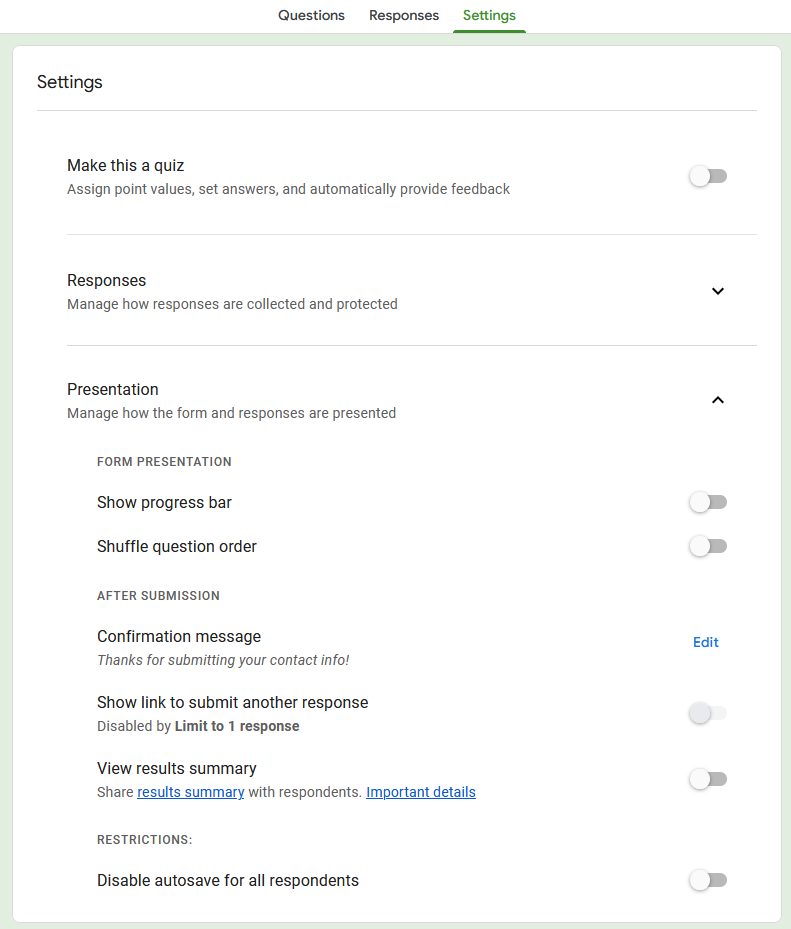
Presentation: Manage how the form and responses are presented
- Show progress bar
- Shuffle question order
- Update the submission confirmation message
- Allow respondents to submit another response
- Share the results summary with respondents
- Disable autosave for respondents
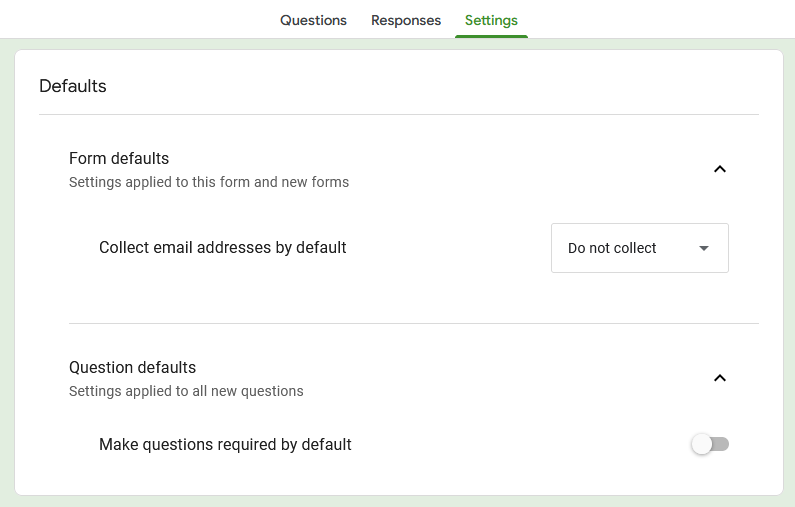
Defaults
- Collect email addresses by default
- Make questions required by default
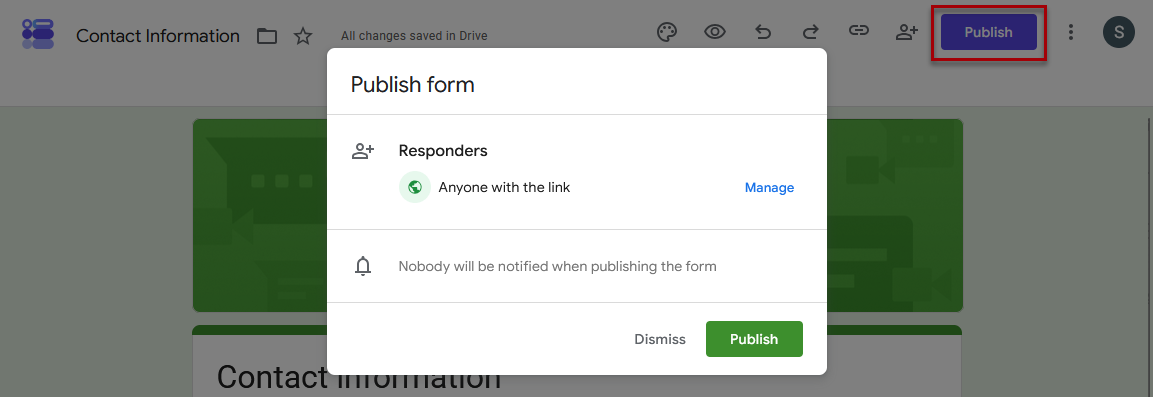
Step 7: Publish, test, and share your form
Once your form is ready, it can be published, tested, and shared.
Publishing your form
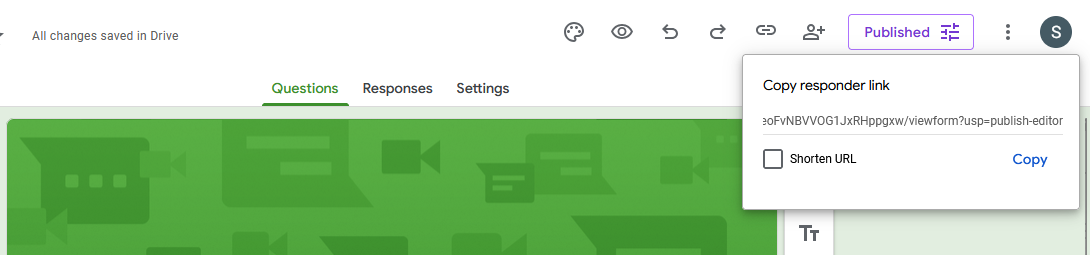
- Click the publish button to manage who can respond using your form and view notification settings.
- Once published, a link will be displayed
- Opt to shorten the URL if desired
- To access the link in the future, click on the link icon, the share icon, or the published button
Testing your form
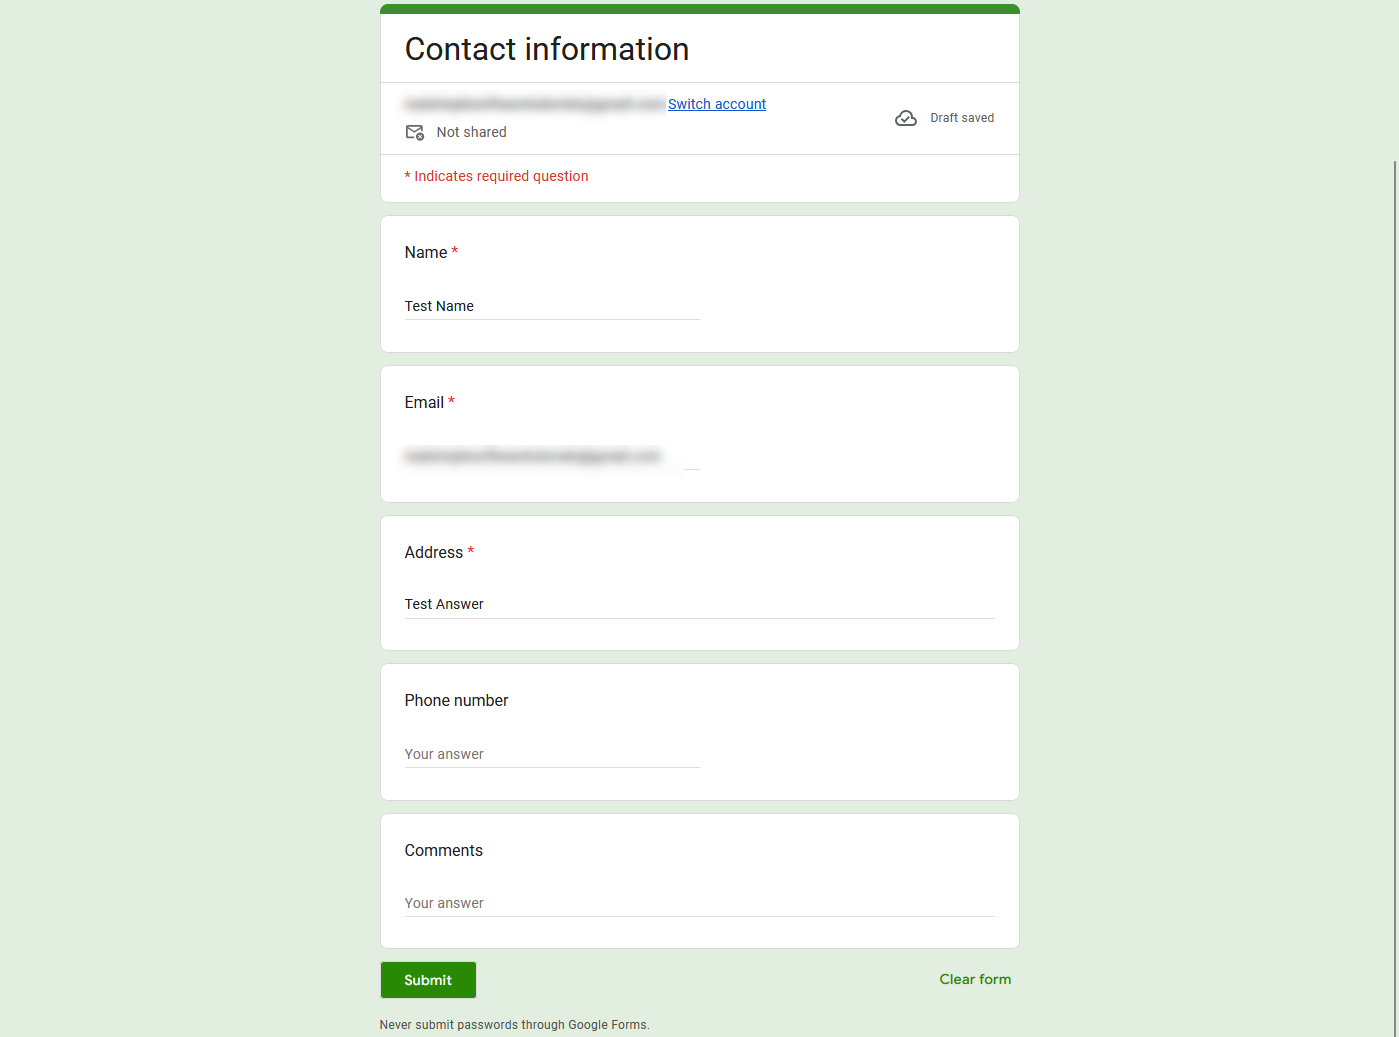
- Copy and paste your form link into a new browser tab or window
- Enter test data into your form and submit.
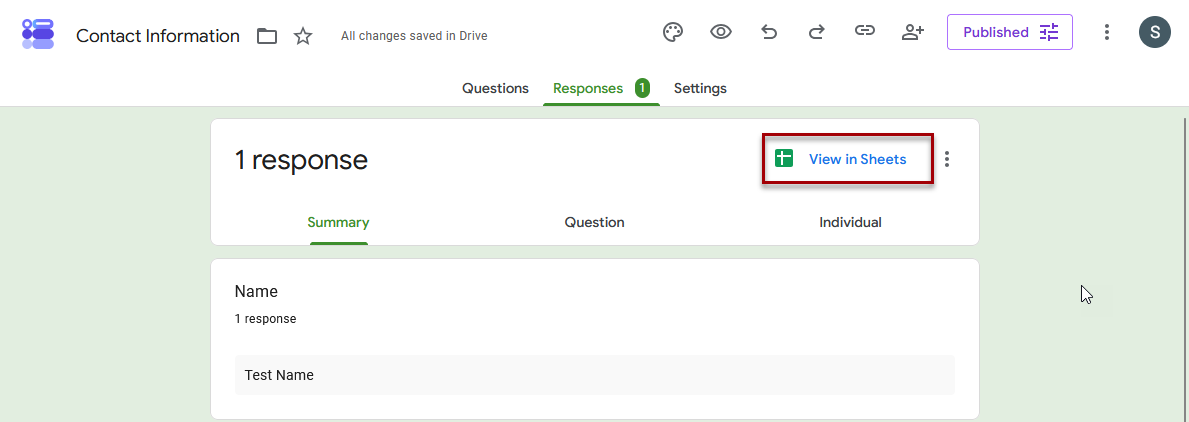
- Return to your form to confirm the test data was received as expected:
- There should be a number next to responses indicating a new response has been received.
- Clicking on responses will display the response information.
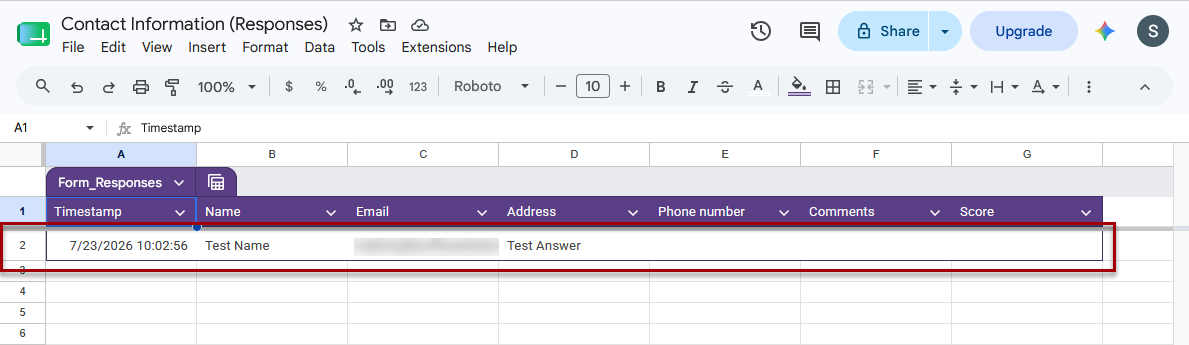
- Click on view in Sheets to verify that your test data appeared instantly alongside an automatic timestamp.

Deleting test data
- Delete from both the responses tab and Google Sheet:
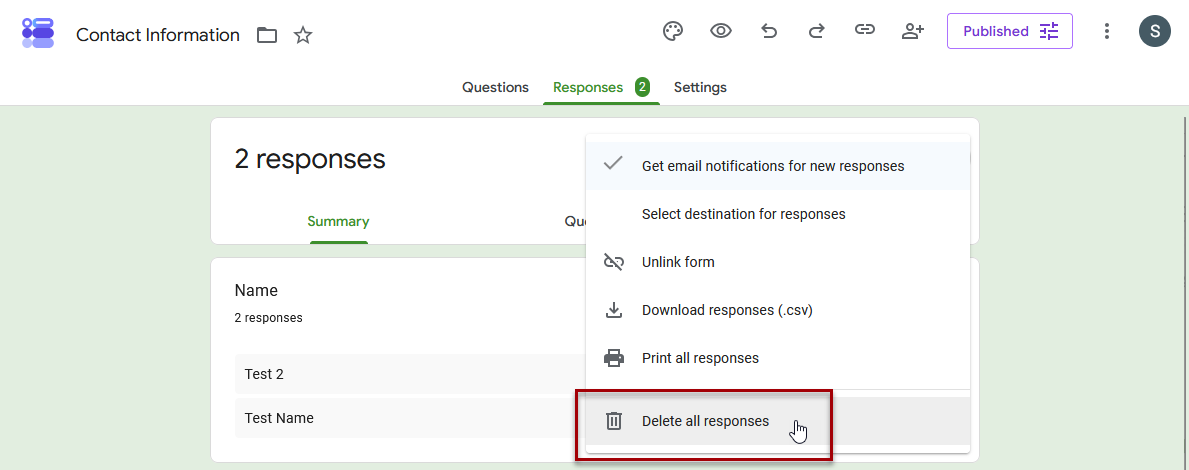
- Click on the responses tab, then click on the 3 dots next to “view in Sheets” and select delete all responses.
- Delete responses only from Google Sheet:
- Simply click on the row and delete it.
- The next form submission will appear in its place on the sheet.
Share your form
- Once the form is ready to share, the link can be copied and shared.
Additional Tips
Preview Before Sharing
Always preview your form before publishing. A quick test can help catch missing required fields or confusing questions before anyone else sees it.
Rename Your Form Early
Google names new spreadsheets after your form. Giving the form a meaningful name before linking it keeps your files organized.
Don’t Rearrange Spreadsheet Columns
Avoid moving or deleting columns in the response sheet after your form is live. Google expects those columns to match your form questions.
Use Descriptions
Each question can include a description. If a question might confuse respondents, adding a brief explanation can improve response quality.
Keep the raw data tab untouched
When you link a sheet, Google creates a tab named Form Responses 1. Avoid adding custom formulas, color formatting, or manual notes directly inside this tab, as new submissions might push rows down or mess up formulas. If you want to analyze or pivot the data, create a second tab in the spreadsheet and reference the first tab using formulas like =QUERY(‘Form Responses 1’!A:Z, “SELECT *”).
Turn on email notifications
If you want an email alert every time someone fills out your form, go to the Responses tab in Google Forms, click the three dots icon (⋮), and check Get email notifications for new responses.
Use Response Validation
For fields like email addresses, phone numbers, or numbers within a specific range, click the three dots at the bottom right of the question box and select Response validation. This forces respondents to enter valid data before submitting.
Collect email addresses automatically
In the form’s Settings tab under Responses, you can turn on Collect email addresses. This automatically records the respondent’s email without needing a separate question block.
Use this list to create mailing labels
If you want to use your collected form data to create mailing labels:
- Click on file > download > Microsoft Excel to download the data in an Excel file
- Follow the tutorial below:
How to Create Mailing Labels in Word From an Excel List
Learn how to create mailing labels in Microsoft Word using an Excel spreadsheet with Mail Merge. This step-by-step tutorial shows you how to connect your data, insert merge fields, preview your labels, and print professional mailing labels. Includes downloadable sample files and a printable quick reference guide.
Related
How to Set Default Margins in Microsoft Word
Learn how to set default margins in Microsoft Word so new documents automatically use your preferred margin sizes. This quick tutorial shows how to create custom margins, save them as the default for future documents, and restore Word’s standard one-inch margins if you change your mind later.
Microsoft Word Basics: Features, Tools, and Functions Explained
Get familiar with Microsoft Word and learn what its most common tools and features do. This guide explains Word’s main tabs, formatting options, styles, tables, images, page layout tools, headers and footers, saving files, and more, with a guided video walkthrough and detailed training manual for additional help.

How to Insert a Horizontal Line Across the Page in Word (3 Easy Methods)
Learn three easy ways to insert a horizontal line across the page in Microsoft Word. This tutorial covers the AutoFormat shortcut, the Borders button, and drawing lines with Shapes, plus how to customize line styles, colors, and thickness for professional-looking documents.
Stay Updated
There are two easy ways to get notified when new tutorials are published:
Subscribe on YouTube for new video tutorials: @SimpleSoftwareTutorials
or enter your email below to receive new blog posts directly in your inbox:

