
Taking a screenshot on a Mac is easy once you know the keyboard shortcuts, but there are several different ways to capture your screen depending on what you need.
You can take a picture of your entire screen, select only part of the screen, capture a specific window, copy a screenshot directly to your Clipboard, or use the built-in Screenshot app for additional options.
In this guide, we’ll look at the main Mac screenshot shortcuts, what each one does, where screenshots are saved, and how to change the save location if you want them to go somewhere else.
How to Read Mac Screenshot Shortcuts
Mac screenshot shortcuts usually require you to press several keys at the same time.
For example:
Shift + Command + 3
means:
- Press and hold Shift.
- Press and hold Command (⌘).
- Press the 3 key.
- Release the keys.
You do not type the + signs.
Take a Screenshot of the Entire Screen
To capture everything currently visible on your screen, press: Shift + Command + 3
Your Mac takes a screenshot of the entire screen.
By default, the screenshot is saved as a file on your Desktop. Apple says screenshot filenames include the date and time, which can help you identify the most recent capture.
Copy the Entire Screen to the Clipboard Instead
Sometimes you don’t want to create a separate image file. You may simply want to paste the screenshot directly into a Word document, email, presentation, chat, or another program.
Press: Control + Shift + Command + 3
Adding the Control key tells your Mac to copy the screenshot to the Clipboard instead of saving it as a normal screenshot file.
You can then paste it into another program using: Command + V
Because this version is copied to the Clipboard, you should not expect to find a new screenshot file sitting on your Desktop.
Capture Part of the Screen
If you only want to capture a specific area, press: Shift + Command + 4
Your pointer changes into a crosshair.
Then:
- Click and hold your mouse or trackpad.
- Drag across the area you want to capture.
- Release when the correct area is selected.
The screenshot is taken when you release the mouse or trackpad button.
If you change your mind before capturing it, press Esc to cancel.
Move the Selected Area Before Capturing
If you’ve selected the correct size but want to move the selection to a slightly different location, hold the Space bar while dragging.
This lets you reposition the selected area without changing its size.
Capture a Specific Window
If you want a screenshot of one application window without manually dragging around it:
- Press Shift + Command + 4.
- Release the keys.
- Press the Space bar.
- Move the camera icon over the window you want to capture.
- Click the window.
Your Mac captures that individual window.
By default, the screenshot may include the window’s shadow.
If you want to remove the shadow, hold the Option key while clicking the window.
Open the Mac Screenshot App
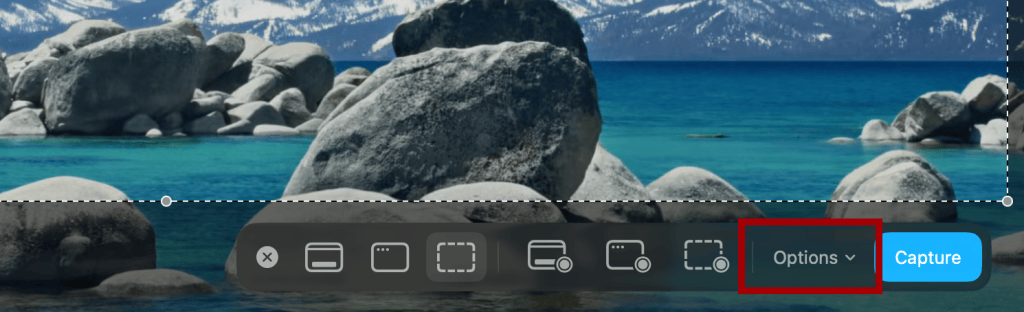
For more options, press: Shift + Command + 5
This opens the built-in Screenshot toolbar. Apple also refers to this as the Screenshot app.
From here, you can choose to:
- capture the entire screen
- capture a specific window
- capture a selected portion of the screen
- record the entire screen
- record part of the screen
This is especially useful if you don’t want to memorize all of the individual keyboard shortcuts.
Screenshot App Options
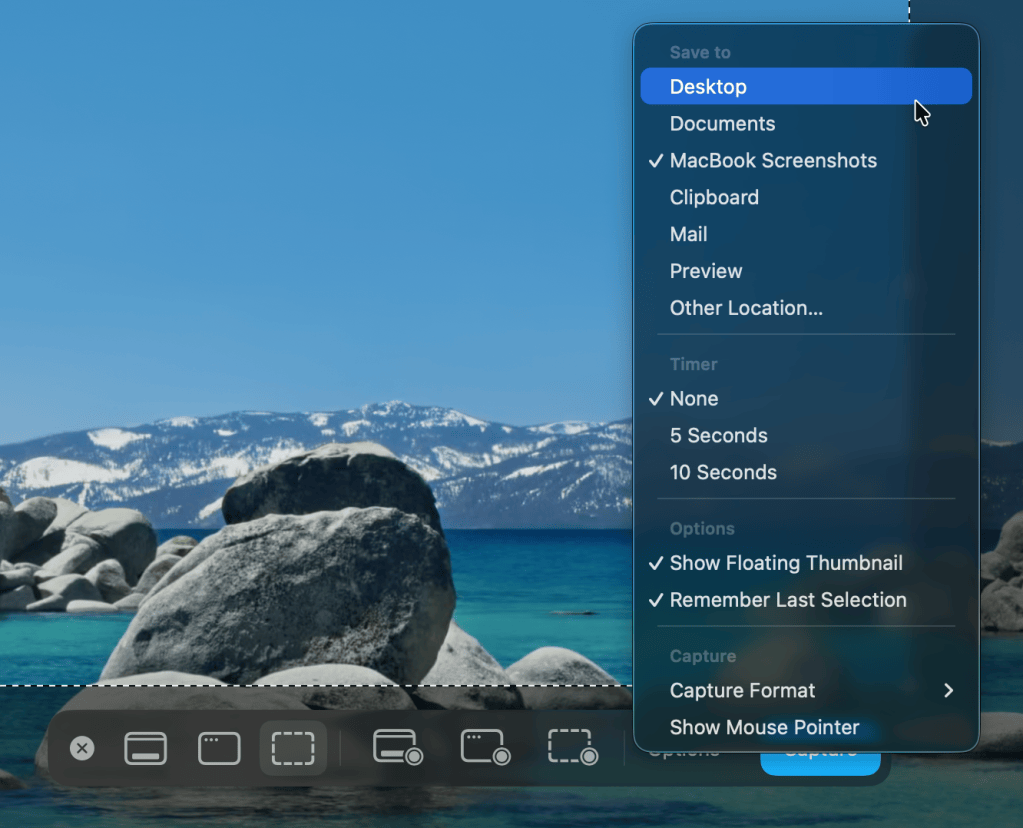
After pressing Shift + Command + 5, select Options.
Depending on what you’re capturing, you can adjust settings such as:
- where screenshots are saved
- whether a timer is used
- whether the floating screenshot thumbnail appears
- whether the mouse pointer is included
- whether your previous selection is remembered
The Screenshot app is also one of the easiest ways to check where your screenshots are currently being saved.
Where Do Screenshots Go on a Mac?
By default, Mac screenshots are saved to your Desktop.
The filename typically begins with Screenshot and includes the date and time the screenshot was taken.
If you can’t find a screenshot, start by checking your Desktop.
However, there are several reasons a screenshot might not appear there.
You Copied It to the Clipboard
If you added the Control key to the screenshot shortcut, the screenshot was copied to your Clipboard instead of being saved as a normal file.
For example Control + Shift + Command + 3 copies the entire screen.
In this situation, open the program where you want to use the screenshot and press Command + V to paste it.
Your Screenshot Save Location May Have Been Changed
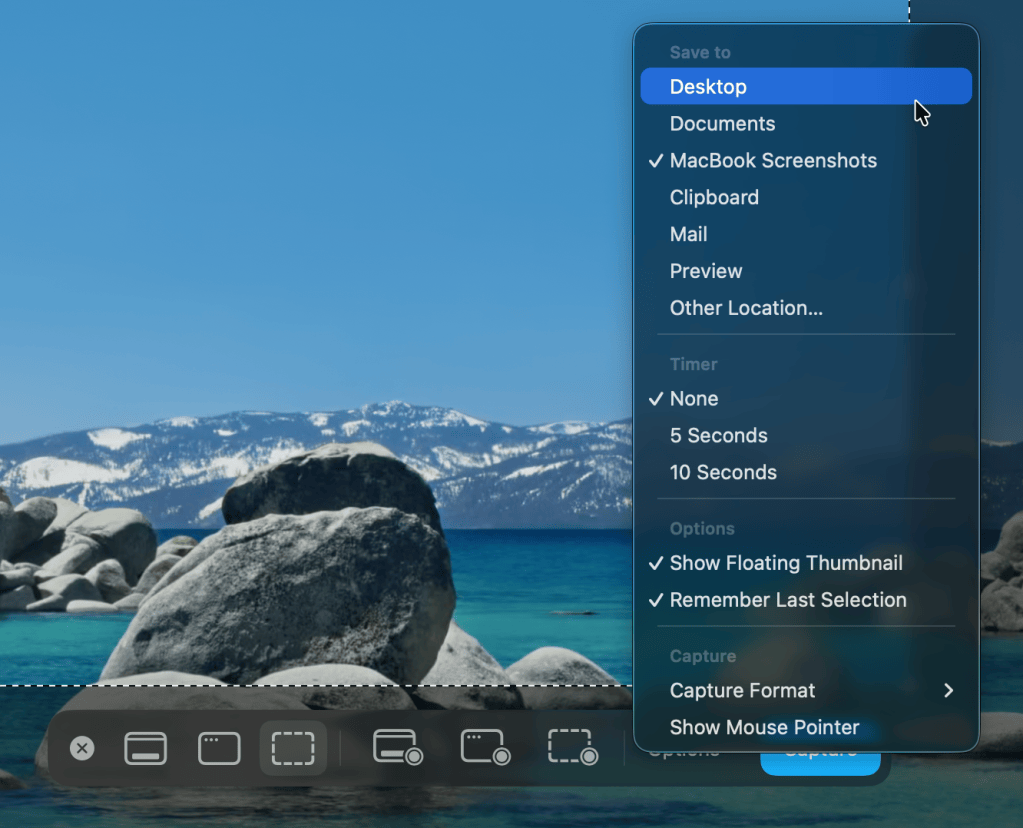
Your Mac lets you choose where screenshots are saved:
- Press: Shift + Command + 5
- Then select: Options
- Look under Save to
You may see options such as:
- Desktop
- Documents
- Clipboard
- Messages
- Preview
- another location you’ve selected
If your screenshots have suddenly stopped appearing on the Desktop, this is one of the first settings to check.
You Moved the Floating Thumbnail
After taking a screenshot, you may see a small floating thumbnail appear temporarily in the lower-right corner of the screen.
You can click the thumbnail to edit or mark up the screenshot.
You can also drag that thumbnail into another location or application before it finishes saving.
If you did that, the screenshot may have ended up somewhere other than your normal Desktop location.
What Happens When You Click the Screenshot Thumbnail?
After taking a screenshot, a small preview may appear in the lower-right corner of the screen.
Clicking it opens the screenshot, providing access to editing and markup tools.
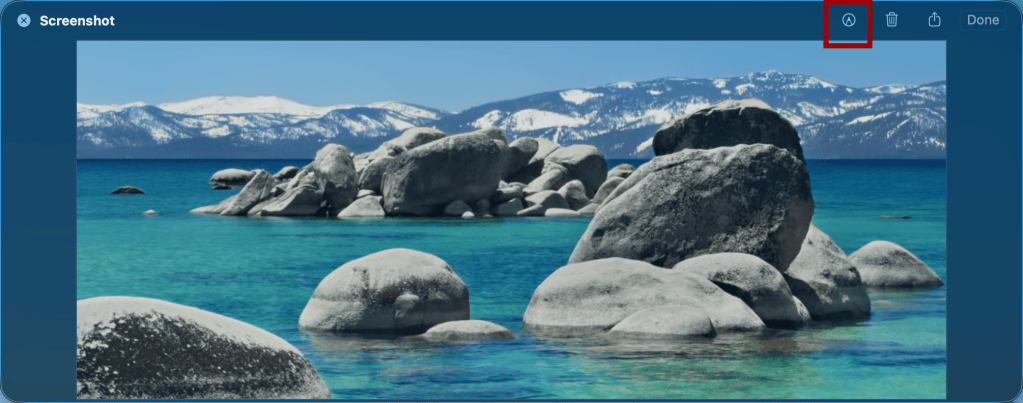
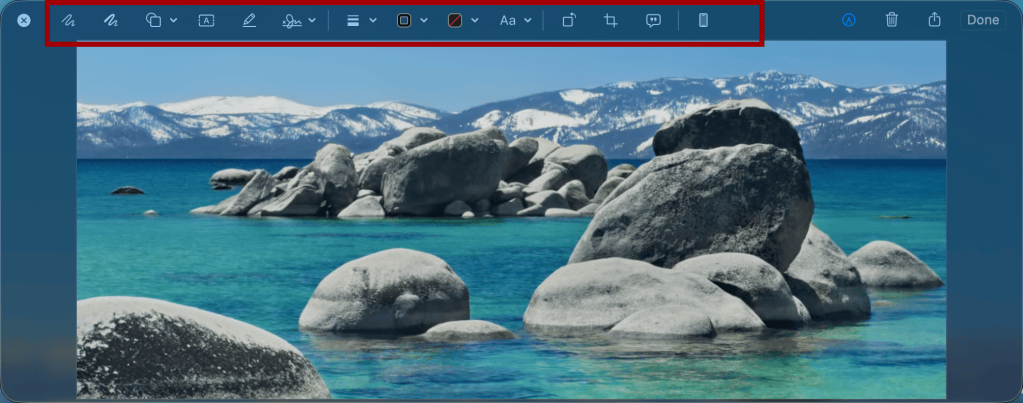
You can use these tools to do things such as:
- crop the screenshot
- draw on it
- add shapes
- add text
- highlight or annotate information
- share the screenshot
When you’re finished, make sure you pay attention to what you do next.
Depending on the options you choose, you may save, share, copy, or move the screenshot somewhere else.
If you’re unsure where an edited screenshot went, check the screenshot’s normal save location first, then check any location you selected while editing.
How to Change Where Screenshots Are Saved
If you take screenshots frequently, you may not want them cluttering your Desktop.
To change the default location:
- Press Shift + Command + 5.
- Click Options.
- Look under Save to.
- Choose one of the available locations.
You can also select Other Location to choose another folder.
For example, you could create a folder called Screenshots and save all future screenshots there.
This can make them much easier to organize and find later.
Screenshot File Types
Mac screenshots are normally saved as PNG image files. Screen recordings are normally saved as MOV video files.
On supported Macs running newer versions of macOS, the Screenshot app may also offer additional capture-format options.
For most everyday screenshot use, you don’t need to change these settings.
Mac Screenshot Shortcuts Quick Reference
| What You Want to Do | Shortcut |
|---|---|
| Capture the entire screen | Shift + Command + 3 |
| Copy the entire screen to Clipboard | Control + Shift + Command + 3 |
| Capture part of the screen | Shift + Command + 4 |
| Capture a specific window | Shift + Command + 4, then Space |
| Open Screenshot tools | Shift + Command + 5 |
A Helpful Shortcut Pattern
There is actually a useful pattern to these shortcuts:
3 = entire screen
4 = select something specific
5 = open the Screenshot tools
And if you add Control, you can copy the screenshot to your Clipboard instead of saving it as a normal screenshot file.
That may be easier to remember than treating every combination as a completely separate shortcut.
Try It: Practice Taking Screenshots
Try each of these:
- Take a screenshot of your entire screen.
- Find the screenshot on your Desktop.
- Take a screenshot of only part of the screen.
- Capture one application window.
- Open the Screenshot toolbar with Shift + Command + 5.
- Check which save location is currently selected.
- Copy a screenshot to the Clipboard and paste it into a document.
You don’t need to memorize every shortcut right away.
If you remember Shift + Command + 5, you can always open the Screenshot tools and choose what you want to capture from there.
Tip: Take a screenshot of the Mac Screenshot Shortcuts Quick Reference guide above and save it to your desktop so it’s handy whenever you need it!
If You Can’t Find Your Screenshot
If you took a screenshot and it seems to have disappeared, check these things:
- Look on your Desktop.
- Press Shift + Command + 5 → Options and check the current Save to location.
- Think about whether you added Control to the shortcut, which would have copied it to the Clipboard instead.
- Check whether you dragged the floating thumbnail somewhere else.
- Search your Mac for files beginning with Screenshot.
Once you know how your Mac handles screenshot files, the shortcuts become much easier to use—and you’re much less likely to wonder where your screenshot disappeared to.
Related

How to Check Your macOS Version and MacBook Model
Learn how to check your macOS version, MacBook model, chip or processor, memory, and storage. This simple guide shows where to find important Mac information you may need for software compatibility, troubleshooting, updates, or technical support, with clear steps you can follow on your own Mac.

10 Keyboard Shortcuts Everyone Should Know
Learn 10 useful keyboard shortcuts for Windows and Mac that can make everyday computer tasks faster and easier. This guide explains shortcuts for undo, copy, paste, save, find, print, switching between apps, and more, with simple instructions for reading and using keyboard shortcuts correctly.

What Is an Operating System? Windows, macOS, and More Explained
Learn what an operating system is, how Windows, macOS, ChromeOS, and other systems differ, and how to tell which one your computer uses. This beginner-friendly guide explains operating systems in plain language so you can better understand your computer and follow software tutorials with confidence.
Stay Updated
There are two easy ways to get notified when new tutorials are published:
Subscribe on YouTube for new video tutorials: @SimpleSoftwareTutorials
or enter your email below to receive new blog posts directly in your inbox:

