
Taking a screenshot is a quick way to capture what’s currently displayed on your computer screen.
You might take a screenshot to:
- save information for later
- show someone an error message
- include an image in a document or presentation
- capture part of a webpage
- share what you’re seeing with technical support
- create instructions or training materials
Windows includes several built-in ways to take screenshots, so you don’t need to install any additional software for basic screen captures.
This guide covers the built-in screenshot tools available in Windows.
Using a Mac instead? See How to Take a Screenshot on a Mac for macOS shortcuts and screenshot tools.
The Easiest Option: Windows + Shift + S
For most situations, one of the easiest ways to take a screenshot in Windows is Windows key + Shift + S
This opens the Windows Snipping Tool capture controls. Your screen will dim slightly, and you can choose what you want to capture.
You’ll typically see several capture options.
Rectangle
This lets you click and drag to draw a rectangle around the part of the screen you want to capture.
This is useful when you only need one portion of the screen, such as:
- part of a webpage
- an error message
- one section of a program
- a chart or image
Window
This lets you select an entire open window.
For example, you could capture:
- a browser window
- a Word document
- File Explorer
- a dialog box
Full Screen
This captures everything currently displayed on your screen.
Freeform
This lets you draw an irregular shape around the area you want to capture. For most everyday screenshots, Rectangle is usually the easiest option.
What Happens After You Take a Screenshot?
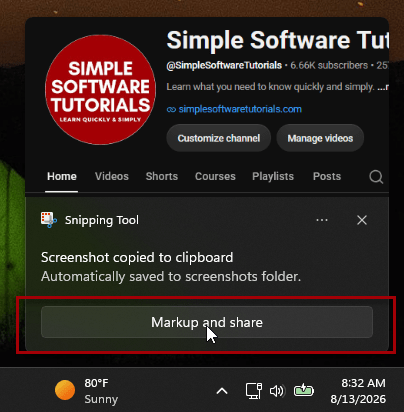
When you use Windows + Shift + S, the screenshot is copied to your computer’s Clipboard. Windows also normally displays a notification after the capture.
The Clipboard is temporary storage that holds something you’ve copied.
That means you can often immediately paste the screenshot into another program using:
Ctrl + V
For example, you could paste it into:
- Word
- PowerPoint
- an email
- Microsoft Teams
- Paint
- another image editor
If you see a notification after taking the screenshot, click it to open the image in Snipping Tool.
From there, you can edit, save, copy, or share the screenshot.
Using the Snipping Tool App
You can also open Snipping Tool directly instead of using a keyboard shortcut.
To open it:
- Select Start.
- Search for Snipping Tool.
- Open the app.
From there, select the type of screenshot you want and choose New. Microsoft currently supports rectangular, window, full-screen, and freeform captures in Snipping Tool.
This method may be easier if you prefer clicking buttons instead of remembering keyboard shortcuts.
Edit a Screenshot in Snipping Tool
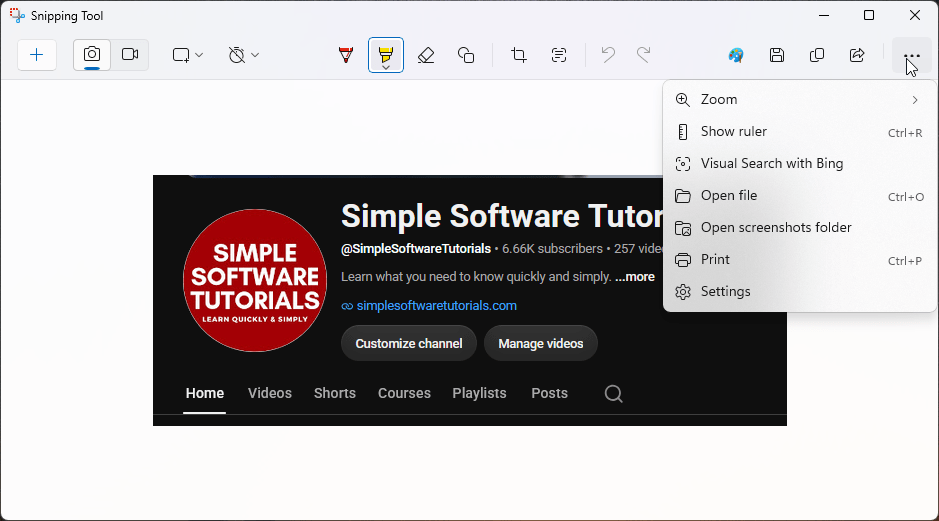
After taking a screenshot, Snipping Tool includes basic editing tools.
Depending on your Windows version, you may be able to:
- crop the screenshot
- draw or write on it
- highlight information
- erase annotations
- add shapes
- copy text from the screenshot
- open the image in Paint for additional editing
You can then save or copy the edited screenshot.
Save a Screenshot From Snipping Tool
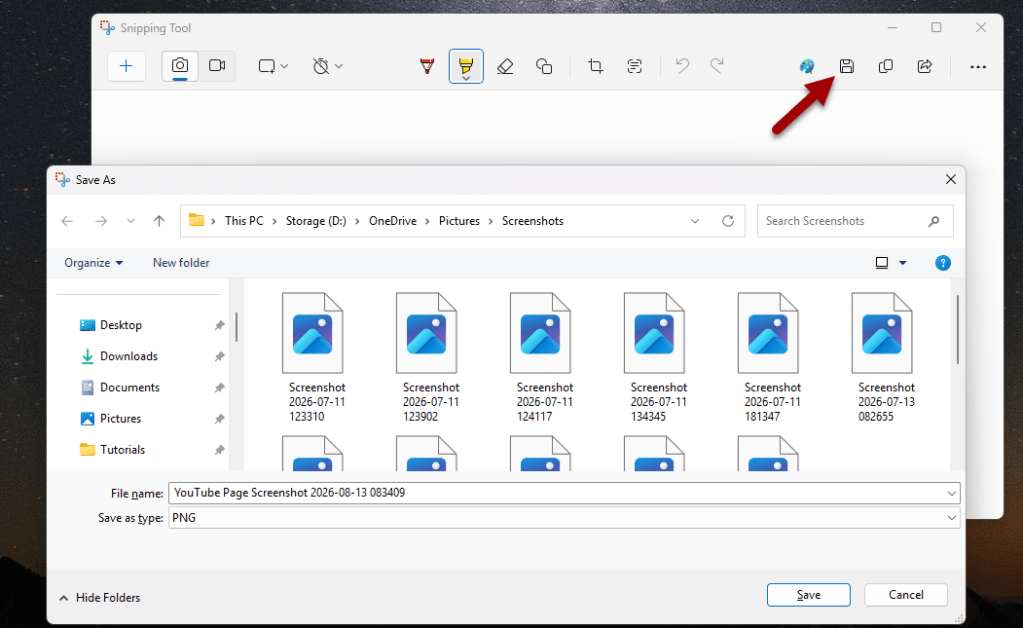
If you want to keep the screenshot as an image file:
- Open the screenshot in Snipping Tool.
- Click on the Save icon.
- Choose where you want to store the file.
- Give it a useful filename.
- Select Save.
Pay attention to the folder you choose so you know where to find the screenshot later.
You might create a dedicated folder such as Pictures → Screenshots or Documents → Project Name → Screenshots if you take screenshots frequently.
Use a Delay to Capture Menus or Other Temporary Items
Sometimes the thing you want to capture disappears as soon as you click somewhere else.
A common example is a drop-down menu.
Snipping Tool includes a Delay option that lets you wait a few seconds before the screenshot begins. Microsoft currently documents delayed captures through the Snipping Tool app.
For example:
- Open Snipping Tool.
- Click on the Clock icon to open delay options.
- Choose a delay, such as 5 seconds.
- Select New.
- Open the menu or screen you want to capture.
- Wait for the screenshot controls to appear.
- Capture the area.
This can be especially useful when creating instructions or documenting software.

Use the Print Screen Key
Many Windows keyboards include a Print Screen key. It’s often found toward the top right of your keyboard, not too far from the backspace button.
It may be labeled:
- Print Screen
- PrtSc
- PrtScn
- PrntScrn
The exact label depends on your keyboard.
Pressing Print Screen can capture the entire screen and copy it to your Clipboard, allowing you to paste it into another program.
After pressing Print Screen, open the program where you want to use the screenshot and press Ctrl + V to paste it.
Why Didn’t Anything Happen?
This is one of the confusing things about Print Screen. You may press the key and see no obvious message or new file.
That doesn’t necessarily mean it failed – the screenshot may simply be sitting on the Clipboard waiting for you to paste it somewhere.
Save the Entire Screen Automatically
If you want Windows to capture the entire screen and save the screenshot as a file automatically, use Windows key + Print Screen.
On supported Windows devices, this saves the screenshot to Pictures → Screenshots.
This is useful when you want to quickly save the entire screen without opening an editor first.
Capture Only the Active Window
If you have several windows open but only want to capture the one you’re currently using, press Alt + Print Screen.
This copies an image of the active window to your Clipboard.
Then paste it into another program using Ctrl + V
For example, if Chrome is currently active, Alt + Print Screen can capture the Chrome window without including your entire desktop.
What If My Keyboard Doesn’t Have a Print Screen Key?
Some compact laptops and keyboards don’t have a dedicated Print Screen key.
Microsoft notes that on some devices you can use Fn + Windows key + Space bar to capture a screenshot.
The exact behavior can vary depending on your keyboard and computer manufacturer.
If you’re unsure, Windows + Shift + S is usually the easiest option because it doesn’t rely on a Print Screen key.
Where Do Windows Screenshots Go?
The answer depends on how you take the screenshot.
Windows + Shift + S
The screenshot is copied to the Clipboard first. Click the notification to open it in Snipping Tool, then save it wherever you choose.
Print Screen
The screenshot is copied to the Clipboard.
Paste it somewhere using Ctrl + V
Alt + Print Screen
The active window is copied to the Clipboard.
Again, paste it into another program with Ctrl + V.
Windows + Print Screen
The screenshot is saved automatically in Pictures → Screenshots
This distinction is important because sometimes people take a screenshot and then search their computer for a file that was never saved as a file in the first place.
Clipboard vs. Saved File
This is one of the most useful screenshot concepts to understand.
A screenshot can either be Copied to the Clipboard or Saved as an image file.
If it’s on the Clipboard, it’s temporary and intended to be pasted somewhere.
If it’s saved as a file, you can find it later in File Explorer and use it like any other image.
For example:
Windows + Shift + S → Clipboard
Print Screen → Clipboard
Windows + Print Screen → Saved file
Understanding that difference makes Windows screenshot behavior much less confusing.
Windows Screenshot Shortcuts Quick Reference
| What You Want to Do | Shortcut |
|---|---|
| Capture part of the screen | Windows + Shift + S |
| Capture the entire screen to Clipboard | Print Screen |
| Capture and automatically save the entire screen | Windows + Print Screen |
| Capture only the active window | Alt + Print Screen |
| Paste a screenshot from Clipboard | Ctrl + V |
Which Screenshot Method Should I Use?
For most people, I’d recommend starting with Windows + Shift + S.
It gives you the most flexibility and lets you capture exactly what you need.
Use Windows + Print Screen when you simply want to save the entire screen quickly.
Use Alt + Print Screen when you only need the current window.
And use Print Screen when you want the entire screen copied directly to the Clipboard.
You don’t need to memorize all of these at once.
Try It: Practice Taking Screenshots
Try each of these activities:
- Press Windows + Shift + S and capture one small area of your screen.
- Paste the screenshot into Word or another program using Ctrl + V.
- Take another screenshot and click the notification to open Snipping Tool.
- Add a highlight or annotation.
- Save the screenshot and pay attention to where you save it.
- Open File Explorer and find the screenshot.
- Use Windows + Print Screen to save the entire screen automatically.
- Find that screenshot in Pictures → Screenshots.
Practicing the different methods can help you understand the difference between copying a screenshot to the Clipboard and saving one as an image file.
Tip: Take a screenshot of the Windows Screenshot Shortcuts Quick Reference guide above and save it to your desktop so it’s handy whenever you need it!
You Only Need One Method to Get Started
Windows gives you several ways to take screenshots, but you don’t need to learn all of them immediately.
If you remember just one shortcut, make it: Windows + Shift + S
It lets you quickly capture all or part of your screen and gives you easy access to the built-in Snipping Tool for editing and saving.
Once that feels comfortable, you can add the other shortcuts when they’re useful.
Once you know how your computer handles screenshot files, the shortcuts become much easier to use – and you’re much less likely to wonder where your screenshot disappeared to.
Related

How to Organize Files and Folders in Windows
Learn how to organize files and folders in Windows with a simple system that makes important documents easier to find. This guide covers File Explorer, folder structures, file naming, Downloads, cloud storage, and practical organization tips to help you create a filing system that works for you.

10 Keyboard Shortcuts Everyone Should Know
Learn 10 useful keyboard shortcuts for Windows and Mac that can make everyday computer tasks faster and easier. This guide explains shortcuts for undo, copy, paste, save, find, print, switching between apps, and more, with simple instructions for reading and using keyboard shortcuts correctly.

What Is an Operating System? Windows, macOS, and More Explained
Learn what an operating system is, how Windows, macOS, ChromeOS, and other systems differ, and how to tell which one your computer uses. This beginner-friendly guide explains operating systems in plain language so you can better understand your computer and follow software tutorials with confidence.
Stay Updated
There are two easy ways to get notified when new tutorials are published:
Subscribe on YouTube for new video tutorials: @SimpleSoftwareTutorials
or enter your email below to receive new blog posts directly in your inbox:

