

Well-designed spreadsheets don’t just store information; they make data entry faster, more consistent, and less prone to errors. By using drop-down menus and proper cell formatting, you can create professional forms that are easy for anyone to complete.
In this tutorial, you’ll learn how to build a custom order form in Microsoft Excel using Data Validation, named ranges, and drop-down lists. You’ll also learn how to format common business fields such as dates, ZIP codes, and credit card numbers to ensure information is entered and displayed correctly. The techniques demonstrated can be adapted for purchase orders, inventory forms, registration forms, customer information sheets, and many other business workflows.
Note: This tutorial was originally recorded using Excel 2016, but the concepts and techniques shown remain applicable in current Microsoft 365 versions of Excel.
What You’ll Learn
In this tutorial, you’ll learn how to:
- Design a clean, professional order form in Microsoft Excel.
- Create reusable drop-down lists using named ranges.
- Build drop-down menus with Data Validation.
- Format dates, ZIP codes, and credit card fields correctly.
- Organize supporting lookup data for easier workbook maintenance.
- Create spreadsheets that improve consistency and reduce data entry errors.
Practice & Resources
Want to work through the examples yourself? This tutorial includes a practice workbook you can use while following along with the video and step-by-step instructions.
Click the button below to view the resources available for this tutorial.
Video Tutorial
Common Uses
This type of order form can be adapted for many purposes, including:
- Product order forms
- Inventory requests
- Equipment checkout forms
- Customer intake forms
- Event registrations
- Purchase requests
- Internal business forms
Breaking Down the Features
Named Ranges
Named ranges allow you to give a meaningful name to a group of cells (such as shirt_size or color) so they can be referenced throughout your workbook.
Data Validation
Data Validation restricts what users can enter into a cell. Using the List option allows users to select values from a drop-down menu instead of typing manually.
Cell Formatting
Formatting fields such as ZIP codes, dates, and credit card numbers ensures information displays correctly and helps prevent common data entry issues.
Real-World Example
The concepts demonstrated in this tutorial were inspired by an Excel ordering system I developed for a sporting goods manufacturer. Sales representatives used the workbook to configure shipping container orders by selecting products from drop-down lists while maintaining consistent formatting and reducing manual data entry. Although this tutorial uses a simplified example, the same techniques can be applied to many business forms and workflows.
Step-by-Step Instructions
Step 1: Lay Out the Form Fields
Create the basic fields you want on your order form:
- Date
- Name
- Street Address
- City
- State
- ZIP Code
- Shirt Size
- Color
- Design
- Quantity
- Credit Card Number
- Expiration Date
- CVC
- Name on Card
- Billing ZIP Code
These will serve as the structure of your form.
Step 2: Format the Basic Fields
Format the Date Field
- Select the date cell.
- Go to Home → Number Format → Short Date.
- Enter a sample date to confirm it displays correctly.
Format the ZIP Code Field
ZIP codes that begin with zero often lose the leading zero unless formatted properly.
- Select the ZIP Code cell.
- Right‑click → Format Cells.
- Choose Special → ZIP Code.
- Click OK.
Repeat this for the billing ZIP code later.
Step 3: Create Lists for Dropdown Options
You can create lists on the same sheet or a separate sheet. The transcript uses the same sheet.
Create the following lists:
Shirt Size:
- Extra Small
- Small
- Medium
- Large
- X Large
- 2XL
Color:
- Black
- White
- Blue
- Red (Optionally sort alphabetically using Data → Sort.)
Design:
- Logo 1
- Logo 2
- Logo 3
Quantity:
1 through 10
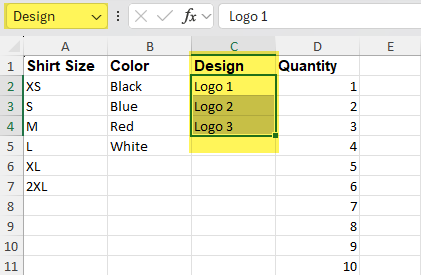
Step 4: Name Each List
Naming lists allows you to reference them easily when creating dropdowns.
- Select the entire list (e.g., all shirt sizes).
- Click in the Name Box (top-left, next to formula bar).
- Type a name with no spaces (e.g.,
shirt_size). - Press Enter.
Repeat for:
colordesignquantity
Step 5: Insert Dropdown Boxes Using Data Validation
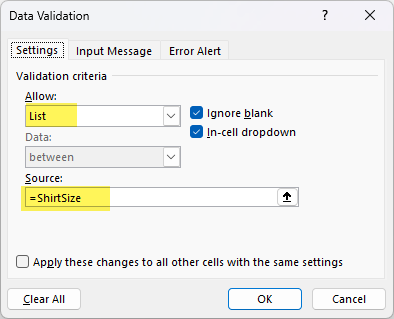
For each dropdown field (shirt size, color, design, quantity):
- Select the cell where the dropdown should appear.
- Go to Data → Data Validation.
- Under Settings, choose List.
- In Source, type:Code
=shirt_size(or the appropriate list name) - Click OK.
Repeat for:
=color=design=quantity
Step 6: Customize Dropdown Appearance (Optional)
To make dropdown fields visually obvious:
- Apply a light fill color (Home → Fill Color).
- Add borders around dropdown cells.
This helps users quickly identify interactive fields.
Step 7: Format Credit Card Fields Correctly
Credit Card Number
Excel only stores up to 15 digits in a number. Credit cards often have 16 digits, so you must store them as text.
- Select the credit card number cell.
- Change the format to Text.
- Enter the number again.
- Ignore the “Number stored as text” warning — this is correct.
Expiration Date
- Select the expiration date cell.
- Right‑click → Format Cells.
- Choose Date.
- Select a format that shows MM/YYYY.
- Click OK.
CVC & Name on Card
- CVC → leave as a normal number.
- Name on Card → leave as text.
Billing ZIP Code
Format the same way as the main ZIP Code:
- Format Cells → Special → ZIP Code
Step 8: Final Formatting and Cleanup
- Adjust alignment (left, center, right) for readability.
- If you inserted lists on the same sheet, hide those rows:
- Right‑click the row numbers → Hide.
This keeps your form clean and professional.
Step 9: Your Order Form Is Ready
You now have:
- A fully functional order form
- Dropdown menus for easy selection
- Proper formatting for dates, ZIP codes, and credit card fields
- A clean layout ready for printing or digital use
Additional Tips
Helpful Tip
Store your drop-down lists on a separate worksheet instead of the same page as your form. This keeps the workbook cleaner and makes it easier to update available options without affecting the form layout.
Version Compatibility
Although this tutorial was recorded using Excel 2016, the techniques demonstrated—including Data Validation, named ranges, and custom formatting—continue to work in current Microsoft 365 versions of Excel.
Related

How to Remove Extra Spaces in Excel
Learn how to remove extra spaces from text in Microsoft Excel using the TRIM function. This beginner-friendly tutorial explains what TRIM removes, when to use it, and why it’s one of the most useful functions for cleaning imported or inconsistent data.


How to Create an Order Form with Drop-Down Menus in Microsoft Excel
Learn how to create a professional order form in Microsoft Excel using drop-down menus, Data Validation, and named ranges. This step-by-step tutorial also covers formatting dates, ZIP codes, and credit card fields to build cleaner, more accurate spreadsheets for real-world business use.
Stay Updated
There are two easy ways to get notified when new tutorials are published:
Subscribe on YouTube for new video tutorials: @SimpleSoftwareTutorials
or enter your email below to receive new blog posts directly in your inbox:

