

By default, PowerPoint presentations use a landscape (horizontal) slide layout, but there are times when a portrait (vertical) layout is a better fit, such as creating handouts, posters, flyers, or digital displays.
In this tutorial, you’ll learn how to change the slide orientation in Microsoft PowerPoint from landscape to portrait. This walkthrough covers the Slide Size settings, explains the available layout options, and highlights an important limitation to be aware of before making the change.
Note: Although this video was originally created using PowerPoint 2016, these steps are still accurate for current Microsoft 365 versions of PowerPoint at the time this guide was written.
What You’ll Learn
In this tutorial, you’ll learn how to:
- Change a presentation from landscape to portrait orientation.
- Locate the Slide Size settings in PowerPoint.
- Understand the difference between the Maximize and Ensure Fit options.
- Learn why PowerPoint only supports one slide orientation per presentation.
- Decide when portrait orientation is the best choice for your presentation.
Practice & Resources
Need a quick refresher later? This tutorial includes a printable reference guide that summarizes the steps and key concepts covered in the lesson.
Click the button below to view the resources available for this tutorial.
Video Tutorial
Key Concepts
Slide orientation is just the direction your slides face. There are two options:
- Landscape – wide, like a TV screen
- Portrait – tall, like a sheet of paper
PowerPoint normally uses landscape. If you want your slides to be portrait, you have to change the orientation.
Here’s the simple idea:
- PowerPoint doesn’t put orientation in the “Layout” menu (even though that seems logical).
- Instead, it hides the setting under Design → Slide Size → Custom Slide Size.
- In that box, you choose whether your slides should be Landscape or Portrait.
- PowerPoint then asks how you want your content handled:
- Maximize (make everything as big as possible)
- Ensure Fit (shrink things so nothing gets cut off)
One important thing: PowerPoint only allows one orientation for the whole presentation. You can’t mix portrait and landscape slides in the same file.
Step-by-Step Instructions
Step 1: Open your PowerPoint presentation
Make sure your file is open and you can see your slides.
Step 2: Go to the Design tab
Across the top ribbon, click Design.
(This is important—orientation settings are not in Layout, even though it seems like they should be.)
Step 3: Find the Slide Size button
On the right side of the Design ribbon, click Slide Size.

Step 4: Choose Custom Slide Size
A small menu appears. Select Custom Slide Size… (The portrait/landscape option is hidden here.)
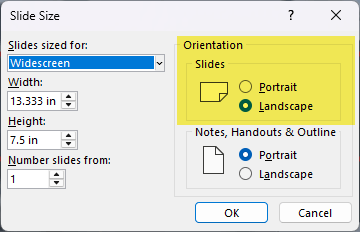
Step 5: Change the orientation
In the dialog box that opens:
- Look for Orientation
- Change Slides from Landscape to Portrait
Step 6: Choose how PowerPoint should handle existing content
You’ll see two options:
- Maximize – makes your content as large as possible (may cause layout shifts)
- Ensure Fit – scales content down to fit the new orientation
Select the option that works best for your presentation.

Step 7: Apply the change
Click OK. Your slides will now switch to portrait orientation.
Important Note: PowerPoint only allows one orientation per presentation. You cannot mix portrait and landscape slides in the same file.
Additional Tips
Helpful Tip
If you’ve already added content to your slides, choosing Ensure Fit usually produces better results by reducing the likelihood of text or images being cropped after changing the orientation.
Version Compatibility
This tutorial was originally recorded using PowerPoint 2016, but the process remains the same in current Microsoft 365 versions of PowerPoint.
Related Feature
Need both portrait and landscape slides? PowerPoint doesn’t support mixed orientations within a single presentation, but you can create separate presentations and link between them as a workaround. (You could even link to your “Workaround for Multiple Orientations in PowerPoint” tutorial once it’s added.)
Related

How to Use PowerPoint to Prepare for an Interview
Learn how to use PowerPoint as a practical interview preparation tool. This guide includes free, customizable presentation templates, step-by-step instructions, and additional presentation ideas to help you research a company, understand a role, organize your thinking, and prepare more confidently for interviews or new responsibilities.
How to Add & Use Speaker Notes in PowerPoint
Learn how to add, format, and use speaker notes in Microsoft PowerPoint. This tutorial shows how to display the Notes pane, organize talking points, use Presenter View, and confidently present during in-person or online meetings while keeping your notes hidden from your audience.
How to Record Your Screen Using PowerPoint & Add It to a Slide
Learn how to record your screen directly in Microsoft PowerPoint and insert the recording into a presentation. This tutorial shows how to capture a specific area of your screen, record audio and mouse movements, and create software demonstrations, tutorials, or narrated presentations without additional screen recording software.
Stay Updated
There are two easy ways to get notified when new tutorials are published:
Subscribe on YouTube for new video tutorials: @SimpleSoftwareTutorials
or enter your email below to receive new blog posts directly in your inbox:

