

Creating a workflow in Jira does not automatically make it available within a space. Until the workflow is connected to a space and assigned to one or more work item types, it may remain inactive and have no effect on the Stories, Tasks, or other work items you create.
In this tutorial, I’ll show you how to add an existing workflow to a Company-managed Jira space and select which work item types should use it. This is useful when you’ve created a custom workflow, found an existing workflow you want to reuse, or discovered that a workflow is not appearing where you expected it to.
What You’ll Learn
- Understand why a workflow can exist without being used in a space
- Locate the settings for a Company-managed Jira space
- Add an existing workflow to the space
- Assign the workflow to Stories, Tasks, or other work item types
- Confirm that the workflow is available within the space
- Understand how workflows and Kanban boards work together
Common Uses
- Adding a newly created custom workflow to a space
- Reusing one workflow across multiple spaces
- Assigning a specialized workflow to Stories or Tasks
- Separating workflows for different work item types
- Correcting a workflow that was created but never connected
- Applying a workflow designed for content planning, approvals, hiring, customer onboarding, or another business process
- Making custom statuses available to work items within a space
Requirements / Compatibility
- A Jira Cloud account
- A Company-managed Jira space
- An existing workflow
- Permission to manage the space and its workflows
- At least one work item type to assign to the workflow, such as Story, Task, Bug, Epic, or Sub-task
This tutorial uses the current Jira Cloud interface for Company-managed spaces. Team-managed spaces use a different and more self-contained approach to workflow customization.
Understanding How Jira Works
A workflow defines the statuses a work item can use and the transitions that determine how it can move from one status to another. However, creating the workflow is only the first part of the process.
Jira also needs to know:
- Which space should use the workflow?
- Which work item types within that space should follow it?
The relationship looks like this:
Create or locate a workflow ↓Add the workflow to a space ↓Assign it to work item types ↓Stories, Tasks, or other items use the workflow
For example, you might add a Job Search Workflow to your Job Search space and assign it to Stories. Every Story created in that space can then move through the statuses defined by that workflow, such as:
Interested → Preparing → Applied → Interviewing → Waiting → Follow Up → Closed
You could assign the same workflow to Tasks as well, but that may not be appropriate if your Tasks follow a simpler process. Jira allows different work item types to use different workflows so each type of work can follow the process that makes the most sense.
Workflows and Kanban Boards
A workflow and a Kanban board are closely related, but they are not the same thing.
- The workflow controls the actual statuses and allowed transitions.
- The Kanban board displays work items visually by mapping those statuses to columns.
Adding a workflow to a space makes its statuses available to the selected work item types. You may still need to review the board’s column settings afterward to make sure the new statuses are mapped to the correct Kanban columns.
Step-by-Step Instructions
Note: Your options and screens may vary depending on the choices made throughout this process, so your experience may look slightly different from what I’ve documented here, but the general process will be the same.
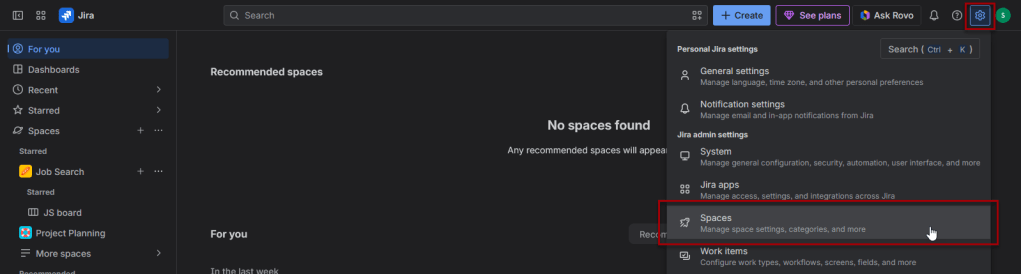
Step 1: Navigate to space settings
- Click on the settings icon
- Click on spaces
- This should bring you to manage spaces, but if not, access manage spaces from the left sidebar
Step 2: Navigate to space settings details page
- From manage spaces:
- Locate the space on the list of spaces
- Click on the 3 dots in the Space URL column
- Click on space settings
- This will open the space settings details page

Step 3: Add the existing workflow to the space
- Navigate to space settings > workflows:
- Expand the left navigation sidebar and click on workflows
- Click on add workflow
- Click on add existing
- Click on the workflow you’d like to add
- Click next
- Assign issue types to the selected workflow (bug, epic, story, sub-task, task, or all)
- Click finish


Additional Tips
Helpful Tip: Assign Only the Work Item Types That Need It
You do not have to assign a workflow to every work item type in the space. Think about how each type of work should move before selecting All.
For example:
- Stories might use your complete job-search workflow.
- Tasks might only need To Do → In Progress → Done.
- Sub-tasks might use an even simpler workflow.
Keeping workflows appropriate to each work item type can prevent unnecessary complexity.
Common Mistake: Assuming the Workflow Is Active After Creating It
A workflow can appear on Jira’s workflow management page without being connected to any space. If it appears under Inactive workflows, it is not currently controlling work items.
Adding it to a space and assigning it to at least one work item type makes it part of that space’s configuration.
Check Existing Work Items
If the selected work item type already uses another workflow, Jira may ask you to map existing statuses to the statuses in the new workflow. Review these mappings carefully so existing work items do not move to an unintended status.
Review Your Kanban Columns
After adding the workflow, open the board settings and confirm that each workflow status is mapped to the appropriate column. Adding a workflow does not necessarily organize the board columns for you.
Version Differences
This tutorial was created using Jira Cloud and a Company-managed space. Atlassian may periodically change menu names, navigation, or configuration screens, but the general process remains the same: connect the workflow to the space and assign it to the appropriate work item types.
Related Posts

How to Customize the Details Section of a Jira Story
Learn how to customize the Details section of a Jira Story so the fields you actually need are easy to see and edit. This guide walks through creating custom fields, updating the Story layout, controlling what appears in the details section, and troubleshooting missing fields in a Company-managed Jira space.

How I’m Actually Using My Jira Job Tracker
See how I’m actually using my Jira Job Tracker to save potential jobs, clone a template Story, record listing details, preserve job descriptions, and move opportunities through a flexible Kanban workflow. This practical walkthrough shows that job tracking can be simple, useful, and easy to adapt.

3 Job Opportunity Templates to Organize Your Job Search
Choose from three reusable job-opportunity templates designed to organize applications, company research, contacts, interviews, documents, follow-ups, and outcomes. Start with a minimalist, standard, or maximalist version, then copy, paste, and customize it for Jira, OneNote, Notion, or another job-tracking system.
Stay Updated
There are two easy ways to get notified when new tutorials are published:
Subscribe on YouTube for new video tutorials: @SimpleSoftwareTutorials
or enter your email below to receive new blog posts directly in your inbox:

