
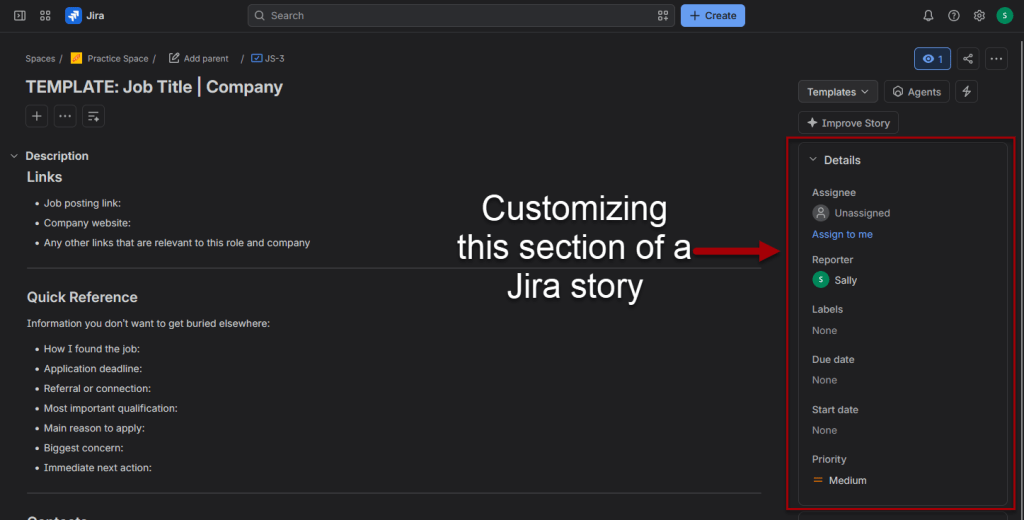
The Details section of a Jira Story is where you can quickly view important information such as the assignee, reporter, labels, due date, priority, and other fields associated with the work item.
But if you want to customize or control which fields appear directly in the Details section, the process is not as straightforward as it might seem.
Creating a custom field alone is not enough. Jira uses several layers of configuration to determine whether a field is available to a Story and where that field appears.
In this tutorial, I’ll walk through the complete process in plain language, from creating a custom field to making it appear in the Details section of a Jira Story. I’ll also explain what each Jira setting is actually doing so the process makes sense instead of feeling like a series of unrelated administrative steps.
If you already have the fields you need, you can skip the custom-field creation steps and start with the configuration process.
This tutorial is designed for newer or less-experienced Jira users who have permission to manage their space and want a simple explanation of how to control the fields shown on their Stories.
Requirements / Compatibility
- A Jira Cloud account
- At least one Jira site already created
- Internet connection
- Modern web browser
This tutorial uses the current Jira Cloud interface. The overall process is similar across plans, although some options may vary depending on your subscription level, permissions, and whether you’re creating a Team-managed or Company-managed space.
Understanding How Jira Works
Jira uses several different settings to control Story fields, and each setting does a different job.
- Custom field: Creates the field itself
- Field scheme: Makes the field available where you need it
- Work item layout: Controls where the field appears in the Story view
You do not need to memorize all of these Jira terms before starting. I’ll show you each setting in the order you need it and explain what it does along the way.
Step-by-Step Instructions
Note: This tutorial uses Jira’s newer Field schemes experience. Some Jira sites may still show Field configurations and Field configuration schemes instead. Atlassian is gradually replacing those older settings with Field schemes, so your screens and terminology may differ.
Step 1: Decide which fields you want to show on the story
Before changing Jira settings, decide what information you actually want visible on the Story.
Create a list of fields you want to show on the story. It’s also helpful to consider what type of fields these should be – date, drop-down, short answer, multi-choice, etc.
You may also want to consider which fields might be helpful for reporting purposes, if you plan on creating reports for this data at some point. For example, how long between application and closing, reasons for closing stories, or types of jobs.
For my job tracker project, some fields I thought could potentially be helpful are:
- Application date – track when I applied to the job
- Closed date – when I closed the job opportunity
- Closed reason – the reason(s) I closed the opportunity (multi-choice)
- Interview date – the date of the most recent or upcoming interview
- Job type – the type of job this is (e.g., training, marketing, consulting)
- Number of attachments – helps identify if I might have attached a resume, cover letter, or more
- Number of comments – can indicate the level of activity on a job opportunity (more comments, more activities)
- Days since last comment – helps me know how long since I’ve last logged activity in the comments
- Time in status – helps me to know if I might need to follow up or close an opportunity
Step 2: Create a field scheme for the Story fields & add it to your space
A field scheme is essentially the collection of fields you want available for a particular use case. Jira’s newer field-scheme system is intended to replace the older combination of field configurations and field configuration schemes.
Navigate to Jira administration and create a field scheme that will contain the fields you want available for this type of work.
The basic path in the newer Jira experience is: Settings → Work items → Field schemes → Create field scheme
Give it a clear name that describes its purpose. For example: Job Search Story Fields
Once the field scheme exists, connect it to the Jira space where you want to use the fields. This tells Jira: “Use this collection of fields for work in this space.”
- Click on the 3 dots in the action column
- Click on Spaces using this scheme
- A slide out will display any spaces using this scheme. If your space is not listed here, click on add spaces.
- A list of available spaces will be shown. Check the box next to the space you want to add the field scheme to (e.g., Job Search).
- Click on Add 1 space
- A confirmation message will appear confirming that the space has been added to the field scheme.
Want more detailed instructions with screenshots? Check out: How to Show Custom Fields on Jira Stories (Create a Field Scheme)
Step 3: Create the custom fields & add them to the field scheme
In this step, we’ll create the custom fields from step 1 and add them to the field scheme created in step 2.
Navigate to: Settings → Work items → Fields
Create each custom field and select an appropriate field type.
For example:
- Application Date → Date picker
- Employment Type → Single-select field
- Salary Range → Text or number field
- Source → Single-select or text field
- Follow-Up Due → Date picker
As you create fields, make sure they are added to the appropriate field scheme.
This is an important step because creating a custom field alone does not automatically add it to your field schemes. Atlassian specifically notes that newly created custom fields must be manually added to the relevant schemes.
Upon creating the new field, Jira should give you the option to associate the field with a field scheme during creation; select the scheme you created earlier.
Otherwise, return to: Settings → Work items → Field schemes
Open your scheme and add the new field.
Want more detailed instructions with screenshots? Check out: How to Create Custom Fields in Jira
Step 4: Customize the details section
This step is where we can finally choose what is shown in the details section of a Jira story.
- Go to Space settings (settings icon > spaces > click the 3 dots next to the space > space settings)
- Select Work items (left menu > work items)
- Select Layout
- Find the Story work type/layout
- Click Edit work item layout
- You should see sections for description fields, context fields, and hide when empty
- Drag your custom fields into the section where you want them
- Save the changes
Save the layout and open an actual Story.
Verify:
- Your custom fields appear
- Fields can be edited
- Values save correctly
I would also test both:
- A Story with blank fields
- A Story where you populate several custom fields
If something is missing, troubleshoot backward: Layout → Screen → Work type availability → Field scheme → Custom field
Related Content
This tutorial was created as part of my complete guide to building a job tracker in Jira:

How to Build a Job Search Tracker in Jira (Complete Guide)
Build a practical job search tracker in Jira from start to finish. This complete guide covers creating a space, planning a workflow, customizing Kanban columns, building reusable job-opportunity templates, tracking application activity, and organizing every job, contact, document, interview, follow-up, and outcome in one place.
Related

How I’m Actually Using My Jira Job Tracker
See how I’m actually using my Jira Job Tracker to save potential jobs, clone a template Story, record listing details, preserve job descriptions, and move opportunities through a flexible Kanban workflow. This practical walkthrough shows that job tracking can be simple, useful, and easy to adapt.

3 Job Opportunity Templates to Organize Your Job Search
Choose from three reusable job-opportunity templates designed to organize applications, company research, contacts, interviews, documents, follow-ups, and outcomes. Start with a minimalist, standard, or maximalist version, then copy, paste, and customize it for Jira, OneNote, Notion, or another job-tracking system.
How to Create a Template Story in Jira
Learn how to create a reusable template Story in Jira, store it safely in the Kanban backlog, and clone it whenever you add a new job opportunity. This guide also explains how to organize job details, contacts, documents, and comments into one complete record.
Stay Updated
There are two easy ways to get notified when new tutorials are published:
Subscribe on YouTube for new video tutorials: @SimpleSoftwareTutorials
or enter your email below to receive new blog posts directly in your inbox:

