
Jira workflows control the statuses available to your work items and how those items can move from one stage to another. While Jira includes default workflows, those stages may not reflect the process you actually want to manage.
In this tutorial, I’ll show you how to create a new Jira workflow from scratch using your own custom statuses. You’ll learn how to replace the default starting status, allow work items to move freely between stages, assign each status to the correct category, and connect the finished workflow to a Company-managed Jira space.
I’ll use a job search workflow as the example:
Interested → Preparing → Applied → Interviewing → Waiting → Follow Up → Closed
As a bonus, I’ll also show you how to add a separate Templates status where reusable Stories can be stored outside the active workflow and cloned whenever they are needed.
Purpose: This tutorial is part of my job tracking in Jira project. This step is responsible for creating a logical flow for new job opportunity stories to flow through, so jobs can easily be added to and tracked in Jira.
What You’ll Learn
In this tutorial, you’ll learn how to:
- Create a new Jira workflow
- Add your own custom statuses
- Replace Jira’s default starting status
- Set the initial status for newly created work items
- Allow transitions from any status
- Assign statuses to the To Do, In Progress, and Done categories
- Add a separate status for storing reusable templates
- Troubleshoot the “This status needs a transition” warning
- Save the completed workflow
- Add the workflow to a Company-managed Jira space
- Assign the workflow to specific work item types
Common Uses
A custom Jira workflow can be useful for:
- Job application tracking
- Content planning and publishing
- Marketing campaign management
- Customer onboarding
- Recruiting and hiring
- Approval and review processes
- Client project management
- Product development
- Training development
- Event planning
- Small-business operations
- Any process that does not fit Jira’s default statuses
Requirements / Compatibility
To follow this tutorial, you’ll need:
- A Jira Cloud account
- A Company-managed Jira space
- Permission to create and manage workflows
- Permission to update the workflow configuration for the space
- A planned list of workflow stages
This tutorial uses the current Jira Cloud interface for a Company-managed space. Team-managed spaces use a different and more simplified workflow configuration process.
Your screens and available options may vary depending on your Jira plan, permissions, and site configuration.
Practice & Resources
To make this process easier to follow, I created a companion quick-reference guide that outlines the workflow setup steps covered in this tutorial.
The guide includes:
- The complete job search workflow
- Recommended status categories
- Instructions for changing the initial status
- Instructions for allowing transitions from any status
- Steps for creating a Templates storage status
- Troubleshooting guidance for missing transitions
- Steps for adding the completed workflow to a space
Use the guide while building the same workflow shown in this tutorial, or modify the statuses to create a workflow that better reflects your own process.
Resource:
Custom Jira Workflow Quick Reference Guide – A concise outline of the setup process that can be viewed online or downloaded for reference.
Video Tutorial
Watch the video below to follow the complete process for creating a Jira workflow with your own statuses.
In the video, I demonstrate how to:
- Create a blank workflow
- Replace the default Open status
- Add custom workflow stages
- Configure flexible transitions
- Add a Templates storage status
- Save the workflow and connect it to a space
Understanding How Jira Works
A Jira workflow defines the path a work item can follow from the moment it is created until the work is complete.
A workflow is made up of three main elements:
- Statuses: The stages work can be in
- Transitions: The available movements between statuses
- Status categories: Jira’s broader grouping of statuses as To Do, In Progress, or Done
The relationship looks like this:
Create a work item ↓Initial workflow status ↓Move through statuses using transitions ↓Reach a completed status
Statuses
Statuses answer the question: Where does this work item currently stand?
For the job search tracker, each Story represents one job opportunity. Its status shows the current stage of that opportunity:
Interested → Preparing → Applied → Interviewing → Waiting → Follow Up → Closed
These statuses are more meaningful for a job search than Jira’s default software-development stages.
The Initial Status
The initial status is where every new work item begins.
Jira workflows may initially use a default status such as Open. In this example, that status is replaced with Interested, because every new job opportunity should begin in the Interested stage.
When a reusable template Story is cloned, the clone is created as a new Story and starts in this initial Interested status.
Transitions
Transitions control how work items move between statuses.
For a strict business process, you might require work to move through every stage in a specific order. A job search is less predictable, so this workflow allows movement into each active status from any status.
That flexibility supports situations such as:
- Returning from Waiting to Interviewing
- Moving directly from Interested to Closed
- Going back to Preparing after an application has been submitted
- Moving from Follow Up back to Waiting
Status Categories
Every status is assigned to one of Jira’s three broader categories:
| Category | Meaning |
|---|---|
| To Do | Work that has not started |
| In Progress | Work that is active or still requires attention |
| Done | Work that is complete |
For this workflow:
- To Do: Interested, Templates
- In Progress: Preparing, Applied, Interviewing, Waiting, Follow Up
- Done: Closed
These categories help Jira interpret the overall state of each work item, even when you use custom status names.
The Templates Status
The Templates status is not part of the normal job-search progression. It serves as a utility status for storing reusable Story templates.
Later, this status can be mapped to the Kanban backlog rather than a visible board column. That keeps templates separate from active job opportunities while allowing them to remain accessible when needed.
The intended process is:
Store template Story in backlog ↓Clone the template ↓Clone begins in Interested ↓Update it with the new job details
This provides a simple template system without requiring automation, marketplace apps, or paid Jira features.
Step-by-Step Instructions
In this tutorial, I’ll show you how to create a new Jira workflow from scratch, replace the default starting status with one that fits your process, add a placeholder for a story template, and allow work items to move directly between any of your workflow stages.
In this example, I will create a job search workflow:
Interested → Preparing → Applied → Interviewing → Waiting → Follow Up → Closed
Feel free to use these same statuses or make your own modifications to suit your ideal workflow.
Note: Your options and screens may vary depending on the choices made throughout this process, so your experience may look slightly different from what I’ve documented here, but the general process will be the same.
Once you’ve created a Jira account and created a space, log in to the site.
Step 1: Navigate to space workflows:
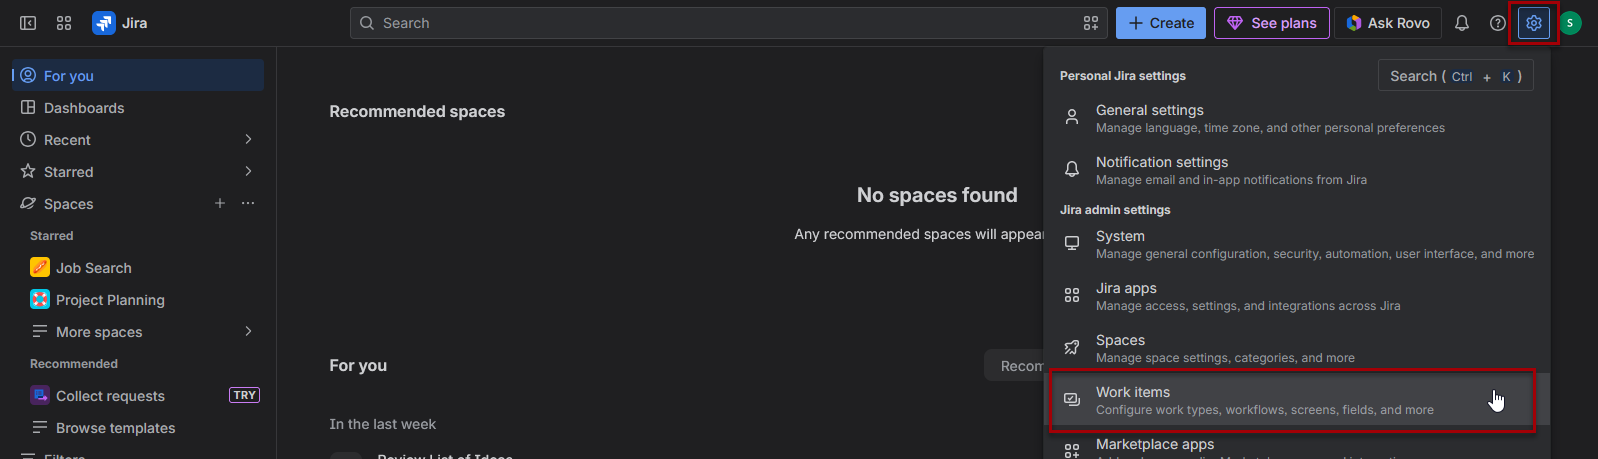
- Click on the settings icon on the top right of the page
- Click on Work items
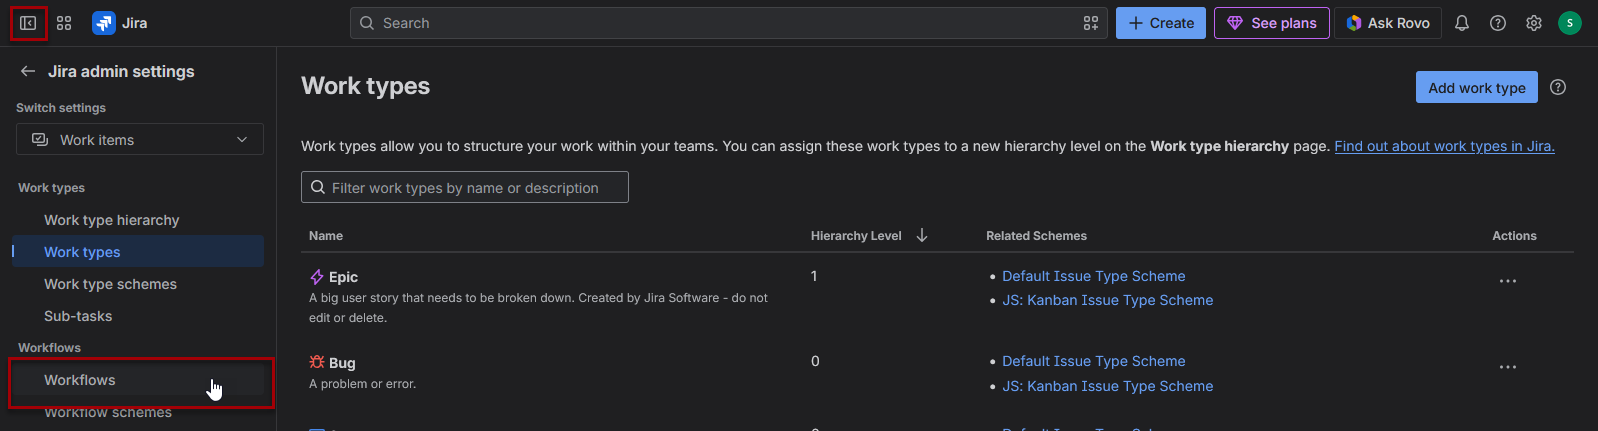
- If the left-side sidebar is not visible, hover over or click on the sidebar icon on the top left of the page
- Click on Workflows
Step 2: Create a new workflow
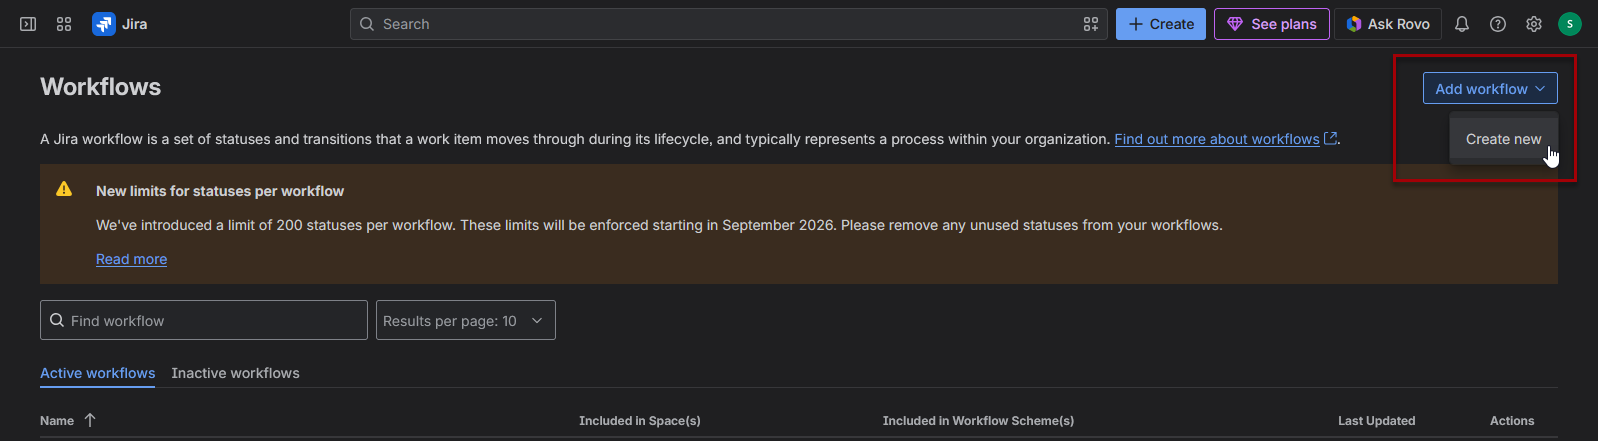
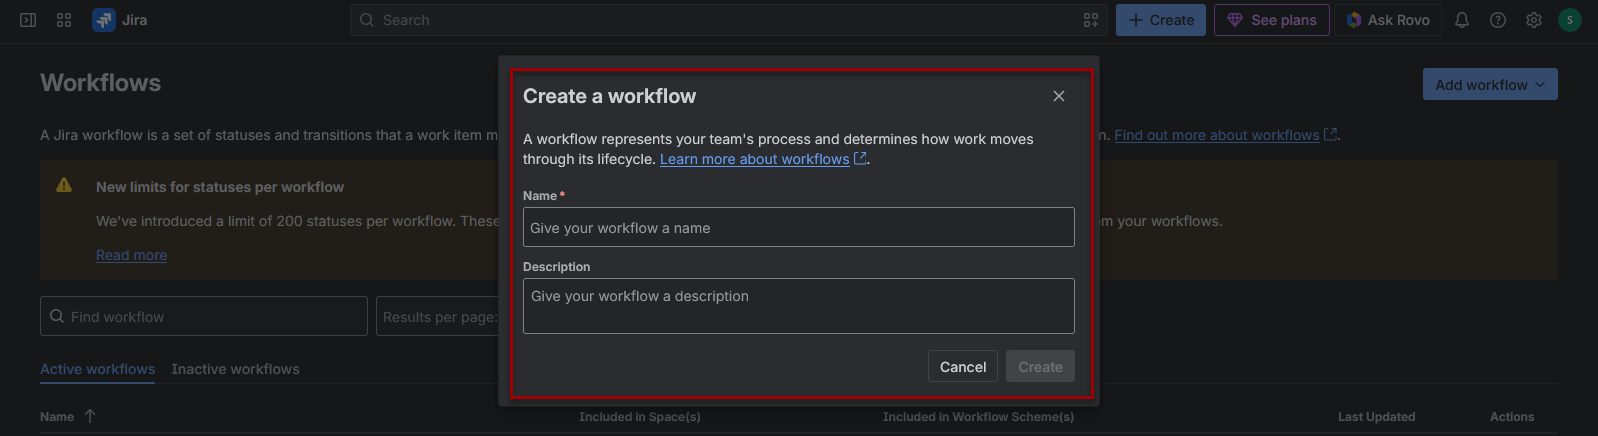
- Click on add workflow then click on create new
- A modal will pop up prompting you to provide a name and description for your workflow
- Click Create
I named mine Job Search Story Workflow and pasted the stages of my workflow with their definitions as the description.
Note: I decided to include “story” in the title because this workflow will apply only to stories.
Step 3: Design the workflow
Workflows can be designed in diagram or text mode. I opted to work in diagram mode for the initial design steps.
In this step, we’ll create the workflow to use the following statuses (or use your own statuses):
Interested → Preparing → Applied → Interviewing → Waiting → Follow Up → Closed
Add the first status (Interested):
- Click Add status
- Search for the status name (Interested) or create a new one
- Check the box: allow transitions from any status
- Click Add
Change the initial status (to Interested):
- Do this in Diagram view.
- You should see the initial Create transition running from Start → Create → Open.
- To change the initial status:
- Click on the arrow connecting Create to open.
- Drag the arrow’s destination from Open to Interested.
- Confirm that the diagram now shows: Start → Create → Interested
Delete the Open status:
The original “open” status needs to be deleted so the first step of the custom workflow (interested) can take its place.
- Click on the status that needs to be removed (open)
- Click Delete status.
Add the remaining statuses:
- Click Add status
- Search for the status name or create a new one for each of these remaining statuses (or your own chosen statuses):
- Preparing
- Applied
- Interviewing
- Waiting
- Follow Up
- Closed
- Check the box: allow transitions from any status
- Click Add
- Repeat to add the rest of the workflow statuses
Troubleshooting: If any of your statuses have a transition error warning, see the below section: Troubleshooting: “This status needs a transition”
Check the categories:
- There are 3 categories:
- To Do (Gray): Work items that are planned but have not yet been started.
- In Progress (Blue): Tasks actively being worked on, including intermediate steps.
- Done (Green): Completed tasks or items that no longer require further action.
- Ensure that the statuses have the correct category
- For this example:
- To do: interested
- In progress: preparing, applied, interviewing, waiting, follow up
- Done: closed
Bonus Step: Add a template storage status
For the job search tracker project, I will be creating a template story that can be duplicated and used to document new job opportunities. This template story (or stories) will contain all the information I want to collect for each job, formatted consistently so I can ensure I have all the information I need without having to copy and paste a template from an external document.
Rather than go through a complex customization process, I decided to simply add a “templates” step in the workflow which will allow me to create a corresponding “templates” column in my Kanban board where I can store this template story for easy access.
Here’s how to add the templates status:
- Click add status
- Create a new status called templates
- Do not check the allow transitions from any status box
- Click add
This new status will display a transition error. Here’s how to resolve that:
- There are two ways to do this:
- Drag & drop method
- In diagram view, simply click on a transition point on interested and drag it to templates
- Edit the status (in diagram or text view)
- Click on the templates status
- Click on incoming > add transition
- In the incoming statuses dropdown, select Interested
- Drag & drop method
- For the transition name, I entered Store as template
- Click create
Ensure the templates status category is to do:
- Click on the templates status top open its settings in the right slideout menu
- If the category is to do, then no changes are needed
- To change the category to to do:
- Click on the edit icon next to category
- Select to do from the dropdown menu
- Click update
This process will now allow you to create template stories that can be stored in the Templates column for easy access and duplication whenever you add a new job to this board.
The Finished Workflow
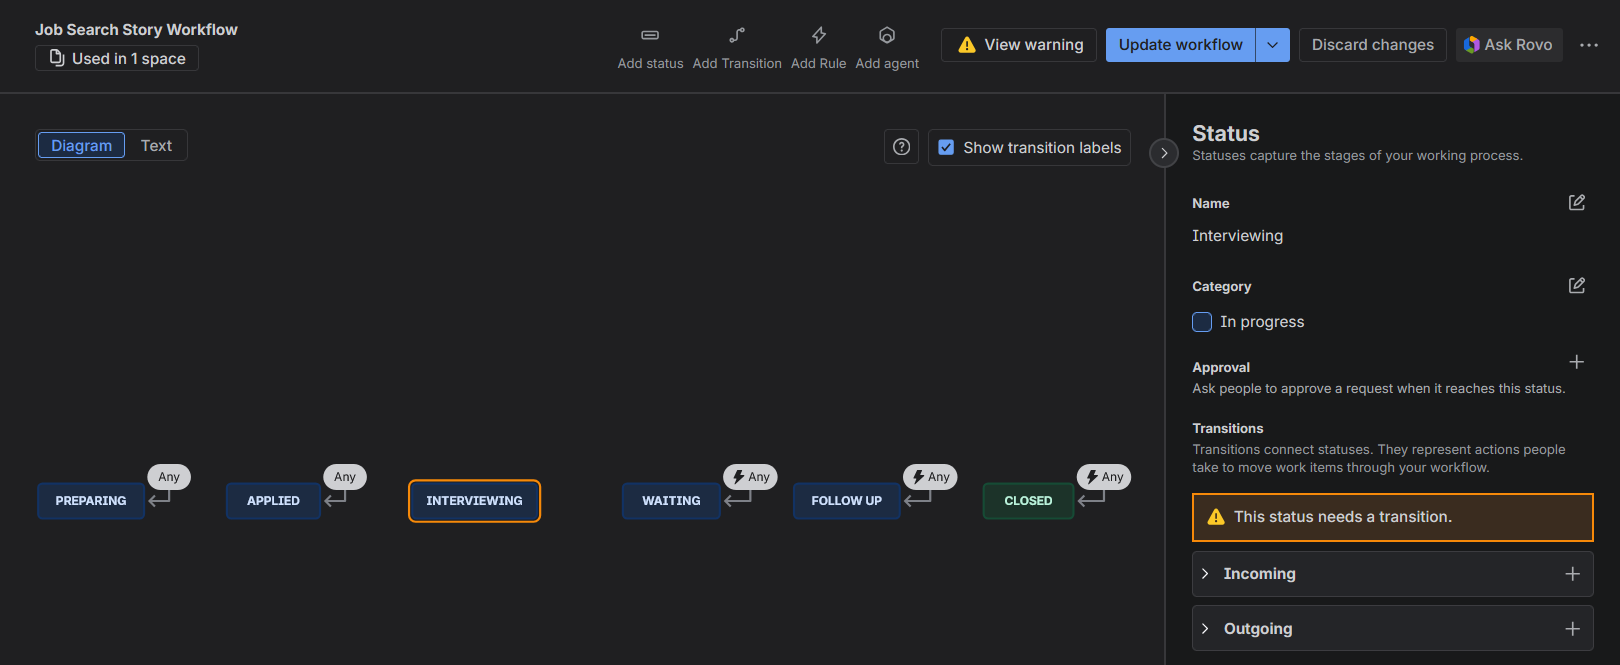
As shown in the screenshot below, the workflow follows my planned workflow:
Interested → Preparing → Applied → Interviewing → Waiting → Follow Up → Closed
Additionally, this workflow includes a storage status for any template stories I create, and when a template story is cloned, it will automatically appear with a status of interested so I can update the story with the job details.

Step 4: Save your new workflow
Once you’ve set up your workflow:
- Click on update workflow to update your workflow
- or click on the dropdown arrow on the update workflow button and save it as a new workflow
- Click close to exit the workflow editor
Note: It may take some time for the new workflow to appear on the workflows page.


After completing these steps, your custom workflow is now complete. It will appear on the workflows page in the inactive workflows section.
Navigate: Settings > Work items > Workflows > Inactive workflows

Step 5: Add the workflow to a space
To add the new workflow to a space:
- Navigate to space settings:
- Click on the settings icon
- Click on spaces
- This should bring you to manage spaces, but if not, access manage spaces from the left sidebar
- From manage spaces:
- Locate the space on the list of spaces
- Click on the 3 dots in the Space URL column
- Click on space settings
- This will open the space settings details page
- Navigate to space settings > workflows:
- Expand the left navigation sidebar and click on workflows
- Click on add workflow
- Click on add existing
- Click on the workflow you’d like to add
- Click next
- Assign issue types to the selected workflow (since this process is for my job tracking stories, I only selected story)
- Click finish


Next Step
If you’re following my How to Build a Job Search Tracker in Jira guide, here’s the next step:
How to Customize Workflow Columns on a Jira Kanban Board
Learn how to customize a Jira Kanban board so its columns align with your workflow statuses. This guide covers adding, deleting, reordering, and mapping columns, plus storing reusable Story templates in the Kanban backlog so they remain accessible without cluttering the active board.
Troubleshooting: “This status needs a transition”
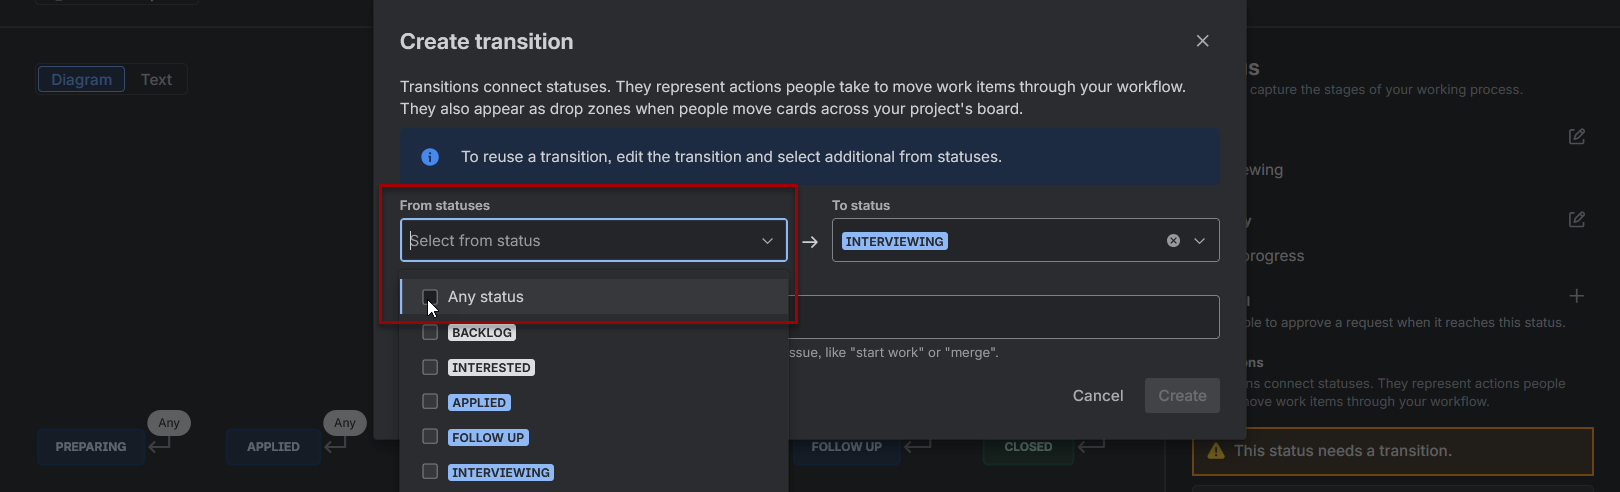
In this example, transitions from any status will be allowed (except for the templates status). If after adding a status, you see a warning message that the workflow status needs a transition, simply update the incoming transition to allow transitions from any status:
- Click on the status with the warning
- Click on incoming > add transition
- In the incoming statuses dropdown, select any status
- Click create

Additional Tips
Helpful Tip: Plan Your Statuses First
Write down your workflow before opening the workflow editor. Decide:
- Which statuses you need
- Which status should be the starting point
- Which status represents completion
- Whether movement should be flexible or restricted
- Whether you need any utility statuses, such as Templates
This makes the workflow much easier to build and reduces unnecessary revisions.
Helpful Tip: Reuse Existing Statuses Carefully
When adding a status, Jira may allow you to select an existing site-wide status or create a new one.
Existing statuses can be shared by multiple workflows. Changing one may affect other projects, filters, or reports. When you need a status with a different meaning or category, creating a new status may be safer.
Common Mistake: Renaming Board Columns Instead of Changing the Workflow
Changing a Kanban column name does not necessarily change the underlying workflow status.
For example, a column named Interviewing could still be mapped to Jira’s default Done status behind the scenes. Always verify that your board columns are mapped to the correct statuses after activating the workflow.
Common Mistake: Forgetting to Assign the Workflow
A newly created workflow will initially appear as inactive. It will not control any Stories or Tasks until it is added to a space and assigned to one or more work item types.
Common Mistake: Forgetting to Update the Workflow
After making changes, click Update workflow before closing the editor. If the workflow does not contain the statuses you expected later, return to the workflow editor and confirm that the changes were saved.
Troubleshooting: “This Status Needs a Transition”
This warning means Jira has no valid path into the status.
For most statuses in this workflow, resolve it by adding an incoming transition from Any status.
For the Templates status, create a specific transition from Interested, such as:
Store as template
Version Differences
This tutorial uses Jira Cloud and a Company-managed space. Atlassian periodically updates Jira’s terminology, menu locations, and interface, so your screens may look slightly different.
Team-managed spaces use a different workflow model and will not follow these exact instructions.
Related Jira Support Content
- Manage how work flows in your team-managed space – https://support.atlassian.com/jira-software-cloud/docs/manage-how-work-flows-in-your-team-managed-project/
Related Posts

How to Customize the Details Section of a Jira Story
Learn how to customize the Details section of a Jira Story so the fields you actually need are easy to see and edit. This guide walks through creating custom fields, updating the Story layout, controlling what appears in the details section, and troubleshooting missing fields in a Company-managed Jira space.

How I’m Actually Using My Jira Job Tracker
See how I’m actually using my Jira Job Tracker to save potential jobs, clone a template Story, record listing details, preserve job descriptions, and move opportunities through a flexible Kanban workflow. This practical walkthrough shows that job tracking can be simple, useful, and easy to adapt.

3 Job Opportunity Templates to Organize Your Job Search
Choose from three reusable job-opportunity templates designed to organize applications, company research, contacts, interviews, documents, follow-ups, and outcomes. Start with a minimalist, standard, or maximalist version, then copy, paste, and customize it for Jira, OneNote, Notion, or another job-tracking system.
Stay Updated
There are two easy ways to get notified when new tutorials are published:
Subscribe on YouTube for new video tutorials: @SimpleSoftwareTutorials
or enter your email below to receive new blog posts directly in your inbox:

