
A Jira workflow defines the statuses your work items can use, but your Kanban board determines how those statuses are displayed visually. To create a board that accurately reflects your process, each workflow status needs to be mapped to the correct Kanban column.
In this tutorial, I’ll show you how to customize the columns and status mappings on a Jira Kanban board so they align with your workflow. I’ll use my Job Search Tracker as an example, with columns for:
Interested → Preparing → Applied → Interviewing → Waiting → Follow Up → Closed
I’ll also show you how to map a separate Templates status to the Kanban backlog. This keeps reusable Story templates accessible without displaying them alongside active job opportunities.
What You’ll Learn
In this tutorial, you’ll learn how to:
- Open the settings for a Jira Kanban board
- Understand the difference between columns and statuses
- Remove unnecessary board columns
- Create columns that match your workflow
- Reorder Kanban columns
- Map workflow statuses to the correct columns
- Move unused statuses to the Unmapped statuses area
- Map a Templates status to the Kanban backlog
- Add the Backlog tab to your space navigation
- Verify that the completed board matches the underlying workflow
Common Uses
Customizing Kanban board columns can help with:
- Job application tracking
- Content production and publishing
- Marketing campaigns
- Client project management
- Recruiting and hiring
- Customer onboarding
- Approval and review processes
- Product development
- Training development
- Personal projects
- Small-business operations
- Any process that moves through defined stages
Requirements / Compatibility
To follow this tutorial, you’ll need:
- A Jira Cloud account
- A Company-managed Jira space
- An existing Kanban board
- A workflow assigned to the space
- Permission to manage the board and its settings
- Workflow statuses that correspond to the columns you want to create
This tutorial uses the current Jira Cloud interface for a Company-managed space. Team-managed spaces use a different board and workflow configuration process.
Your screens and available options may vary depending on your Jira plan, permissions, template, and site configuration.
Video Tutorial
Watch the video below to follow the complete process for customizing the workflow columns on a Jira Kanban board.
In the video, I demonstrate how to:
- Open the board’s column settings
- Remove unnecessary columns
- Create and reorder workflow columns
- Map statuses to their corresponding columns
- Store reusable templates in the Kanban backlog
- Add the Backlog tab for quick access
- Confirm that the final board aligns with the workflow
Understanding How Jira Works
A Jira workflow and a Kanban board work together, but they are not the same thing.
The workflow defines the actual statuses available to a work item and how that item can move between those statuses.
The Kanban board provides a visual representation of the work by displaying those statuses in columns.
The relationship looks like this:
WorkflowDefines statuses and transitions ↓Board column settingsMap statuses to visual columns ↓Kanban boardShows each work item in its current stage
Columns and Statuses Are Different
A column is the visual area you see on the board.
A status is the underlying value Jira assigns to a work item.
Changing a column name does not automatically change the status mapped to it. For example, a column named Interviewing could still be mapped to Jira’s default Done status behind the scenes. The board may look correct while the work items behave incorrectly.
That is why the status labels displayed within each column are important. They confirm which workflow status the column actually represents.
For this project, the mapping should be one-to-one:
| Kanban column | Workflow status |
|---|---|
| Interested | Interested |
| Preparing | Preparing |
| Applied | Applied |
| Interviewing | Interviewing |
| Waiting | Waiting |
| Follow Up | Follow Up |
| Closed | Closed |
Unmapped Statuses
The Unmapped statuses area contains statuses currently available to the board but not assigned to a visible column or the Kanban backlog.
Work items with unmapped statuses will not appear on the board. This area is useful for:
- Identifying statuses that still need to be mapped
- Removing old workflow statuses from the active board
- Temporarily holding statuses while reorganizing columns
If an expected status does not appear anywhere on this page, first verify that the correct workflow has been assigned to the appropriate work item type in the space.
The Kanban Backlog
The Kanban backlog provides a separate storage area for work that should remain accessible without appearing on the active board.
For this project, the Templates status is mapped to the Kanban backlog. This keeps the reusable Job Opportunity template separate from actual job applications.
The process works like this:
Template Story stored in backlog ↓Open and clone the template ↓Clone begins in Interested ↓Customize the clone for the job ↓Track it across the active board
This approach protects the original template from accidental edits while avoiding the need for automation, marketplace applications, or a visible Templates column.
Status Categories
Jira also assigns statuses to one of three broader categories:
- To Do: Work that has not yet started
- In Progress: Work that is active or still requires attention
- Done: Work that is complete
For the Job Search Tracker:
- Templates is a To Do status stored in the Kanban backlog.
- Interested is a To Do status displayed on the board.
- Preparing, Applied, Interviewing, Waiting, and Follow Up are In Progress statuses.
- Closed is a Done status.
The category is determined by the underlying workflow status, not merely by the board column’s appearance.
Step-by-Step Instructions
In the following steps, I’m going to show you how to customize your Kanban board so that it aligns with the custom workflow created for the job tracker project, how to add the template status to the backlog for story template storage, and ensure your Kanban board is set up to track job application statuses.
Note: Your options and screens may vary depending on the choices made throughout this process, so your experience may look slightly different from what I’ve documented here, but the general process will be the same.
Preparation Step: Add a workflow to your space
If you haven’t already applied your workflow to the space you’re updating (or if you want to confirm that it has been applied), this is a necessary step for the job tracker project.
Here’s how to do that: Add a Workflow to a Space
Step 1: Navigate to your space
- Click on the Jira logo to start from the For You page
- Expand the sidebar, if not already expanded, by clicking the arrow icon on the very top left, or just hover over the icon to access the side navigation menu
- Click on Spaces then click on the space you want to view (e.g., Job Search)
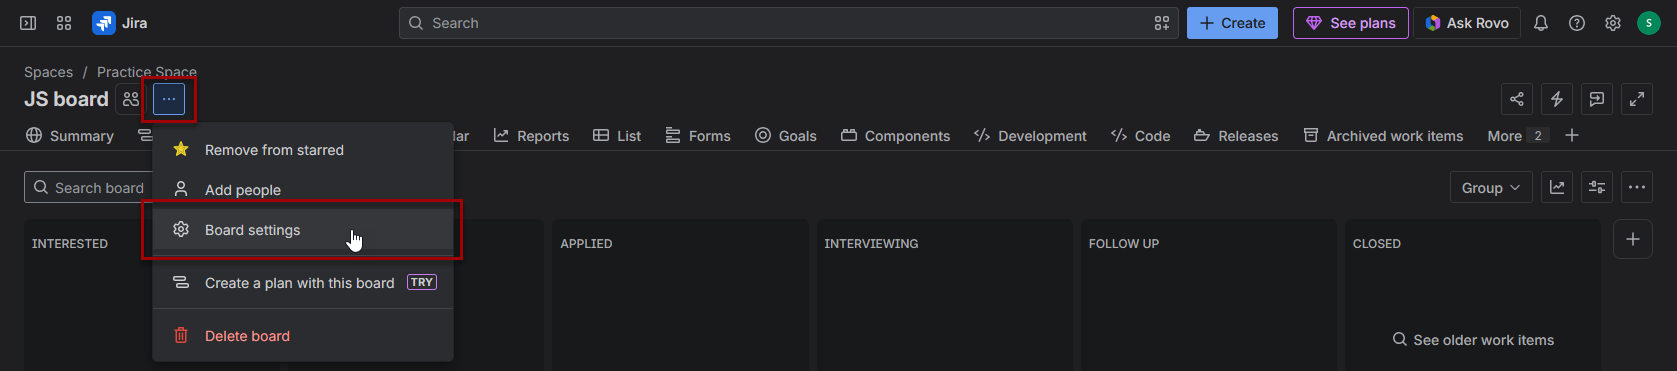
Step 2: Navigate to the board settings
- From the board page, click on the 3 dots next to the board name to open the options
- Click on board settings
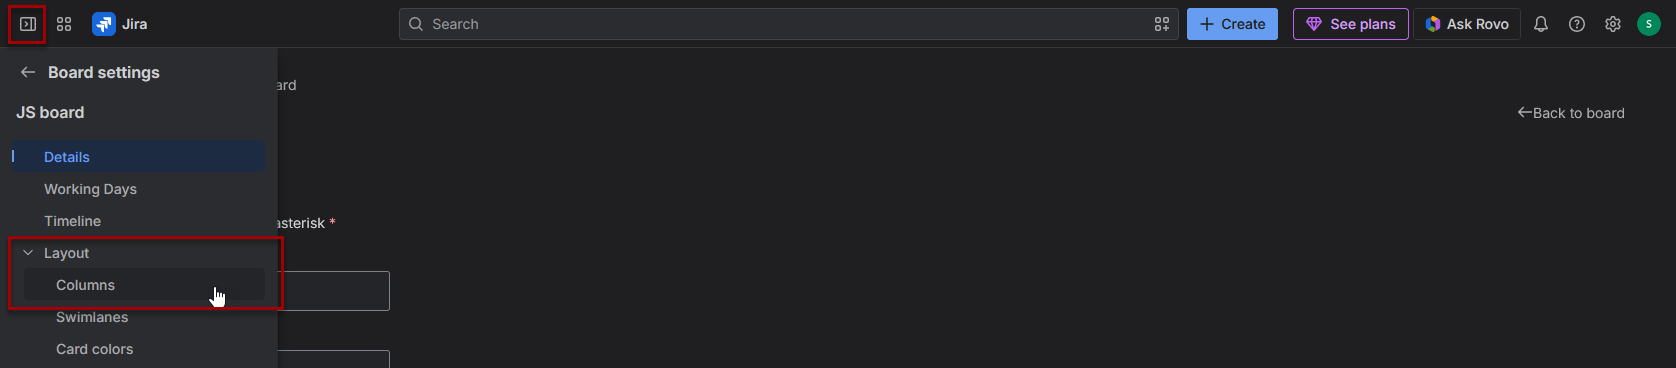
Step 3: Navigate to columns & statuses
- Expand the sidebar, if not already expanded, by clicking the arrow icon on the very top left, or just hover over the icon to access the side navigation menu
- Click on layout to open the layout options
- Click on columns
Step 4: Customize and Map the Board Columns
From here, scroll down to the map statuses to columns section where you should see a layout of columns, and on the left, a column of unmapped statuses.
As a reminder, these are the workflow columns I’m using for this project, if you’re following along:
Interested → Preparing → Applied → Interviewing → Waiting → Follow Up → Closed
Here’s how I like to organize these columns:
Remove Unneeded Columns
- For any columns that are unneeded for this board, click on the trash can icon and confirm you want to delete it
- Leave any columns that align with the workflow statuses (e.g., follow up and closed)
- If backlog is in the Kanban backlog column, click on it and drag it into the unmapped statuses column.
- If you unintentionally delete a status, it can easily be added back following the steps below.
- Note: The done column cannot be deleted until the closed column is added and mapped.
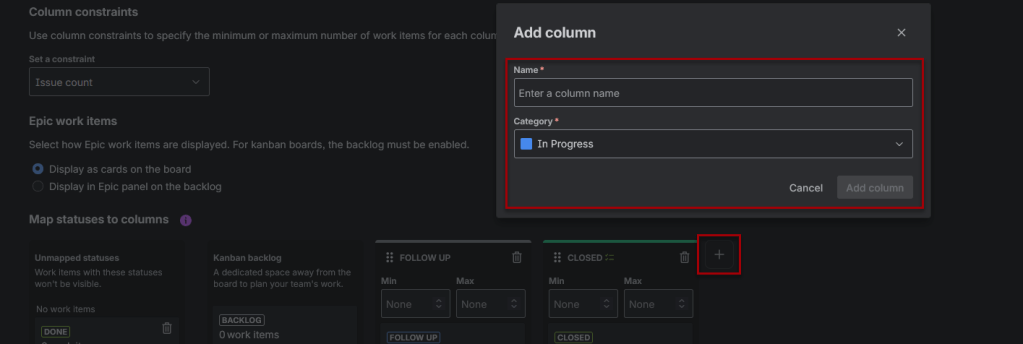
Create Columns
- Add columns for any additional statuses needed (e.g., interested, preparing, applied, interviewing, waiting)
- Click on the + to the right of the columns
- Enter the column name
- Select the appropriate category
- To do: interested
- In progress: preparing, applied, interviewing, waiting, follow up
- Done: closed
- Click on add column
Re-Order Columns
- If the columns aren’t in the correct order, click on a column until the pointer changes to a hand, then click and drag the column to the correct location.
- Repeat this until all the columns are in the same order as the workflow.
Map Statuses
- Ensure every column has the correct status mapped, meaning below the min/max fields, there’s a box with a status name, number of work items, and a “set resolution” checkbox.
- If any column is missing its status, simply locate the correct status from the unmapped statuses column, click on it, and drag it to the correct column.
- If you are using the templates status, click on templates and drag it into the Kanban backlog column.
- This will allow for story templates to be available, but stored separately from the Kanban board.
Final Check
Ensure that everything looks correct:
- Delete the unneeded done column
- Kanban backlog contains the templates status (and backlog status has been removed)
- The columns are in the correct order: Interested → Preparing → Applied → Interviewing → Waiting → Follow Up → Closed
- Each column contains the correct status
Step 5: Navigate back to your space
- Click on the Jira logo to start from the For You page
- Expand the sidebar, if not already expanded, by clicking the arrow icon on the very top left, or just hover over the icon to access the side navigation menu
- Click on Spaces then click on the space you want to view (e.g., Job Search)
Step 6: Add backlog tab (for template storage)
If you’re using the template storage status, you’ll want to add a link to the backlog for easy access.
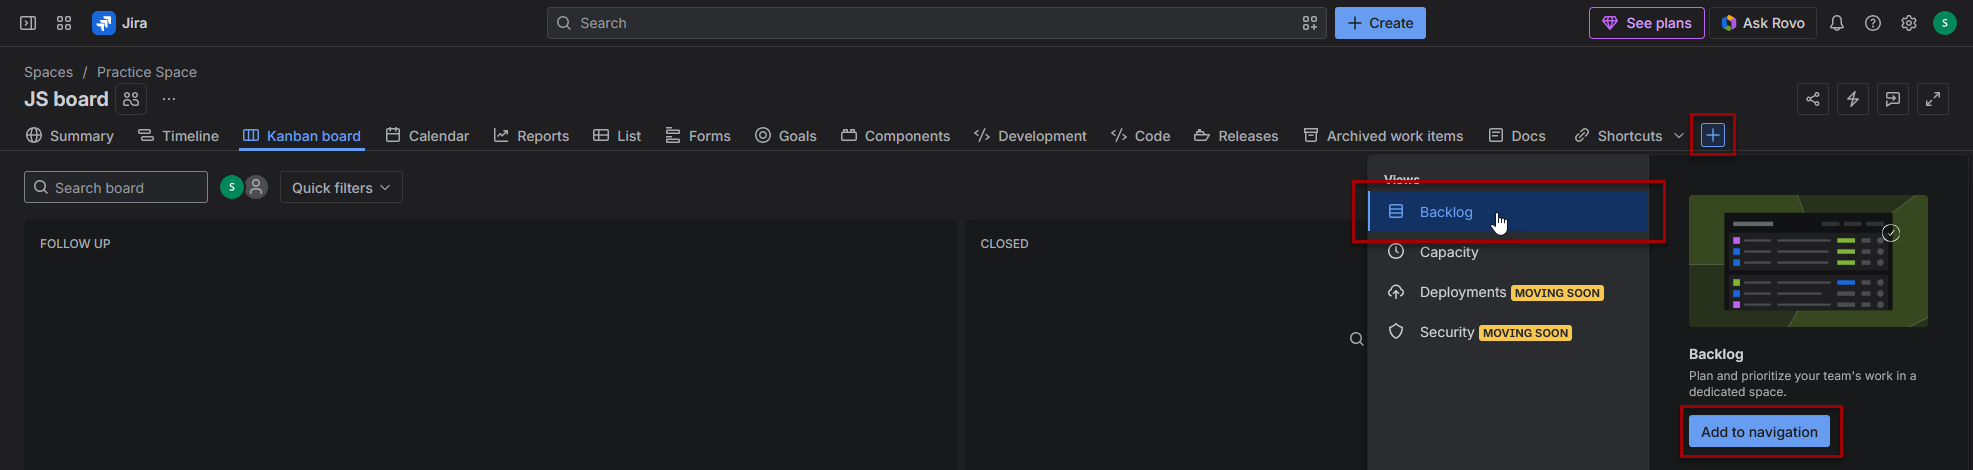
- On the right side of the row of tabs above the Kanban board, click on the + sign
- Click on backlog
- Click on add to navigation
- A backlog tab should now be visible on the row of tabs
Quick Cleanup Tip
While you’re here – if there are any tabs you don’t want in this row, simply hover over the icon for the item, click the 3 dots, and click remove. If you decide you want that tab back later, it can be added back the same way the backlog was added – by clicking the + sign. These tabs can also be dragged to rearrange their location.

Your board is now set up!
After completing these steps, your Kanban board should have all the workflow columns you need to stay organized. If anything needs changing, it’s easy to make adjustments so this board works more efficiently for you.
Next Step
If you’re following my How to Build a Job Search Tracker in Jira guide, here’s the next step:
How to Create a Template Story in Jira
Learn how to create a reusable template Story in Jira, store it safely in the Kanban backlog, and clone it whenever you add a new job opportunity. This guide also explains how to organize job details, contacts, documents, and comments into one complete record.
Additional Tips
Helpful Tip: Map the Status Before Testing the Board
After adding a column, make sure its matching status appears inside it before returning to the board. A column without a mapped status cannot display work items.
Helpful Tip: Keep One Status Per Column When Possible
Jira allows multiple statuses to be mapped to one column, but a one-to-one setup is easier to understand and troubleshoot for this project.
For example: Interested column = Interested status
This makes it immediately clear where every Story belongs.
Helpful Tip: Test with a Temporary Story
After completing the mappings, create a temporary Story and move it across the board. Confirm that:
- It begins in the expected first column
- Each move updates its status correctly
- No unexpected statuses appear
- It can reach the final Closed column
- A cloned template begins in Interested
Delete the test Story after everything works as expected.
Common Mistake: Renaming Columns Without Mapping Statuses
Renaming a column changes only its visible heading. It does not replace the underlying Jira status.
Always review the status label inside each column after renaming or creating columns.
Common Mistake: Missing Workflow Statuses
If Interested, Preparing, or another expected status is missing from the board settings, the correct workflow may not be assigned to the board’s work item type—or recent workflow changes may not have been saved.
Verify the workflow before trying to recreate the missing statuses from the board settings.
Common Mistake: Mapping Templates to a Visible Column
A visible Templates column can clutter the board and increase the chance of accidentally editing or moving the reusable Story.
Mapping Templates to the Kanban backlog keeps it accessible while clearly separating it from active work.
Version Differences
This tutorial uses Jira Cloud with a Company-managed Kanban board. Atlassian periodically updates Jira’s terminology, navigation, and board settings, so your interface may look slightly different.
Team-managed spaces use a different workflow and board-customization process and will not follow these exact steps.
Related Posts

How to Customize the Details Section of a Jira Story
Learn how to customize the Details section of a Jira Story so the fields you actually need are easy to see and edit. This guide walks through creating custom fields, updating the Story layout, controlling what appears in the details section, and troubleshooting missing fields in a Company-managed Jira space.

How I’m Actually Using My Jira Job Tracker
See how I’m actually using my Jira Job Tracker to save potential jobs, clone a template Story, record listing details, preserve job descriptions, and move opportunities through a flexible Kanban workflow. This practical walkthrough shows that job tracking can be simple, useful, and easy to adapt.

3 Job Opportunity Templates to Organize Your Job Search
Choose from three reusable job-opportunity templates designed to organize applications, company research, contacts, interviews, documents, follow-ups, and outcomes. Start with a minimalist, standard, or maximalist version, then copy, paste, and customize it for Jira, OneNote, Notion, or another job-tracking system.
Stay Updated
There are two easy ways to get notified when new tutorials are published:
Subscribe on YouTube for new video tutorials: @SimpleSoftwareTutorials
or enter your email below to receive new blog posts directly in your inbox:

