
Creating a Jira space does not always mean your account has been added to that space’s People list with the role you need. You may be able to create the space or configure its board while still discovering that certain work-item actions—such as deleting a test Story—are unavailable.
In this tutorial, I’ll show you how to check the current users in a Company-managed Jira space and add yourself as an Administrator. This is especially useful when you created and manage the Jira site yourself, are building a personal project, or are currently the space’s only user.
If your Jira site is managed by an employer, school, client, or another organization, you may not have permission to change space membership or roles. In that case, contact your Jira or space administrator for assistance.
What You’ll Learn
In this tutorial, you’ll learn how to:
- Open the settings for a Jira space
- View the people currently added to the space
- Confirm whether your account has been added
- Add yourself to the space
- Select the Administrator role
- Understand why space membership and permissions matter
- Know when to contact a Jira administrator instead
Common Uses
Adding yourself or another person to a Jira space may be useful when:
- Setting up a personal Jira project
- Managing a space you created
- Troubleshooting a missing Delete option
- Giving a project owner administrative access
- Adding members of a small business or student team
- Bringing a new teammate into an existing space
- Adding an external collaborator with limited access
- Confirming who can access and manage the space
Requirements and Compatibility
To follow these instructions, you’ll need:
- A Jira Cloud account
- An existing Jira space
- Access to the space settings
- Permission to add people or manage space roles
This tutorial documents a Company-managed space on a Jira site that I created and administer. Jira screens, available roles, and permissions may vary based on the space type, plan, and site configuration.
Deleting a Story or another work item requires the specific Delete work items permission. Adding yourself as an Administrator resolved that issue in my environment, but role permissions can be configured differently on other Jira sites.
Video Tutorial
Watch the video below to see how to check whether you have been added to a Jira space and add yourself as an Administrator.
In the video, I demonstrate how to:
- Open the space settings
- Navigate to the People page
- Review the current users
- Add your own Jira account
- Select the Administrator role
- Confirm that your account appears in the space
Understanding How Jira Works
Access to Jira can involve several different layers:
Jira site access ↓Access to a specific space ↓Role within that space ↓Permissions granted to that role
Having access to the Jira site does not necessarily mean you have been assigned a role within every space. Likewise, being able to view or configure a board does not automatically grant every work-item permission.
For example, Jira treats deleting work items as a separate permission. A person must have the Delete work items permission in the space where the Story or Task was created.
Administrator Role
The Administrator role is generally intended for someone who owns or manages the space and needs access to its configuration.
For this project, selecting Administrator makes sense because:
- I created and manage the Jira site.
- I am configuring the entire Job Search space.
- I am currently the only user.
- I need access to the settings and actions required throughout the guide.
Board configuration requires either space-administrator or board-administrator access, although individual work-item actions may still depend on separate permissions.
Guest Collaborator Role
Guest access is designed for external collaborators who should work within a limited portion of a Jira environment. Guests must first be invited to the Jira site and then added to a specific space by a space administrator. Jira limits guests to one Jira software or business space per site.
A Guest collaborator may be appropriate for a contractor, client, partner, or another external person who needs limited access. It is not the appropriate role for the person building and administering the entire space.
Important Permission Distinction
Adding someone to the space and assigning a role determines how Jira will evaluate their access, but the role name alone does not guarantee every possible action.
For example:
- An Administrator will typically have broader configuration access.
- A regular user may be able to create or edit work.
- A user can delete Stories only when their permissions include Delete work items.
- A guest has more limited access intended for external collaboration.
For this personal setup, choosing Administrator is the most straightforward option. In an organizational environment, roles should be assigned according to the access each person genuinely needs.
Step-by-Step Instructions
The following steps will guide you through checking to see the current users in the space and adding yourself to the space. If you do not see these options or are unable to add yourself as a user, contact your Jira admin.
Step 1: Navigate to Space Settings
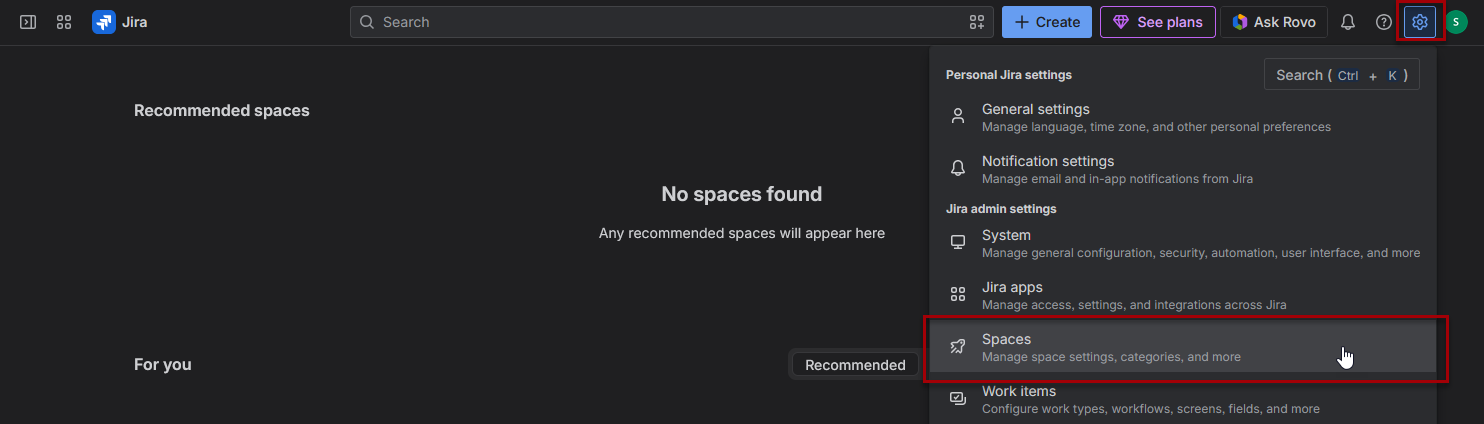
- Click on the settings icon on the top right of the page
- Click on spaces
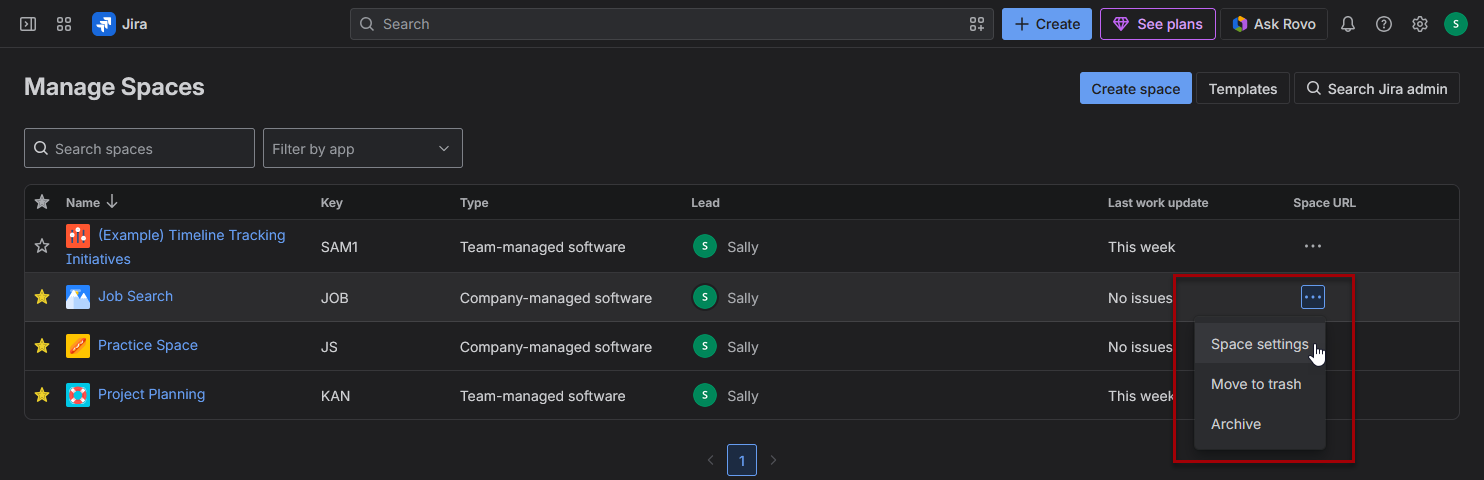
- On the manage spaces page, locate the space you want to update on the list, then click on the 3 dots in the space URL column
- Click on space settings
- This will take you to the space settings details page
Step 2: View current users
Confirm whether you’re a current user in the space:
- Click on people in the left sidebar navigation
- This will display all users who have been added to this space
- Note: You are not automatically added when creating a new space.

Step 3: Add yourself to the space
To add yourself as a user in the space:
- Click on Add people
- Name: Start typing your name into the names field and add your user account
- Role: Select administrators as the role
- Click Add 1 person

You will now appear in the current users list as an administrator

Next Step
If you’re following my How to Build a Job Search Tracker in Jira guide, here’s the next step:
Planning Your Jira Workflow Before You Build It
Learn how to plan your Jira workflow before building it. This guide walks through the thought process behind designing workflow stages, custom fields, story templates, and reusable tasks so you can create a Jira project that’s organized, scalable, and tailored to the way you work.
Additional Tips
Helpful Tip: Check the People Page Early
After creating a new space, open Space settings → People and confirm that your account appears with the appropriate role. Doing this early may prevent confusing permission problems later.
Common Mistake: Assuming the Space Creator Has Every Permission
Creating a site, space, or board does not necessarily mean every layer of access has been configured as expected.
If a menu option is missing, check:
- Whether you have been added to the space
- Which role you were assigned
- Whether that role has the required permission
Contact Your Jira Administrator When Needed
If you cannot access Space settings, open People, or select Add people, your Jira environment is probably controlled by another administrator.
Do not attempt to work around organizational access controls. Contact the Jira or space administrator and explain what you need to accomplish.
For example: I need to delete a test Story in the Marketing space, but the Delete option is unavailable. Can you confirm whether I have the Delete work items permission?
Add Other People Deliberately
For a personal space, adding yourself as Administrator is logical. For a team, avoid assigning everyone the highest level of access by default.
Consider whether each person needs to:
- Configure the space
- Create and edit work
- View and comment only
- Collaborate as an external guest
Version Differences
This tutorial uses the current Jira Cloud interface and a Company-managed space. Atlassian may change terminology, navigation, or available roles over time.
Team-managed spaces manage access through their own access and role settings, so the screens and available controls may differ.
Related Articles

How to Create a New Space in Jira
Learn how to create your first Jira space and choose the right template for your workflow. This beginner-friendly guide explains each setup option, including Team-managed versus Company-managed spaces, and shows how to organize projects for personal use, business, or team collaboration.

How to Create a Custom Workflow in Jira (Company-Managed Projects)
Learn how to create and assign a custom workflow in Jira for Company-managed projects. This guide explains workflow statuses, transitions, status categories, and how to connect your workflow to a space so it reflects the way your team actually works.

How to Add an Existing Workflow to a Jira Space
Learn how to add an existing workflow to a Company-managed Jira space and assign it to Stories, Tasks, or other work item types. This guide explains why creating a workflow is only the first step and how to make it available where you actually need to use it.

