
A reusable template Story can save time and help you capture the same information consistently for every new project or opportunity you track in Jira.
In this tutorial, I’ll show you how to create a regular Jira Story that functions as a reusable template. Rather than using a specialized template feature or marketplace app, you’ll build the Story using the sections and content you want, store it in the Kanban backlog, and clone it whenever you need a new copy.
I’ll also show you how to use comments in the cloned Story to create a chronological activity log. This makes it easy to record important updates, communication, interviews, follow-ups, and next steps without crowding the main Story description.
For my example, each cloned Story becomes a central record for one job opportunity. It can hold the job description, company research, contacts, questions, application details, attached documents, and a complete history of activity in the comments.
What You’ll Learn
In this tutorial, you’ll learn how to:
- Create a new Jira Story
- Format the Story description as a reusable template
- Organize job, company, contact, and application information
- Use consistent Story titles
- Store the original template in the Kanban backlog
- Clone the template for a new job opportunity
- Use comments to create a chronological activity log
- Attach resumes, cover letters, job descriptions, and other files
- Update and refine the template over time
Common Uses
A reusable template Story can help organize:
- Job opportunities
- Client projects
- Content ideas
- Marketing campaigns
- Customer onboarding
- Training-development projects
- Product features
- Event planning
- Research projects
- Recurring business processes
The specific prompts will vary, but the same idea applies: create one well-organized Story, preserve it as the original, and clone it whenever similar work begins.
Requirements / Compatibility
To follow this tutorial, you’ll need:
- A Jira Cloud account
- An existing Jira space
- Permission to create and clone Stories
- A workflow assigned to the Story work type
- A Kanban backlog, if you want to use the storage method shown here
This tutorial uses a Company-managed Jira space and a custom Story workflow. Your interface and available options may differ based on your Jira plan, permissions, space type, and workflow configuration.
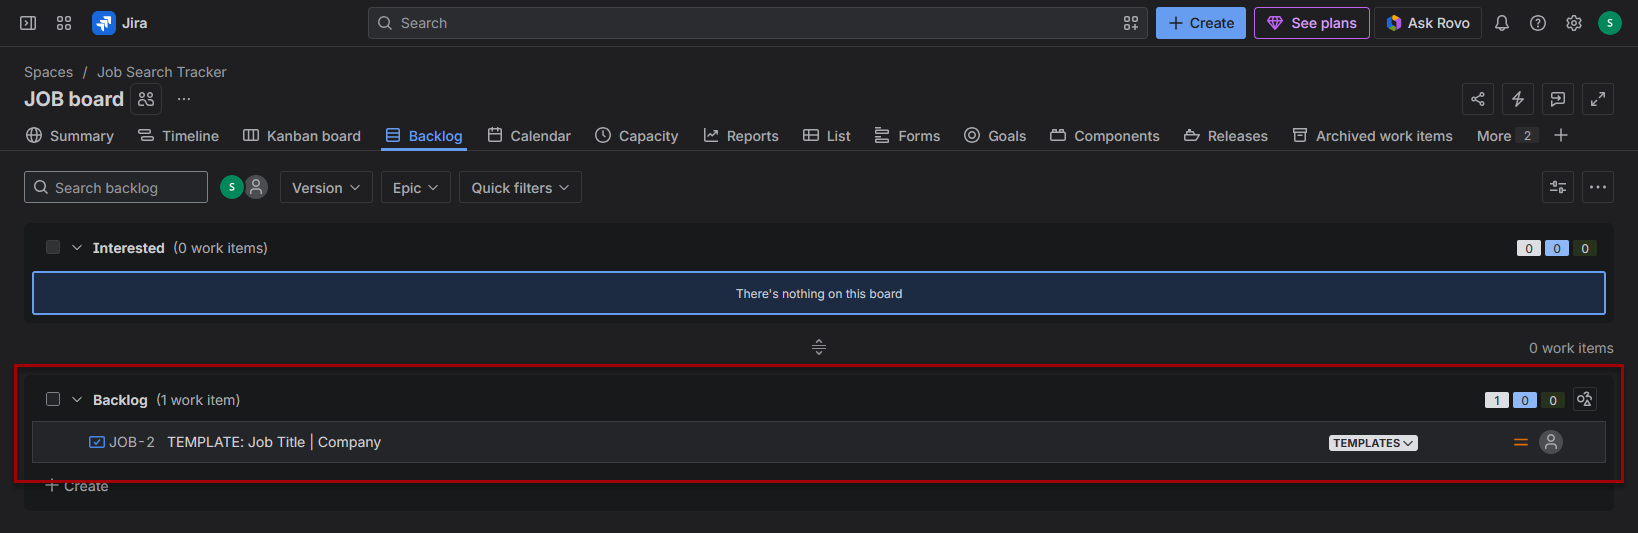
The backlog-storage method also assumes you have created a separate Templates status and mapped it to the Kanban backlog. You can still create and clone a template Story without that setup, but you’ll need to store the original somewhere else.
See how to set that up here: How to Create a Custom Workflow with Your Own Statuses in Jira
Video Tutorial
Watch the video below to see how to create, format, store, and clone a reusable template Story in Jira.
In the video, I demonstrate how to:
- Create the original Story
- Add reusable headings, prompts, lists, and tables
- Name the template clearly
- Move it into the Templates backlog
- Clone it for a new job opportunity
- Confirm that the cloned Story begins in the Interested status
Understanding How Jira Works
A Template Story Is Still a Regular Story
This method does not create a new Jira work type or formal administrative template.
Instead, you create a normal Story and intentionally use it as a master copy:
Create one reusable Story ↓Store the original safely ↓Clone it when needed ↓Update the clone with real information
Because the original remains unchanged, every clone begins with the same structure and prompts.
The Story Becomes the Main Record
For the Job Search Tracker, each Story represents one job opportunity.
The Story description holds the information you may need to reference repeatedly, such as:
- Job and company details
- Important links
- Contacts
- Why you’re interested
- How your experience aligns
- Questions
- Application tracking
- Hiring-process information
- Decision factors
- Outcome
Files such as the resume, cover letter, portfolio, job-description PDF, or assessment can be attached to the same Story.
Comments Create the Timeline
The Story description answers: What do I need to know about this opportunity?
The comments answer: What happened, and when?
Each time something changes, add a comment:
- Application submitted
- Recruiter email received
- Phone call completed
- Interview held
- Follow-up sent
- Assessment completed
- Next step confirmed
This creates a chronological activity history without repeatedly rewriting the main Story description.
A simple comment might look like:
Date:Activity type:People involved:What happened:Important details:Next steps:Follow-up date:
Your template can also include a more detailed interview-comment format for recording questions, takeaways, concerns, and follow-up actions.
Why Store the Template in the Backlog?
Keeping the original template in the Kanban backlog separates it from active job opportunities.
That reduces the chance of:
- Editing the original by mistake
- Moving it through the job-search workflow
- Confusing it with a real application
- Adding company-specific information to the master copy
When the template is cloned, the new Story follows the workflow’s initial status and appears in Interested, while the original remains safely stored in the backlog.
Step-by-Step Instructions
Below, I’ll provide an overview of setting up your template story and I’ll include what I added to my template for reference, but feel free to get creative and customize the story to your own preferences and what will be the most helpful for you.
For more template ideas, check out this post:

3 Job Opportunity Templates to Organize Your Job Search
Choose from three reusable job-opportunity templates designed to organize applications, company research, contacts, interviews, documents, follow-ups, and outcomes. Start with a minimalist, standard, or maximalist version, then copy, paste, and customize it for Jira, OneNote, Notion, or another job-tracking system.
Note: Your options and screens may vary depending on the choices made throughout this process, so your experience may look slightly different from what I’ve documented here, but the general process will be the same.
Step 1: Create a new story
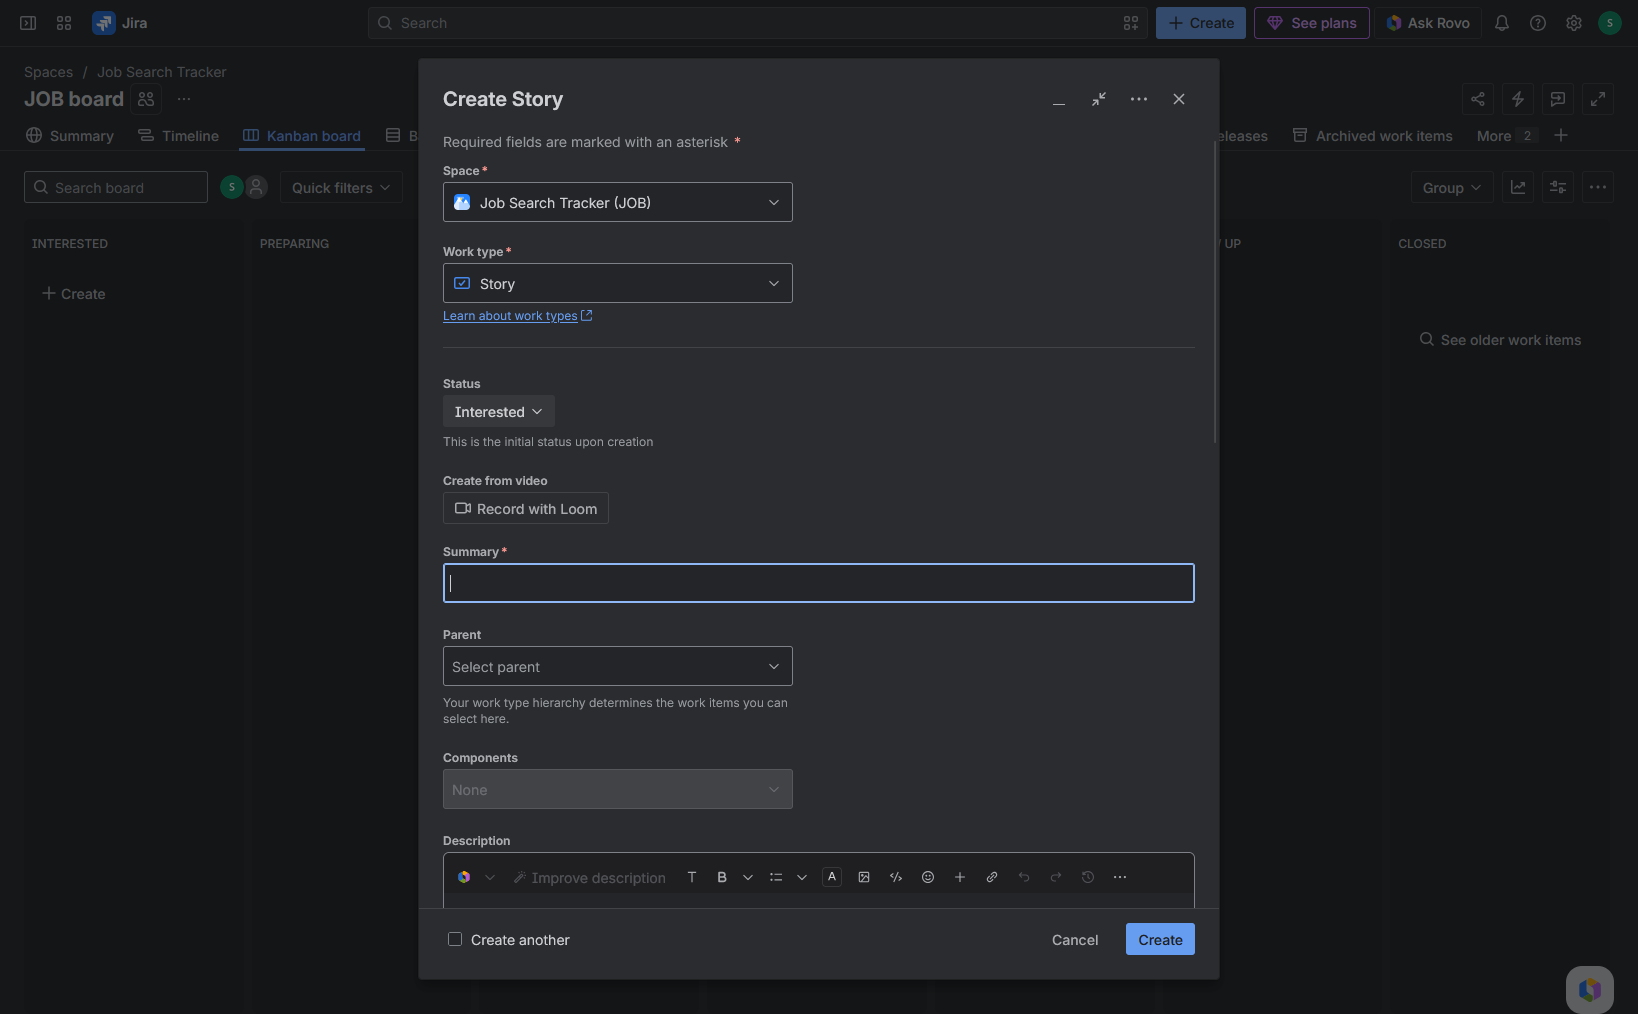
You can start from anywhere in your space, but I like to start from the Kanban board since that’s where the story will be created.
- Click on create
- This will create a new story that can be customized to your preferences

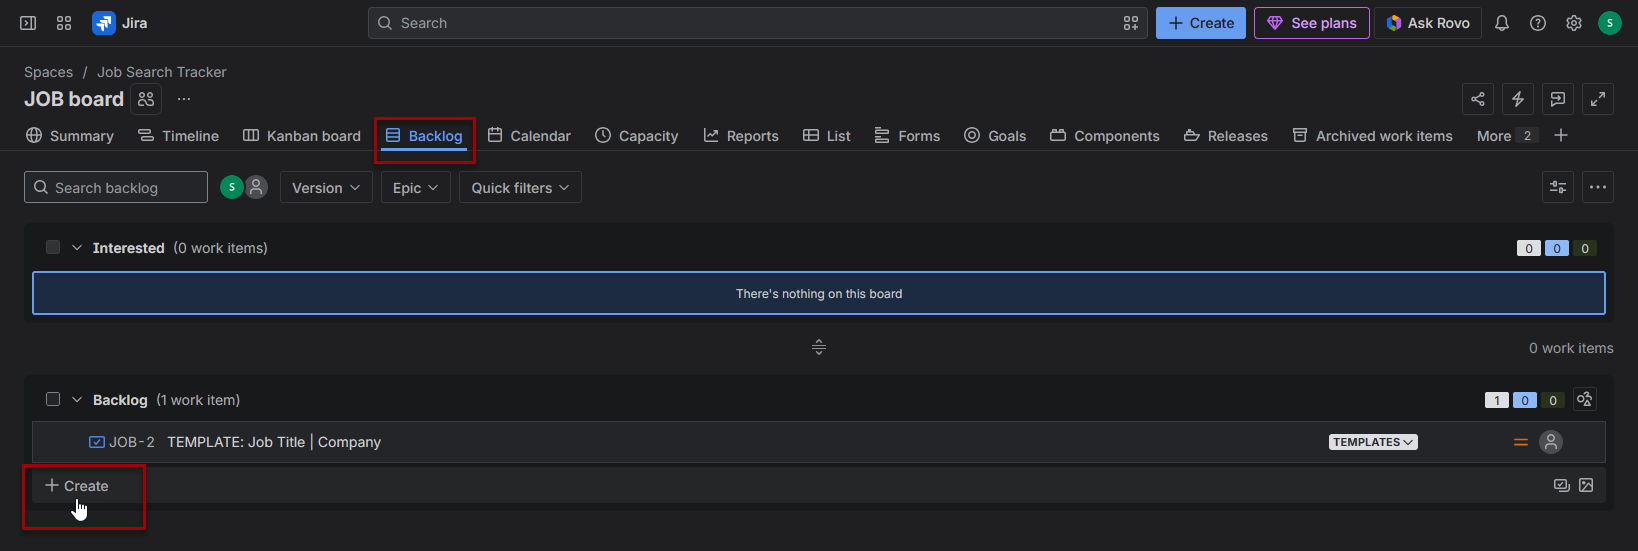
Note: Template stories can also be created from the backlog tab as shown in the screenshot below. However, creating stories by clicking the create button next to search allows you to confirm your workflow functions as expected and personally, I prefer the experience of being able to immediately edit story details in the pop-up modal as shown above.
Step 2: Build your job opportunity story template
As you use this template, you will no doubt find things that work well, things that don’t, and things that are missing. That’s the great thing about having a template – you can always edit the template to suit your needs as they change and develop, and you can also clone the template to create other templates so you have several options.
Tips:
- If at any point you want to save this template so you can work on it later, or to save it as a safeguard, click on create and it will be stored on your Kanban board, available for editing on your schedule.
- There are lots of formatting and element options available to organize your content, like headings, bullet points, divider lines, tables, and more – similar to Microsoft Word – to organize your content so that it is easy to scan and read through.
- Typing 3 hyphens (—) will automatically create a separator line.
- Typing an asterisk then space (* ) will create a bullet point.
Space
This is the space where your story will live. Ensure that the space you want this template to be stored is selected (it should be by default, but it’s always good to double check).
Work Type
The work type should be story. If you created a custom workspace and applied it to stories (as shown in How to Create a Custom Workflow with Your Own Statuses in Jira), this story will use the statuses created in that workflow.
Status
My story defaulted to interested and I will leave it using that status for now, then move it to templates status, which is in the backlog, when I’m ready to start using it.
Summary
This is essentially the title of the story, so I opted to use: TEMPLATE: Job Title | Company
This is to remind me that this story is a template, so I don’t accidentally update it, and it provides an example of how I want to format my titles so they are consistent and easily searchable.
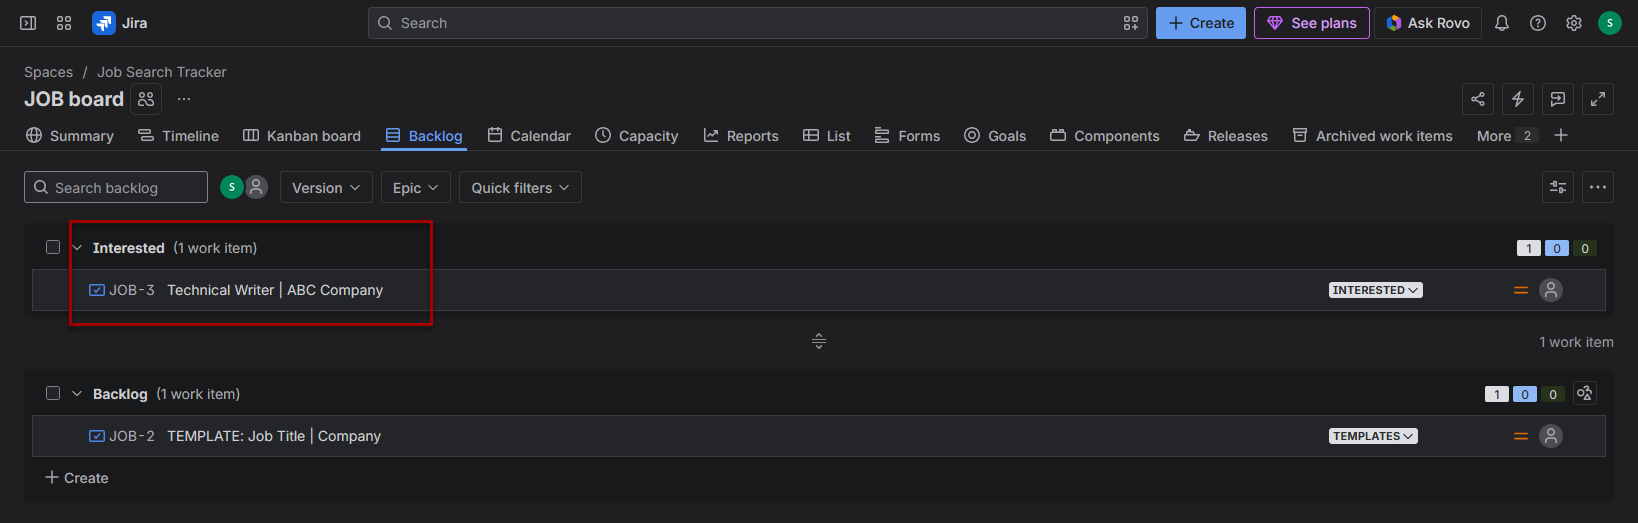
When I clone this story to create a new story for a job opportunity, I will delete template from the title and instead just include the job title and company, like Technical Writer | ABC Company.
Parent & Components
I just left these as-is – nothing selected for parent and none for components.
Description
The description is where the bulk of information will be added, such as links to the job listing and company website, contacts you work with along the way, why you’re interested, how your experience aligns, and any other important information you want to log here.
Skip to the next step
Example Template
Below is how I structured my first template. Feel free to copy and paste this to use or edit for yourself, or check out some additional templates here: 3 Job Opportunity Templates to Organize Your Job Search
Links
- Job posting link:
- Company website:
- Any other links that are relevant to this role and company
Quick Reference
Information you don’t want to get buried elsewhere:
- How I found the job:
- Application deadline:
- Referral or connection:
- Most important qualification:
- Main reason to apply:
- Biggest concern:
- Immediate next action:
Contacts
Keep track of all the people you communicate with (e.g., recruiter, hiring manager, HR, supervisor).
| Name | Title/Company | Phone | Notes | |
|---|---|---|---|---|
Job Info:
Log important information about the role:
- Title:
- Direct Supervisor: (who the role reports to)
- Department: (e.g., sales, marketing, development, IT, HR, etc.,)
- Job Function: (e.g., management, sales, IT, finance, marketing, business development)
- Job Location:
- Remote: (e.g., remote, hybrid, on-site)
- Salary Range:
- Job Type: (e.g., full time, part time, contract)
- Experience Level:
- Travel Required: (e.g., 10%, none)
- Benefits: (e.g., medical, dental, vision, pension, maternity leave, student loan assistance, tuition assistance, disability insurance, etc.,)
Job Description:
Paste job description here or as a comment.
Company Info:
Log important and relevant information about the company:
- Year Founded:
- Company Headquarters:
- Industry:
- CEO Name:
- Company size:
- Public, private, nonprofit, government, or startup:
- Parent company or subsidiaries:
- Main products or services:
- Primary customers or market:
- Major competitors:
- Company mission and values:
- Recent news or major announcements:
- Company reputation or employee themes:
- Former employees or connections who may provide insight:
Why I’m Interested
Short notes such as:
- Interesting mission
- Strong culture
- Relevant products or services
- Familiar software or industry
- Opportunity to grow
- Other personal reasons
How My Experience Aligns
Quick bullets such as:
- Relevant skills
- Similar responsibilities
- Industry experience
- Software knowledge
- Leadership or project examples
- Documentation or training experience
- Process improvement examples
- Portfolio items to mention
Questions
Things to remember before interviews.
Examples
- Remote-work expectations
- Team structure
- Manager and reporting relationship
- Role priorities
- Success measures
- Software stack
- Training and onboarding
- Growth opportunities
- Hiring timeline
- Any concerns that need clarification
Application Tracking
Log activities in the comments to create a detailed chronological timeline. Use this section for details at a quick glance.
- Date discovered:
- Application deadline:
- Date application submitted:
- Application method:
- Current status:
- Last contact date:
- Next follow-up date:
- Referral used:
- Requisition or job ID:
- Original posting source:
- Posting expiration or removal date:
Hiring Process
This is especially valuable because the process often becomes unclear after several conversations:
- Expected hiring stages
- Recruiter screen
- Hiring manager interview
- Panel or team interview
- Assessment
- Presentation
- Reference check
- Background check
- Expected decision date
- Known next step
Decision Factors
This is very useful when comparing multiple active opportunities:
- Overall interest level:
- Strongest advantages:
- Concerns or possible red flags:
- Must-have requirements met:
- Dealbreakers:
- Commute or travel expectations:
- Schedule expectations:
- Equipment or home-office support:
- Career growth:
- Stability:
- Work-life balance:
- Overall fit: (acc
A simple Pros / Concerns section may be easier to maintain than a long rating system.
| Pros | Cons |
|---|---|
Outcome
This belongs near the bottom because every opportunity will eventually conclude:
- Final outcome:
- (e.g., accepted, declined, withdrawn, rejected, canceled, no response)
- Date closed:
- Reason for decision:
- Offer details:
- Lessons learned:
- Would I apply to this company again?
- Follow-up or networking opportunity
Interview and Communication Log Templates
The following templates can be copied and pasted for each interview or to record interactions as dated comments. Comments work great for logging this information because Jira automatically preserves the chronology. It’s handy to keep this section at the end so it will be easy to navigate to when adding comments.
General Activity Template
- Date:
- Activity type:
- Application, email, phone call, follow-up, assessment, or other
- People involved:
- What was discussed:
- Important details:
- Next steps:
- Follow-up date:
Interview Activity Template
- Date and time:
- Interview type:
- People involved:
- Topics discussed:
- Questions they asked:
- Questions I asked:
- Key takeaways:
- Concerns or observations:
- Next steps:
- Follow-up due:
Step 3: Save the story & move it to the templates backlog
- Scroll down to the bottom of the description field and click create or save (depending on whether you already created the story).
- If the story does not automatically close upon saving, it can be closed by clicking the X in the top right or pressing the escape key.
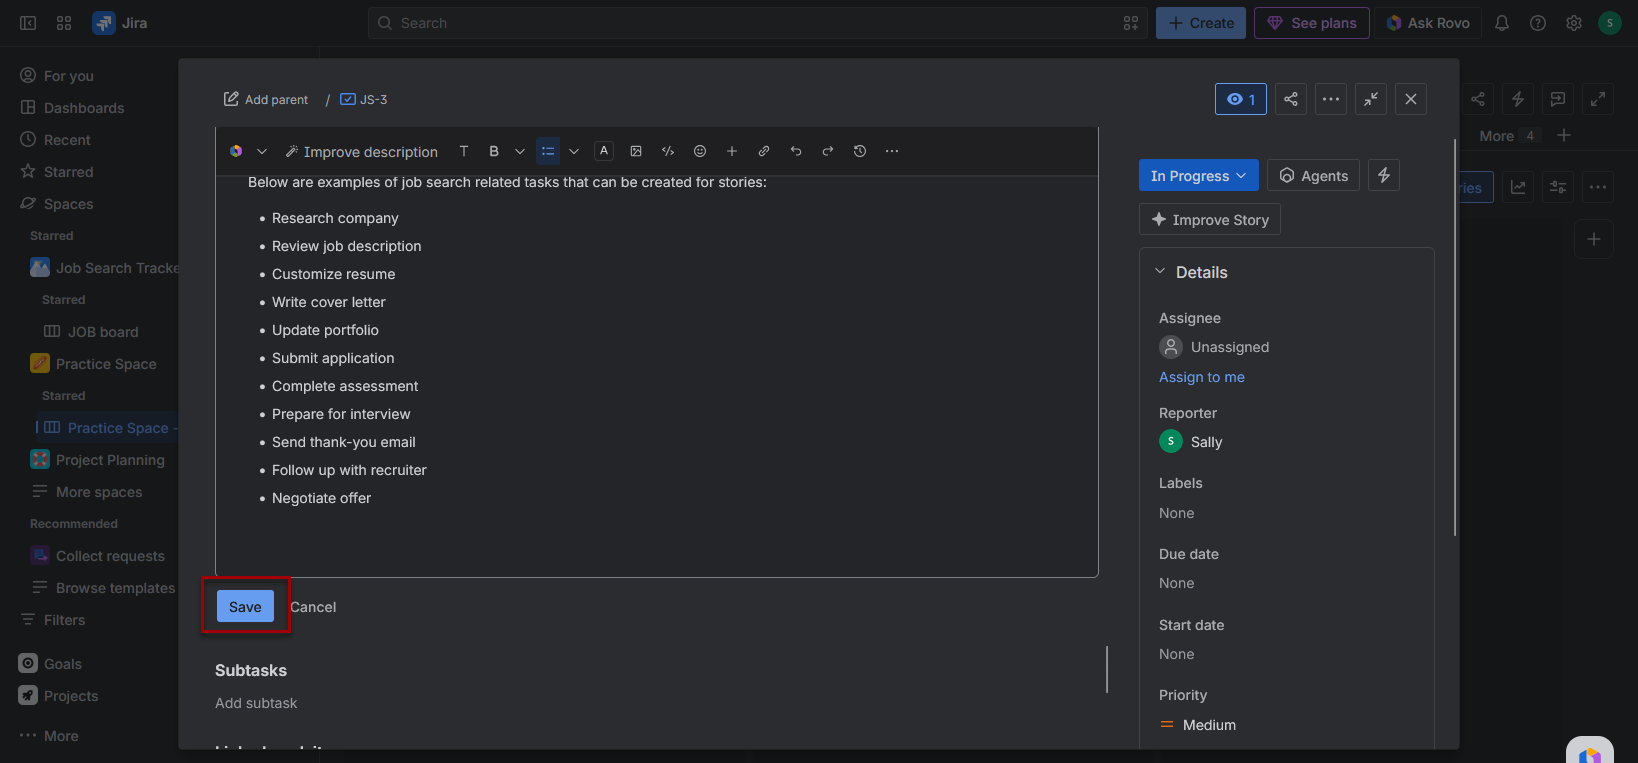
- The story should now appear in the interested column on your Kanban board.
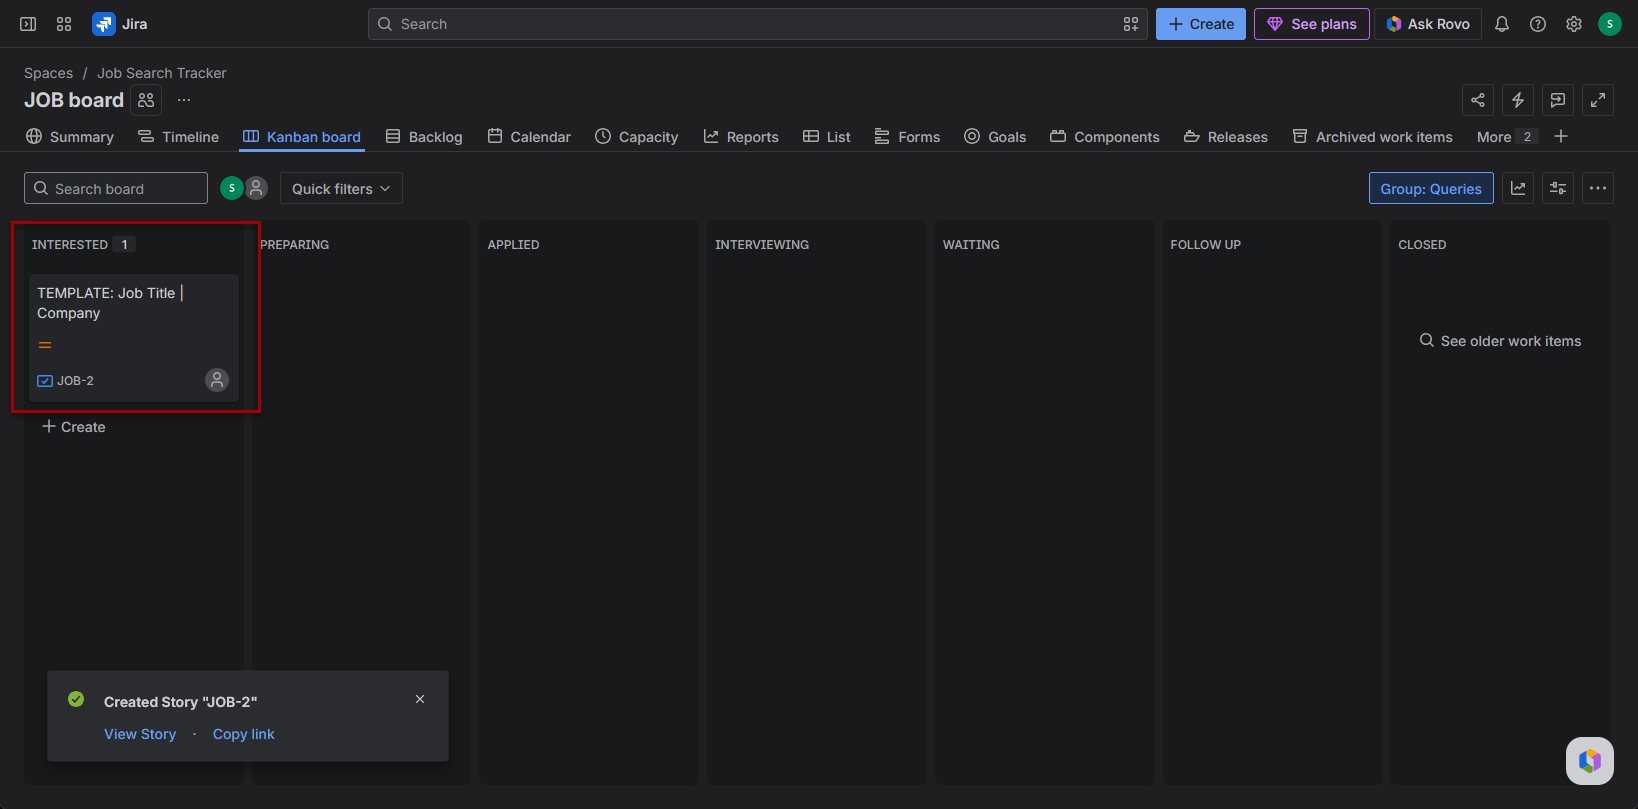
- To move your template story to the templates backlog:
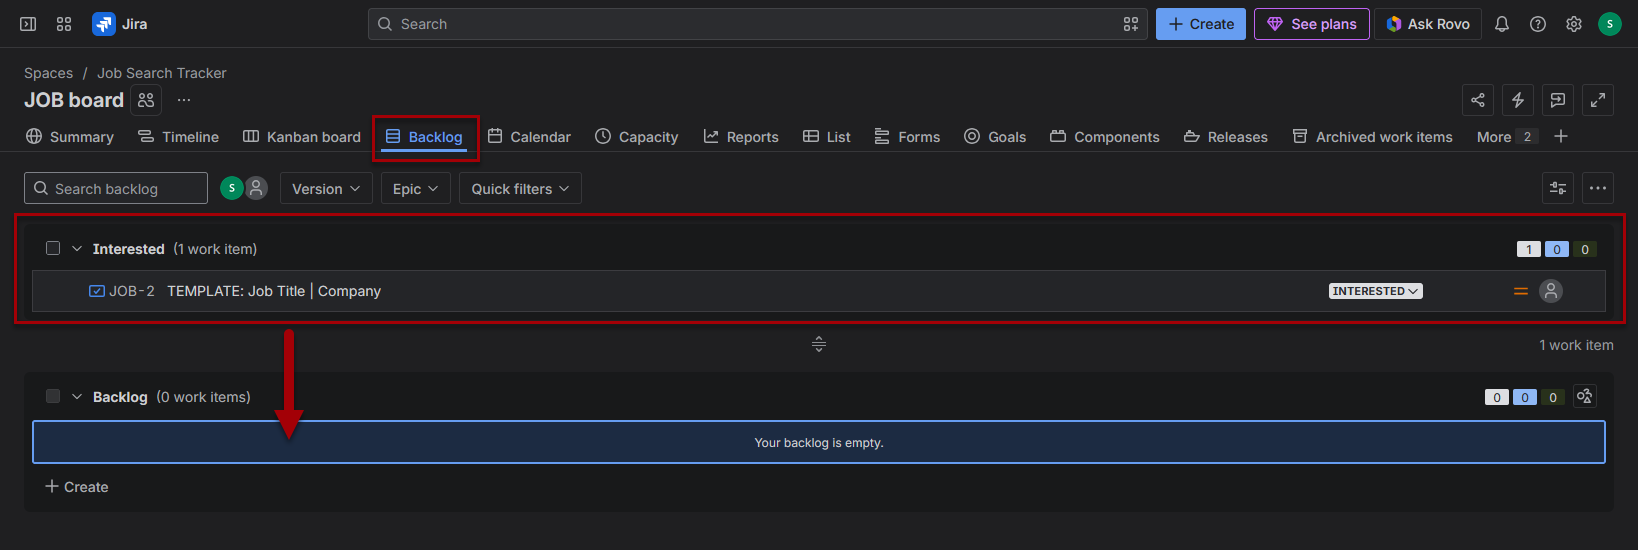
- Click on the backlog tab
- If you don’t see a backlog tab, it may either be under more or it can be added to your navigation by clicking the + sign > clicking on backlog > clicking add to navigation
- The backlog tab can be dragged and moved on the navigation bar – I like to keep it next to the Kanban board tab
- The template story should appear in the interested section
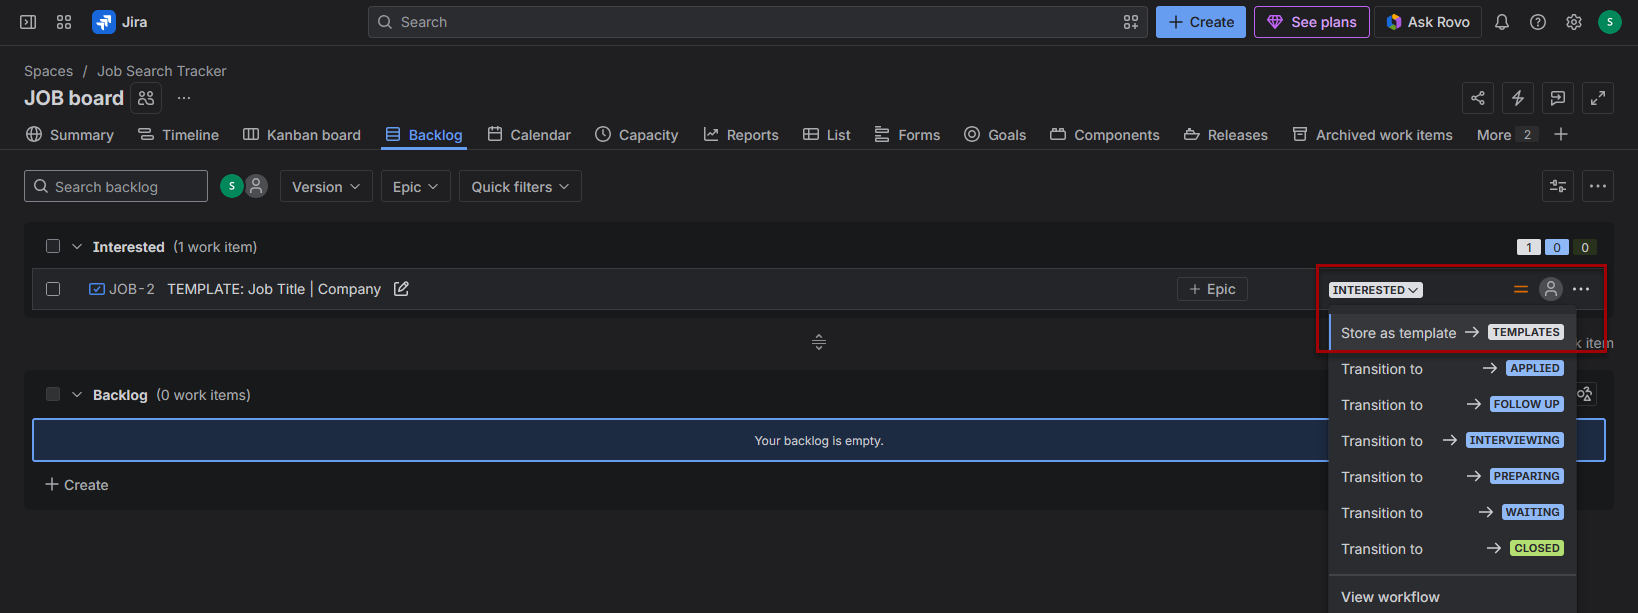
- The template story can be moved to the templates backlog 2 ways:
- Drag and drop it from interested to backlog
- Click on the interested tag on the right side of the story and select store as template –> templates (if that’s how you set up your workflow)
- Click on the backlog tab
Step 4: Clone your template story to log a job opportunity
Now that your template story is created, you can now easily clone it to test it and log new job opportunities!
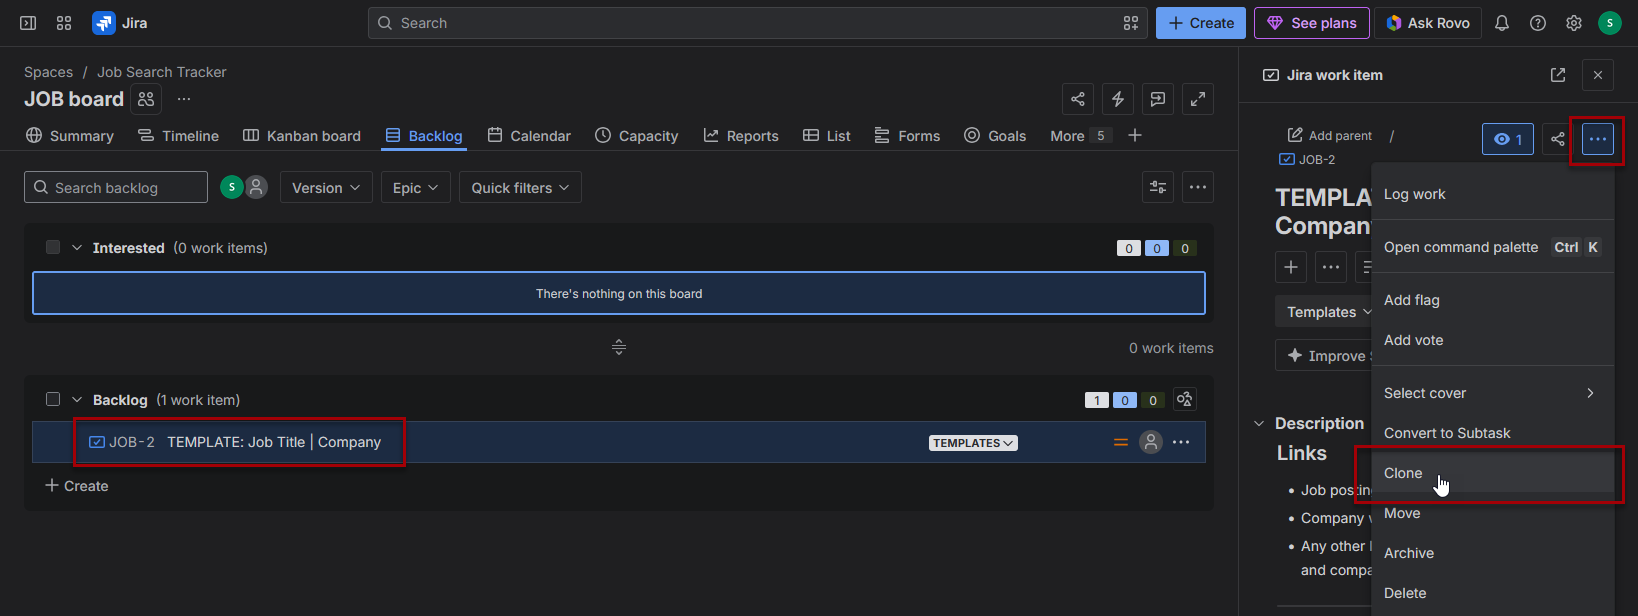
- If you’re not already at the backlog, navigate to the backlog
- Click on the story title to open the story on the right side of the screen
- Click on the 3 dots to open the actions menu
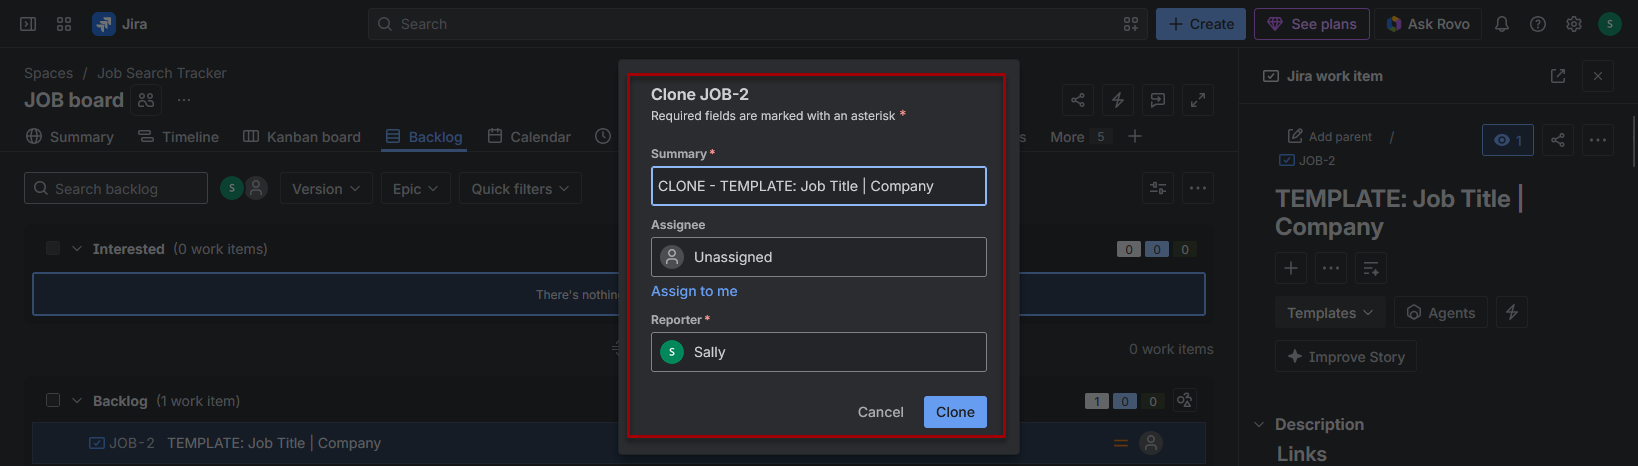
- Click on clone
- Edit the summary (title) to your chosen job title and company format (e.g., Technical Writer | ABC Company)
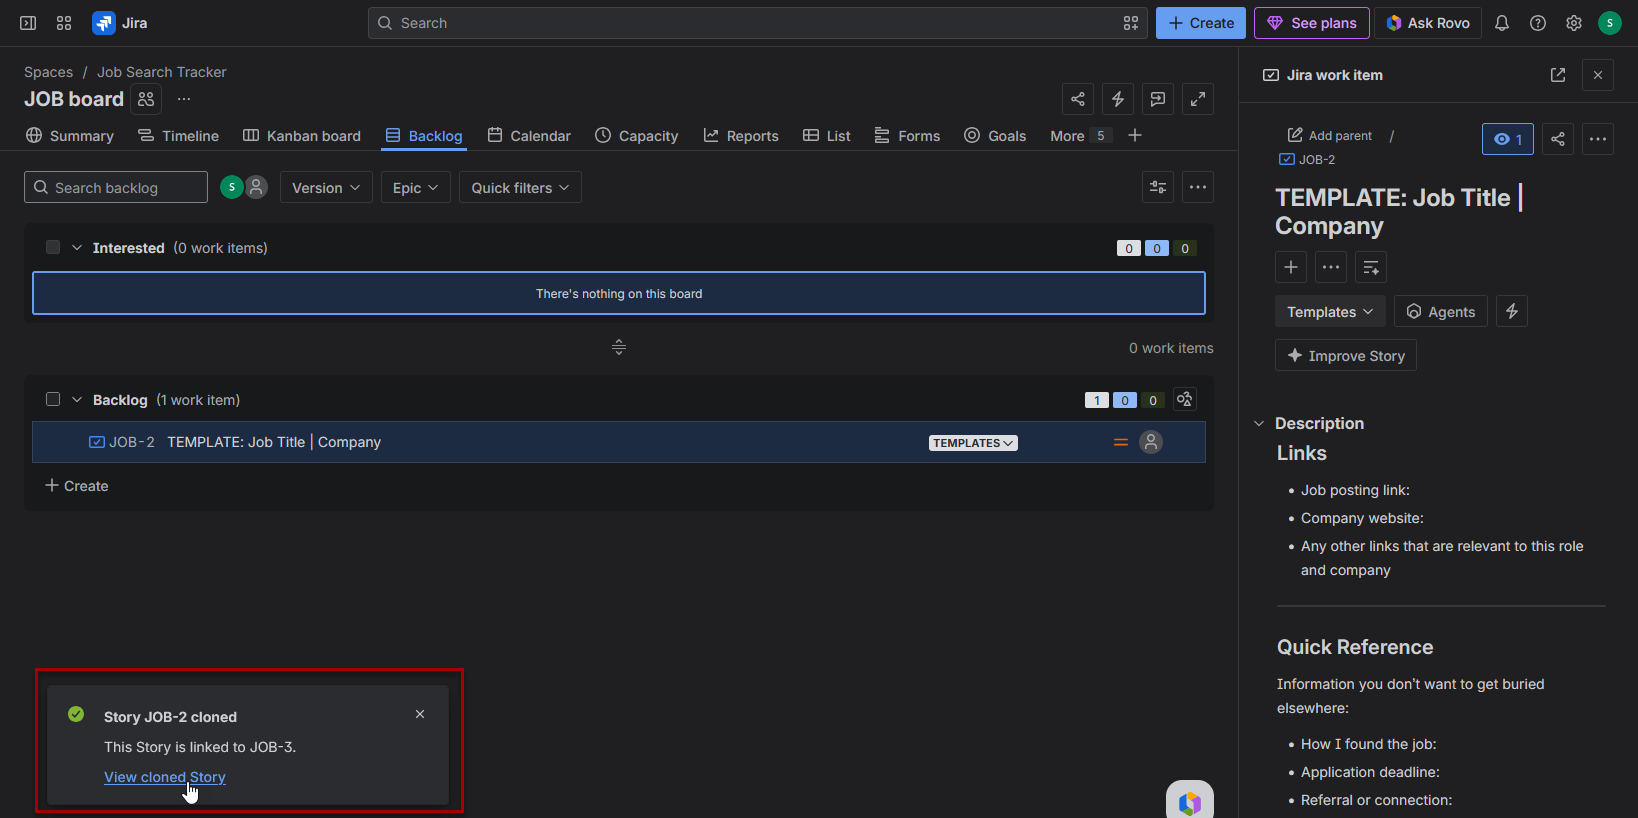
- Click clone
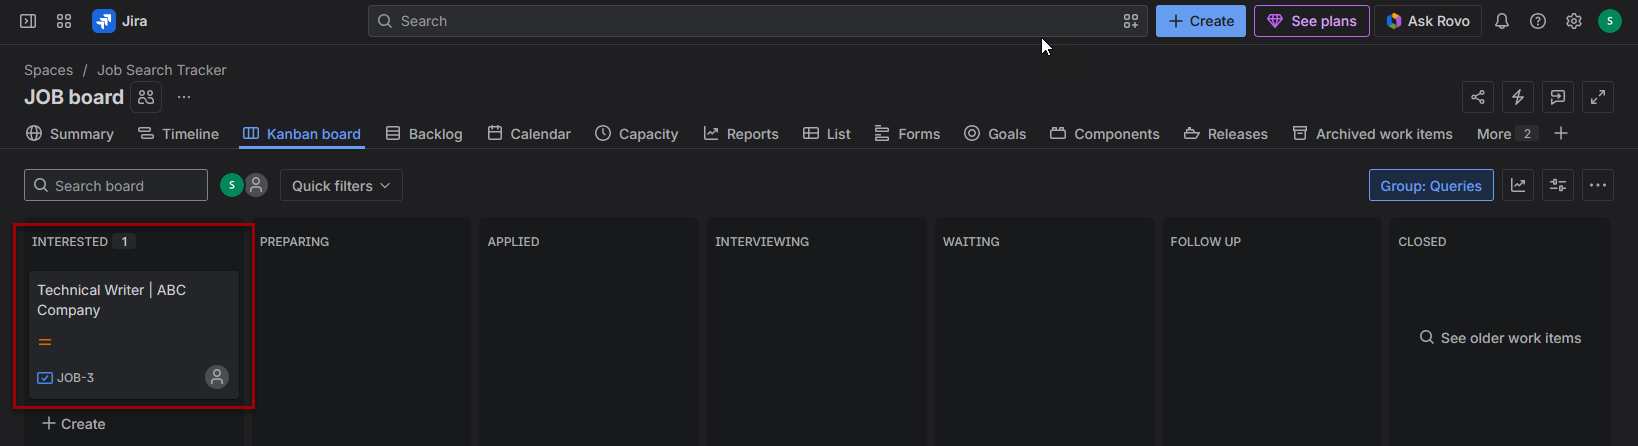
A confirmation message will appear with a link to the new story and the story will also appear in the interested sections in the backlog (might need to refresh the page) and on the Kanban board.
Now you can click the story to open it, add all the relevant details, and log your activities in the story comments.
Step 5: Add Comments to Create an Activity Log
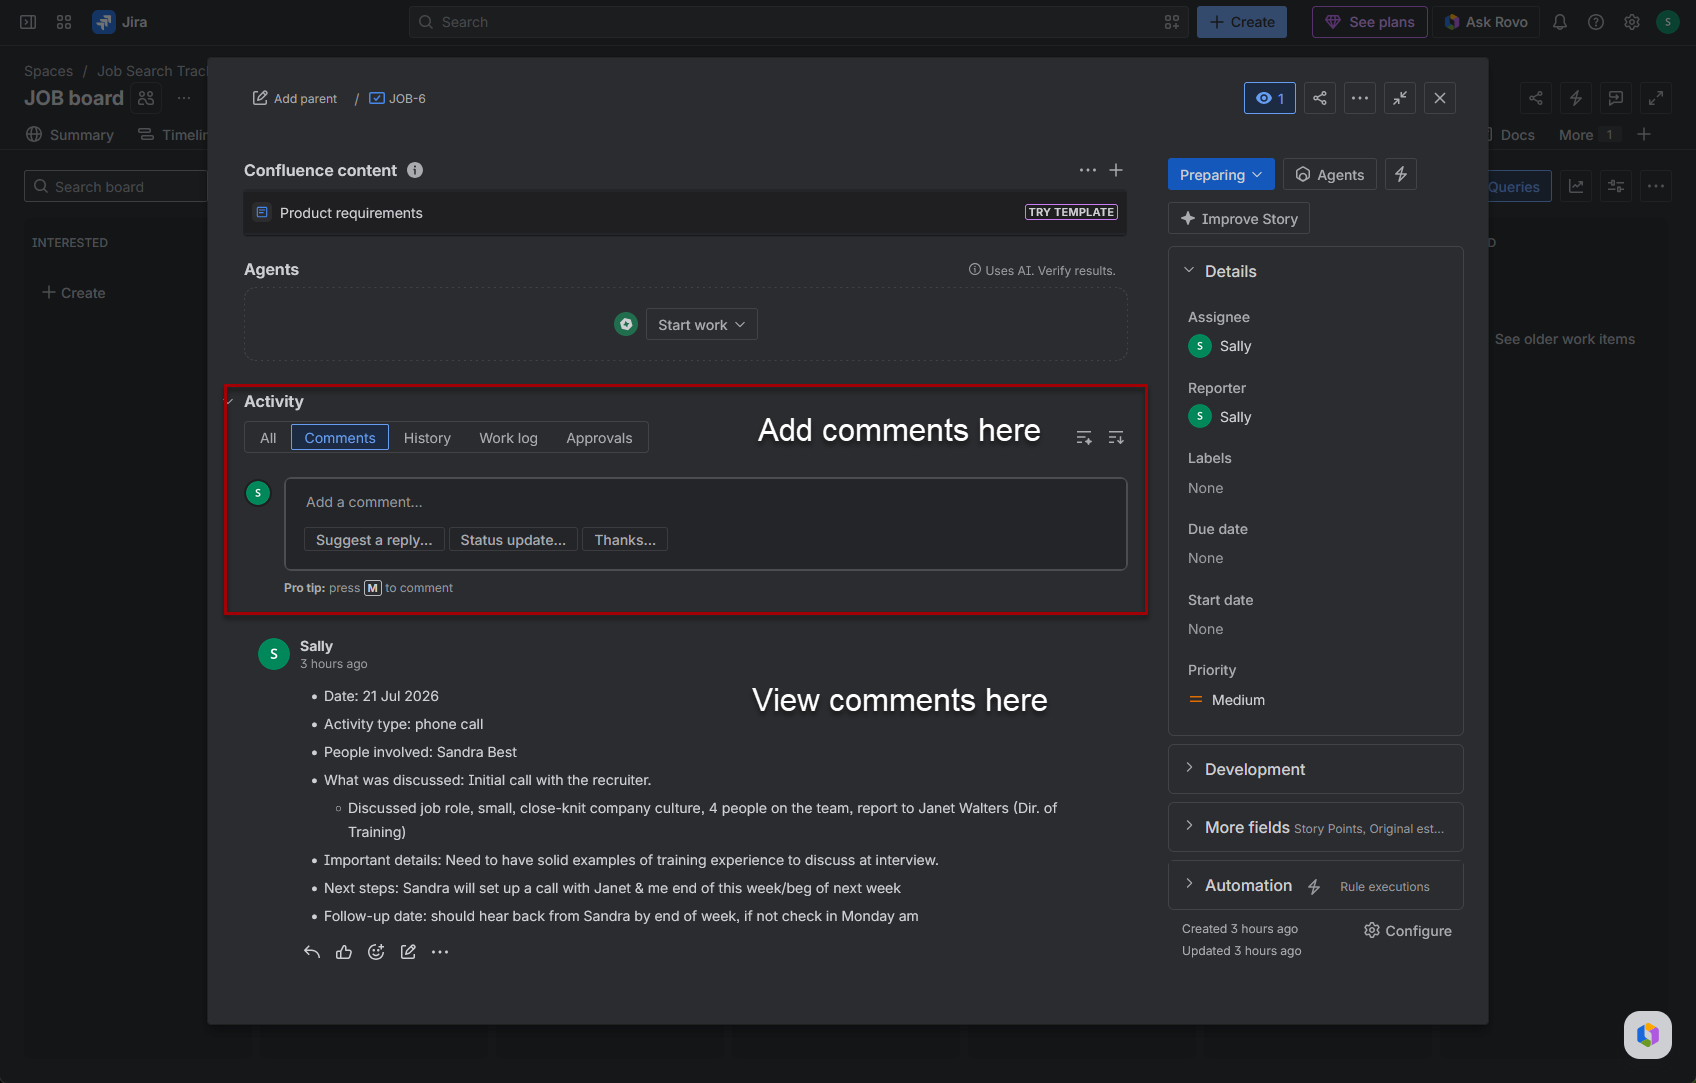
Once you begin using the cloned Story, comments can be used to record activities and communication related to the job opportunity.
The Story description serves as the main source of information about the job, while comments create a chronological record of what happened and when.
You can use comments to document:
- Submitting the application
- Receiving an email or phone call
- Communicating with a recruiter or hiring manager
- Completing an interview
- Sending a thank-you or follow-up message
- Completing an assessment
- Confirming next steps
To add a comment:
- Open the Story.
- Scroll down to the activity or comments section.
- Click in the comment field.
- Enter the details you want to record.
- Tip: Include a template for comments in the story description to just copy and paste
- Click Save or Add.
A simple comment might look like:
July 21, 2026 — Application submitted
Applied through the company website using the Technical Writer resume and customized cover letter. Confirmation email received. Follow up in one week if no response.
Example comment template:
- Date:
- Activity type:
- People involved:
- What happened:
- Important details:
- Next steps:
- Follow-up date:
Continue adding comments as the opportunity progresses. Because Jira displays the activity chronologically, the comments create an easy-to-review timeline while the Story description remains the central location for current job details, contacts, documents, and next steps.
Additional Tips
Start with the Standard Template
A very detailed template can be useful as a reference, but it may feel overwhelming during everyday use.
For most users, I recommend beginning with the Standard version and adding or removing sections after using it for several opportunities.
Make the Template Name Obvious
Use a title that clearly identifies the original, such as:
TEMPLATE: Job Title | Company
After cloning it, remove “TEMPLATE” and replace the placeholders:
Technical Writer | ABC Company
This reduces the chance of accidentally treating the master copy as a real job opportunity.
Keep Current Information in the Description
Use the description for information you want to see quickly, such as:
- Current next step
- Last contact date
- Follow-up date
- Most important concern
- Documents submitted
Use comments for the detailed history.
Save the Job Description
Job postings are frequently edited or removed. Paste the full description into the Story or attach a PDF copy so you still have access to the exact requirements later.
Attach the Submitted Versions
Attach the specific resume and cover letter used for each opportunity—not just your current master documents. This preserves an accurate record of what the employer received.
Common Mistake: Editing the Original Template
Always confirm whether you opened the original Story or a clone before adding job-specific information.
Keeping the original in the backlog and using TEMPLATE in the summary makes this much easier to avoid.
Common Mistake: Moving the Template Through the Workflow
The original template is a reusable utility item, not an active opportunity. It should remain in the Templates backlog rather than moving through Preparing, Applied, Interviewing, or Closed.
Refine the Template Over Time
You will probably discover that:
- Some prompts are never used
- Certain information is missing
- Some sections belong in comments
- Some fields are more useful than expected
Update the original template as your process develops. Future clones will then use the improved structure.
Version Differences
This tutorial uses Jira Cloud. Atlassian may periodically change terminology, menu locations, cloning options, or the Story interface.
Team-managed spaces may organize workflow and backlog settings differently, but the broader template method—create a reusable Story and clone it—can still be adapted.
Related Posts

How to Customize the Details Section of a Jira Story
Learn how to customize the Details section of a Jira Story so the fields you actually need are easy to see and edit. This guide walks through creating custom fields, updating the Story layout, controlling what appears in the details section, and troubleshooting missing fields in a Company-managed Jira space.

How I’m Actually Using My Jira Job Tracker
See how I’m actually using my Jira Job Tracker to save potential jobs, clone a template Story, record listing details, preserve job descriptions, and move opportunities through a flexible Kanban workflow. This practical walkthrough shows that job tracking can be simple, useful, and easy to adapt.
3 Job Opportunity Templates to Organize Your Job Search
Choose from three reusable job-opportunity templates designed to organize applications, company research, contacts, interviews, documents, follow-ups, and outcomes. Start with a minimalist, standard, or maximalist version, then copy, paste, and customize it for Jira, OneNote, Notion, or another job-tracking system.
Stay Updated
There are two easy ways to get notified when new tutorials are published:
Subscribe on YouTube for new video tutorials: @SimpleSoftwareTutorials
or enter your email below to receive new blog posts directly in your inbox:

