

Sometimes you know what you want to say in an email, but right now isn’t the best time to send it. Maybe you’re working after hours, writing a birthday message ahead of time, communicating with someone in another time zone, or preparing a reminder that needs to arrive on a specific day.
Gmail’s Schedule send feature lets you write an email now and choose a future date and time for it to be sent automatically. You can also review your scheduled messages before they go out, cancel a scheduled email if your plans change, and reschedule it for a different time.
In this tutorial, I’ll show you how to schedule, view, cancel, and reschedule emails using Gmail on both a computer and the mobile app. I’ll also cover Gmail’s scheduling limits, share practical reasons for using scheduled email, and provide a few helpful tips for choosing dates, times, and time zones.
Common Uses
- Birthday or anniversary messages – write them ahead of time and schedule them for the right day.
- Work emails after hours – finish a message in the evening but schedule it to arrive during normal business hours.
- Early-morning reminders – prepare a reminder in advance and have it arrive when the recipient is more likely to see it.
- Follow-up emails – schedule a check-in after a meeting, interview, sales call, or project milestone.
- Deadline reminders – send reminders before due dates for payments, forms, registrations, or assignments.
- Client or customer communications – prepare routine messages in batches and schedule them for appropriate times.
- Time zone differences – schedule an email so it arrives during the recipient’s working hours rather than overnight.
- Vacation preparation – write important messages before leaving and schedule them to go out while you’re away.
- Event reminders – schedule messages before appointments, meetings, parties, webinars, or other events.
- School or family reminders – send messages about pickups, activities, permission forms, or upcoming plans at the right time.
- Recurring-but-not-automatic communication – prepare several messages in advance when you don’t need a true recurring automation.
- Job-search follow-ups – schedule a thank-you or follow-up message for a specific date after an interview or application.
- Invoices or payment reminders – prepare messages in advance and schedule them near a due date.
- Newsletter or announcement timing – send a message when recipients are more likely to read it.
- Avoiding accidental late-night sends – write while something is fresh in your mind, but delay delivery until a more appropriate hour.
Video Tutorial
Important Limits to Remember
You can have up to 100 scheduled emails sitting in your Gmail Scheduled Folder at any given time.
Once you reach this 100-email threshold, you cannot schedule any more messages until some of your pending emails are sent or canceled. For example, if 5 of your scheduled emails go out, you will free up space to schedule 5 new ones.
Step-by-Step Instructions – Computer
Step 1: Write the email
Open Gmail and click Compose to write your message. Finish writing your email and be sure to include any attachments, but do not click send.
Note: Scheduled emails cannot be edited while in scheduled status – they will need to be canceled, edited, then rescheduled.
Step 2: Schedule send
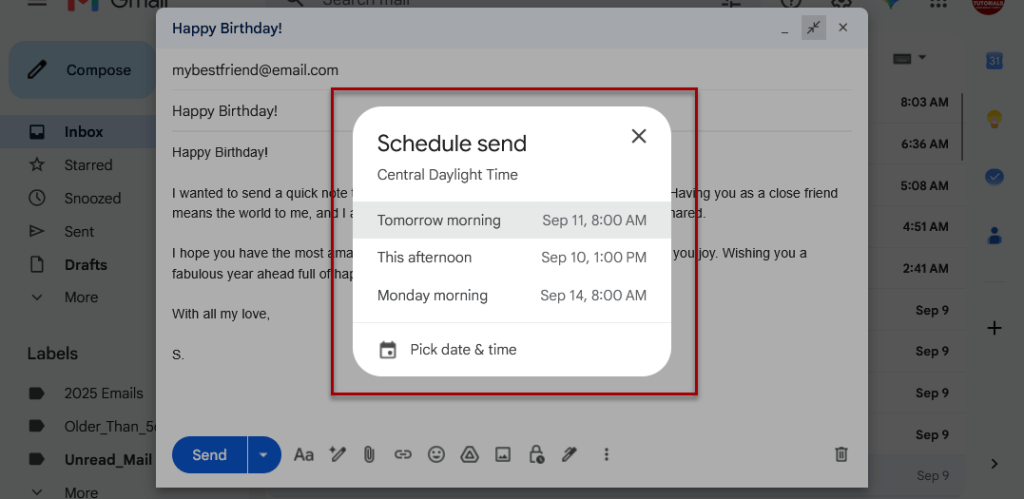
Click the arrow next to the send button then select Schedule send.

Step 3: Select the send date and time
Choose a default send time or click pick date & time to choose a specific date and time to send the email. Click Schedule send.
View in the Scheduled Folder
All scheduled emails can be found in Scheduled on the left-side menu in Gmail. The send date will appear on the right side.

Canceling or changing the scheduled send time
To cancel or edit a scheduled email in Gmail, you need to find it in your Scheduled folder before its set delivery time.
- Click Scheduled in the left-hand menu panel.
- Open the email you want to change.
- Click Cancel send.
- The email will open back up as a draft.
- You can now edit the text, update recipients, or click the down arrow next to Send to reschedule it for a new time.

Step-by-Step Instructions – Gmail App
To schedule an email:
- Open the Gmail app and tap Compose.
- Write your email and recipient info.
- Tap the 3 dots in the top right corner of the screen.
- Tap Schedule send.
- Choose a time or pick a custom date and time, then confirm.


To cancel or reschedule a scheduled email:
- Tap the Menu icon (three horizontal lines) in the top left corner.
- Tap Scheduled.
- Open the email you want to change.
- Tap Cancel send.
- The email will return to your Drafts. Tap it again to make your edits or tap the three dots in the top right to Schedule send again.


Additional Tips
Beyond the basic limits, there are several quirks and technical details to keep in mind when using Gmail’s scheduling feature:
Time Zones
Gmail strictly uses your current device’s time zone when you schedule an email. It does not adjust for your recipient’s location.
If you travel and change time zones after scheduling, the email will still send at the original date and time you scheduled – it won’t shift to your new time zone.
What Feature Blocks Scheduling
If you go to schedule an email and the “Schedule send” option is completely missing or grayed out, check your formatting settings. Plain Text Mode disables the scheduling button. You must click the three dots at the bottom of your compose window and turn off plain text mode to bring the scheduling options back.
Delivery Timing is Not Instant
Gmail explicitly notes that scheduled emails may deploy a few minutes after the exact time you selected. Do not rely on it for down-to-the-second timing (like trying to drop a time-sensitive application exactly at midnight).
Feature Limitations
Gmail’s built-in feature is relatively simple and does not support:
- Recurring emails (e.g., sending the same Monday morning update automatically every week).
- Bulk email mail-merges or personalized mass scheduling.
- Editing in place. You cannot open a scheduled email, tweak a typo, and save it. You are forced to cancel the send entirely, which drops it back into your drafts folder to be edited and rescheduled from scratch.
Years in Advance
While it’s best practice to only schedule a few days or weeks out, Gmail technically allows you to schedule an email up to 49 years into the future!
Related
How to Label Emails From a Specific Date Range in Gmail
Learn how to find Gmail emails from a specific date range using after: and before: search operators, then create and apply a label to organize those messages for easy access later. This tutorial also includes practical copy-and-paste date range examples for years, months, projects, travel, taxes, and more.
How to Automatically Apply a Label Based on Email Age in Gmail
Learn how to automatically apply a Gmail label based on email age using Google Apps Script. This tutorial shows how to create the label, customize an `older_than:` rule, test and authorize the script, and set up a daily trigger so older messages are labeled automatically.
Stay Updated
There are two easy ways to get notified when new tutorials are published:
Subscribe on YouTube for new video tutorials: @SimpleSoftwareTutorials
or enter your email below to receive new blog posts directly in your inbox:

