
Gmail makes it easy to find older emails using search operators such as older_than:, but it does not automatically keep applying a label as messages reach a certain age.
If you want emails to be labeled automatically once they become older than a specific number of days, months, or years, you can use a simple Google Apps Script to handle that process for you.
In this tutorial, I’ll show you how to create a Gmail label, set up a Google Apps Script project, customize the script for your preferred label name and email age, test and authorize the script, and create a daily trigger so the automation continues running on its own.
For my example, I’ll automatically apply a label to emails that are more than 5 days old, but you can easily adjust the script to use a different time period.
Common Uses
- Create a cleanup queue – automatically label emails older than 30 days, 6 months, or 1 year so you can review them later for deletion or archiving.
- Flag aging inbox messages – apply a label to emails that have been sitting in Gmail for more than a set number of days and may need attention.
- Review old newsletters or promotions – automatically group older marketing emails so you can periodically clean them out.
- Track stale follow-ups – label messages older than a certain age so you can check whether a reply or action is still needed.
- Organize old receipts or order confirmations – move aging transactional emails into a review label for easier cleanup.
- Identify older project emails – apply a label once messages reach a certain age so you can separate active work from older reference material.
- Prepare emails for archiving – label messages after a set period so you can review and archive them in batches.
- Monitor aging support or customer emails – flag messages that have been around longer than expected and may need follow-up.
- Separate recent email from older reference material – automatically label messages once they pass a certain age threshold.
- Create a retention-review system – use age-based labels as a reminder to periodically review messages before deleting anything permanently.
Before You Start: How This Works
A Gmail filter can apply a label when mail arrives. However, automatically labeling emails based on how long they’ve been in your inbox is not something Gmail is set up to do.
In Gmail, this can be done manually by using search operators such as older_than:30d to find emails older than 30 days, then selecting all of those emails and applying a label to them.
To automate this process, Google Apps Script automation can be scheduled to check for emails based on parameters like age, and apply the label of your choice.
Examples of older_than: Search Criteria
Gmail’s older_than: search operator lets you identify messages older than a relative amount of time. You can use:
- Days:
older_than:5d– messages older than 5 days - Months:
older_than:3m– messages older than 3 months - Years:
older_than:1y– messages older than 1 year
You can change the number to fit your needs. For example:
older_than:30dolder_than:6molder_than:2y
For this tutorial, I use older_than:5d.
Tip: If your goal is cleanup rather than organization, you could use the automatically applied label as a review queue. For example, labeling messages older than 30 days or 1 year so you can periodically review them before deciding whether to archive or delete them.
Step-by-Step Instructions
Below, I’ll walk you through all the steps needed to automatically label your emails based on age. Part 2 involves using JavaScript, but you do not need to understand code to use this – I’ll explain what the code means and exactly how and where to make any modifications, if needed.
If you’d like to watch a video that shows a similar process using Google Apps Script, check out: How to Create an Unread Emails Folder in Gmail That Updates Automatically
Part 1: Create Your Mail Label
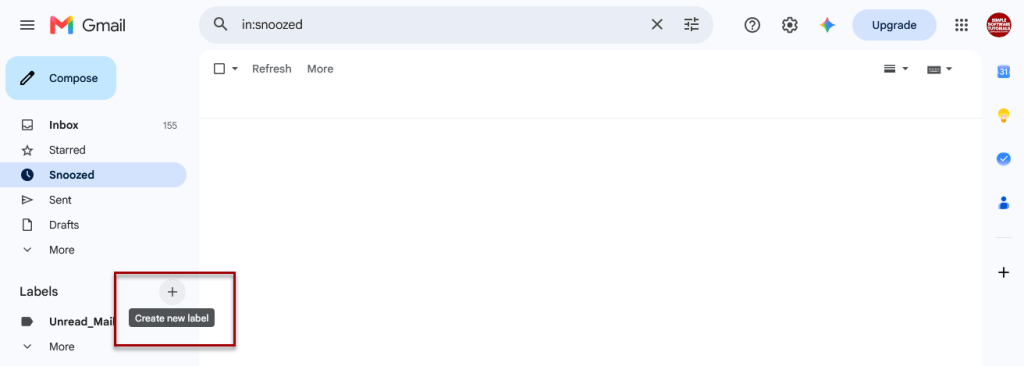
Create a new label by clicking the + sign next to Labels in the left side menu in Gmail.
Give your label a name. I’m using Older_Than_5d since this will apply to emails older than 5 days, but use whatever makes the most sense for what you plan to do. Then click Create.
Tip: For this tutorial, I recommend using underscores instead of spaces. Gmail labels can contain spaces, but using a simple label name without spaces makes it easier to reference consistently in Gmail searches and in the Apps Script code later in this tutorial.
If you choose a different label name, that’s fine – just make sure the name in your Apps Script code in part 2 exactly matches the label you created in Gmail.
Part 2: Automatically Label Messages
For the automated version, we’ll use Google Apps Script, Google’s browser-based scripting tool.
The script has one simple job: Find messages that are the specified age and label them accordingly.
We’ll then create a time-based trigger so Google runs that process automatically every day.
Before Continuing: About Google Permissions and the “Unverified App” Warning
The script needs permission to work with Gmail because its job is to search your mail and change a Gmail label.
When you run it for the first time, Google may display an Authorization Required screen and an additional warning telling you that the app hasn’t been verified.
That warning can look intimidating, so it’s worth understanding what you’re doing before continuing.
In this tutorial, you are creating the Apps Script project inside your own Google account and pasting the code into it yourself. Because the script requests access to Gmail and hasn’t gone through Google’s verification process as a publicly distributed application, Google may display the unverified-app warning.
That doesn’t mean you should ignore security warnings whenever you see them.
Whenever you copy code from the internet:
- Review the code when possible.
- Pay attention to the permissions Google asks you to grant.
- Only continue if the requested access makes sense for what the script is supposed to do.
- Don’t authorize scripts from sources you don’t trust.
If you aren’t comfortable granting the script access to Gmail, you can stop here. You’ll simply need to use the older_than search operator to to find the emails then manually label them as desired. This tutorial walks through that process: How to Label Emails From a Specific Date Range in Gmail
Step 1: Open Apps Script and Create a Project
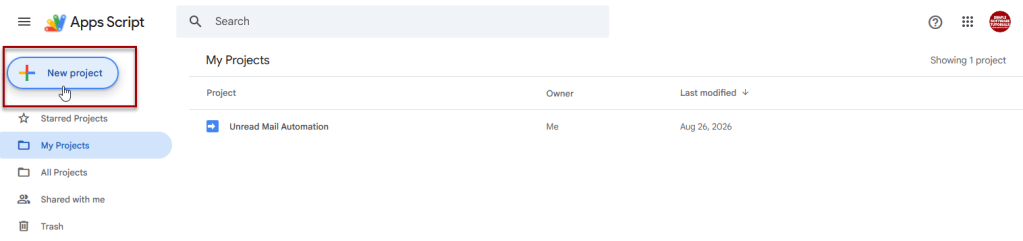
Go to Google Apps Script (https://script.google.com) and sign in with your Google account.
In the top-left corner, click the New project button.
Step 2: Add and Save the Code
You will see a default block of code that says function myFunction() { ... }. Select all of it and delete it.

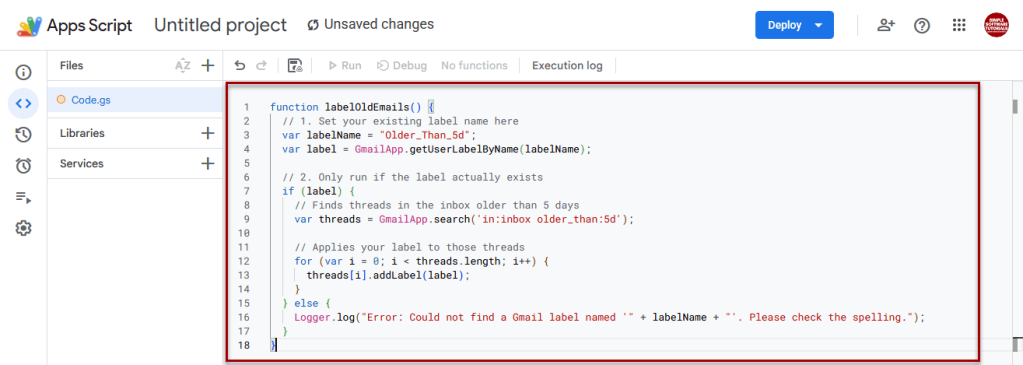
Copy and paste this exact snippet into the editor:
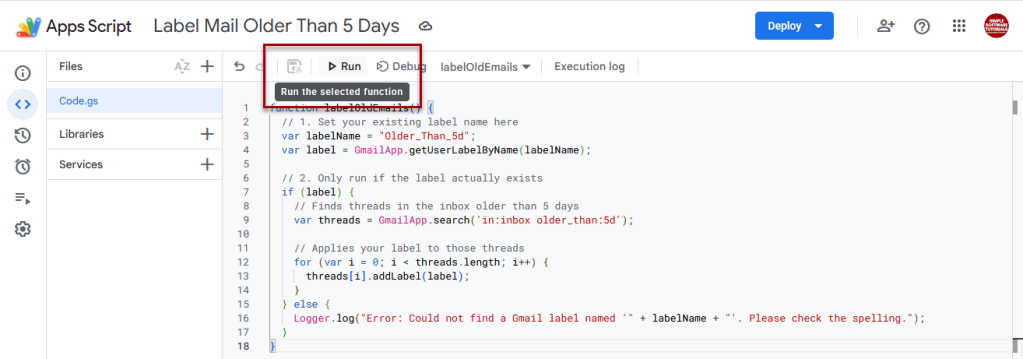
function labelOldEmails() { // 1. Set your existing label name here var labelName = "Older_Than_5d"; var label = GmailApp.getUserLabelByName(labelName); // 2. Only run if the label actually exists if (label) { // Finds threads in the inbox older than 5 days var threads = GmailApp.search('in:inbox older_than:5d'); // Applies your label to those threads for (var i = 0; i < threads.length; i++) { threads[i].addLabel(label); } } else { Logger.log("Error: Could not find a Gmail label named '" + labelName + "'. Please check the spelling."); }}
What Does This Code Do?
You don’t need to know JavaScript to use the script, but here’s the basic idea:
- It identifies your Older_Than_5d Gmail label (or whichever label name you chose).
- It searches that label for mail in your inbox that is older than 5 days (or whichever email age you chose).
- It applies the label to matching Gmail threads each time it runs.
- If it cannot find the label, it will produce an error message.
The lines beginning with // are comments. They are notes explaining the code and aren’t instructions that Apps Script executes.
If You Used a Different Label Name
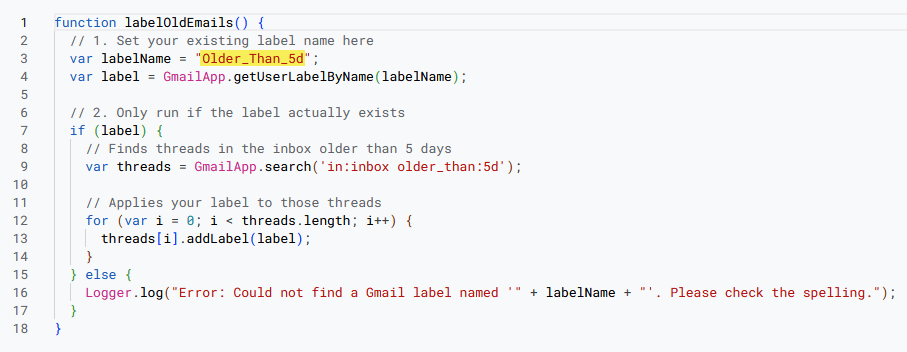
Find this line (it was on line 3 for me): var labelName = “Older_Than_5d”;
Replace Older_Than_5d with the exact name of your Gmail label, keeping the quotation marks.
For example: var labelName = “My_Old_Email”;
If you used Older_Than_5d, you don’t need to change anything.
If You Used a Different Date Range
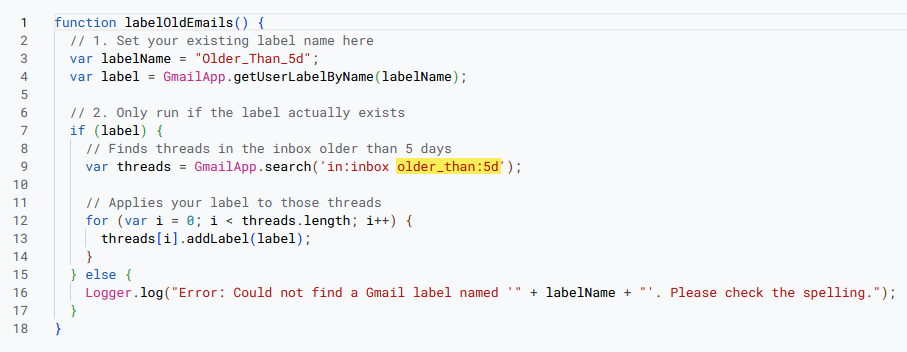
Find this line (it was on line 9 for me): var threads = GmailApp.search(‘in:inbox older_than:5d’);
Replace older_than:5d with the search operator you used, keeping the quotation marks.
For example: var threads = GmailApp.search(‘in:inbox older_than:1y’);
As a reminder, here are some examples of various search operators:
- Days:
older_than:5d– messages older than 5 days - Months:
older_than:3m– messages older than 3 months - Years:
older_than:1y– messages older than 1 year
If you used older_than:5d, you don’t need to change anything.
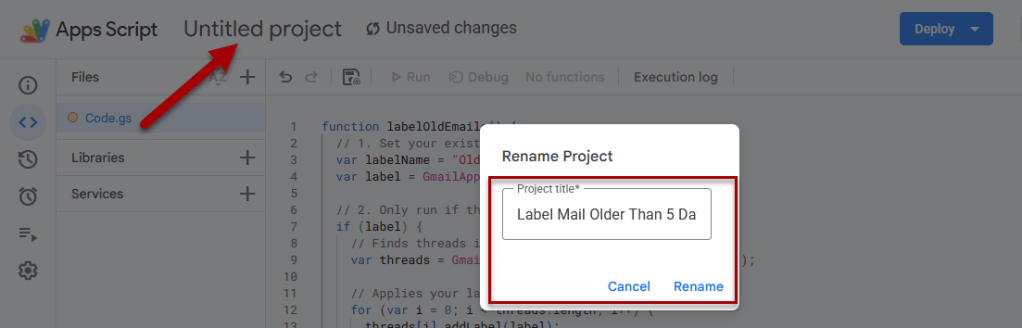
Name your project by clicking on Untitled Project in the top left, entering a name (I used Label Mail Older Than 5 Days), then clicking Rename.
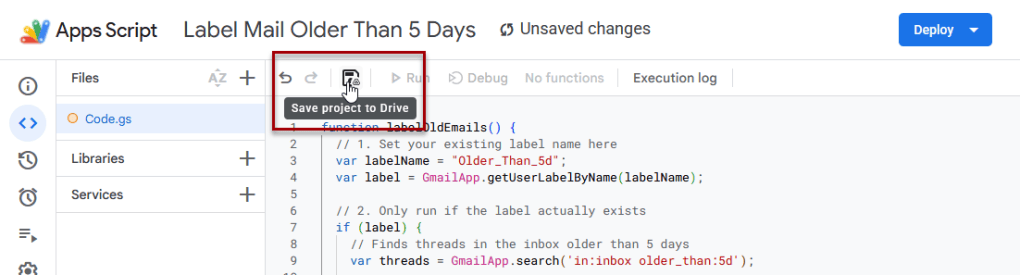
Click the Save project icon at the top of the editor (it looks like a classic 3.5″ floppy disk).
Step 4: Test and Grant Permissions
Click the Run button at the top (the right-pointing play arrow).
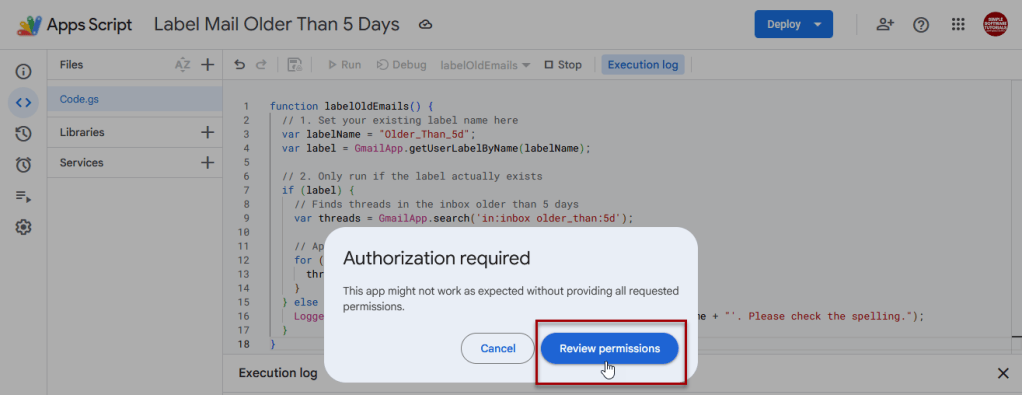
An Authorization required window will pop up. Click Review permissions.
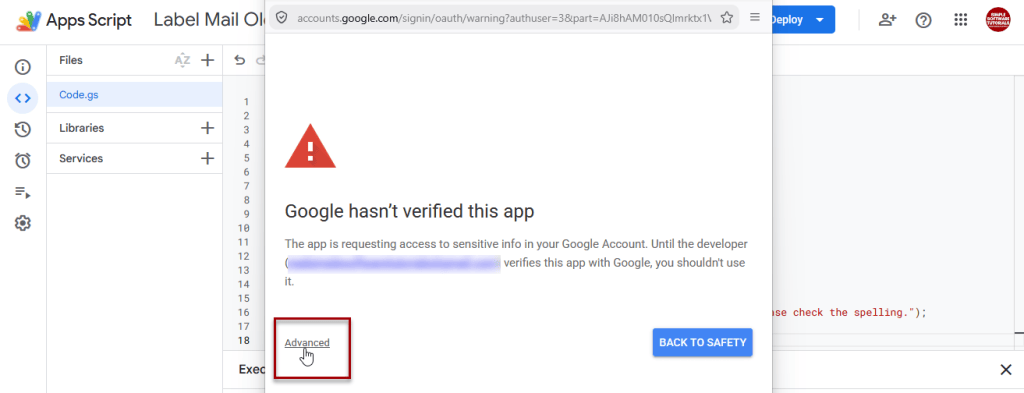
Google will display a warning screen saying “Google hasn’t verified this app.” This is normal for scripts you write yourself. Click the small Advanced link at the bottom.
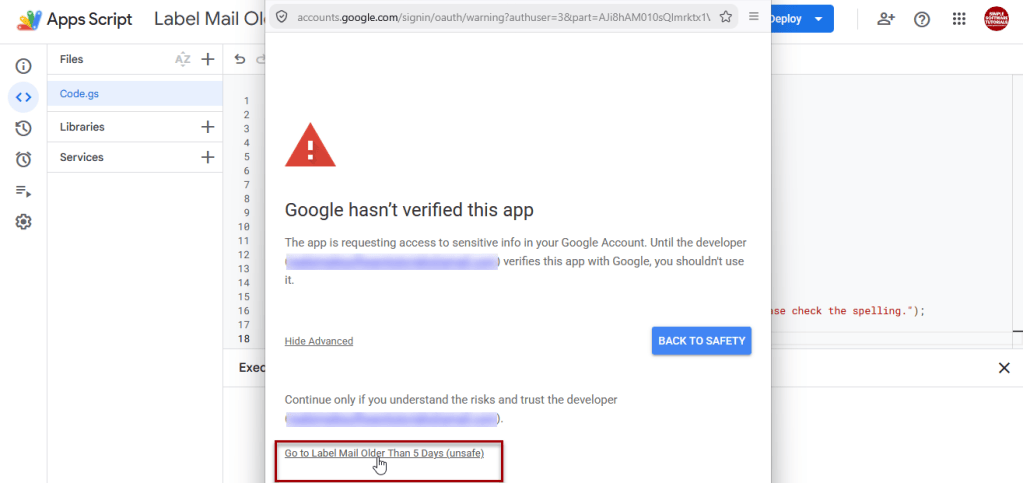
Click Go to Label Mail Older Than 5 Days (unsafe) (or whatever you named your project).
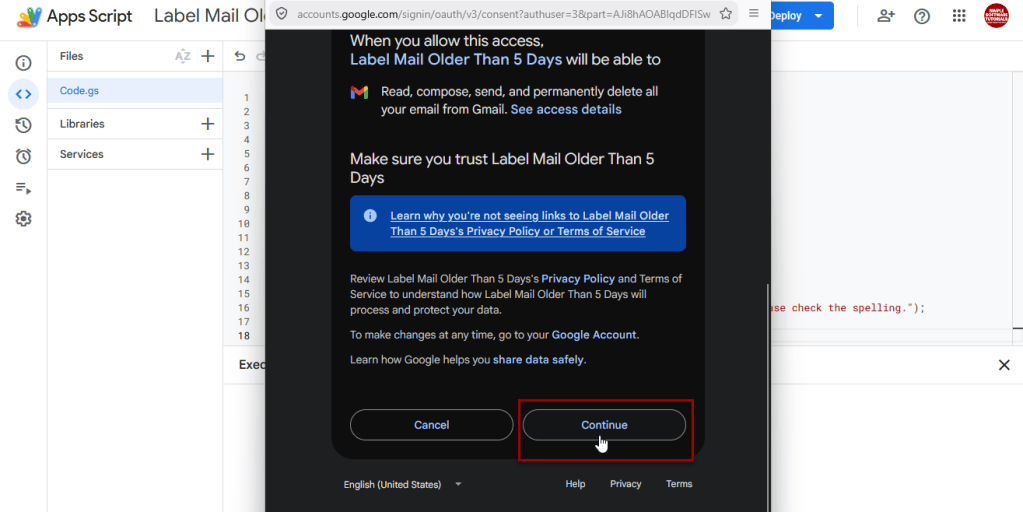
Click Continue on the next screen to give your script permission to view and manage your Gmail labels.
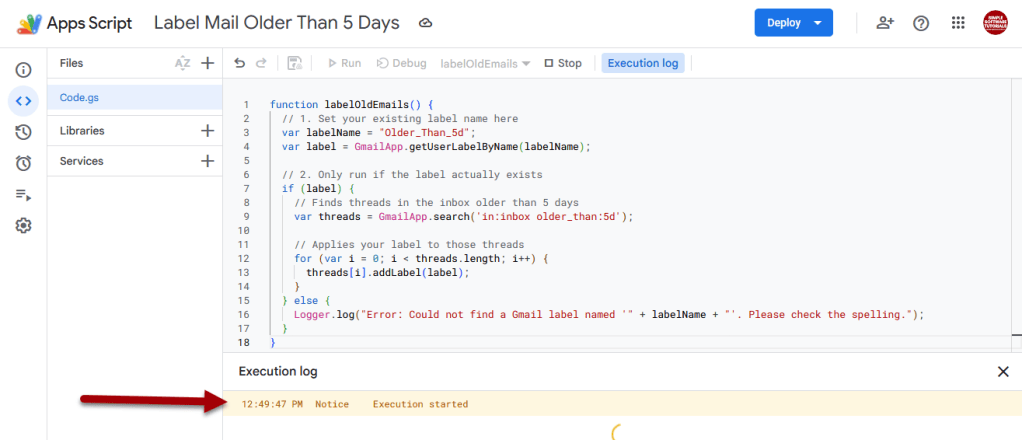
You will be returned to your project in Google Apps Script and should see an “execution started” status in the execution log.
Step 5: Set the Automation
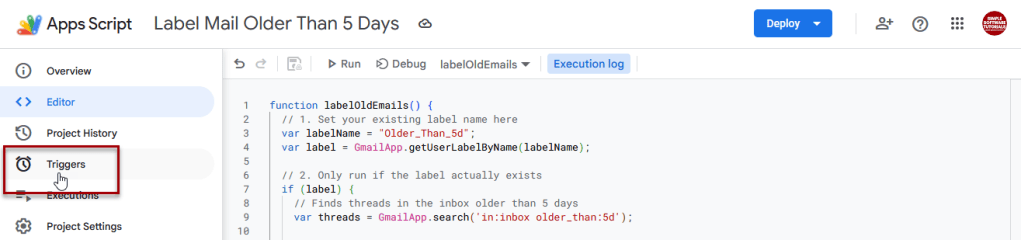
Click the Triggers icon (it looks like a small alarm clock) in the left-side menu.
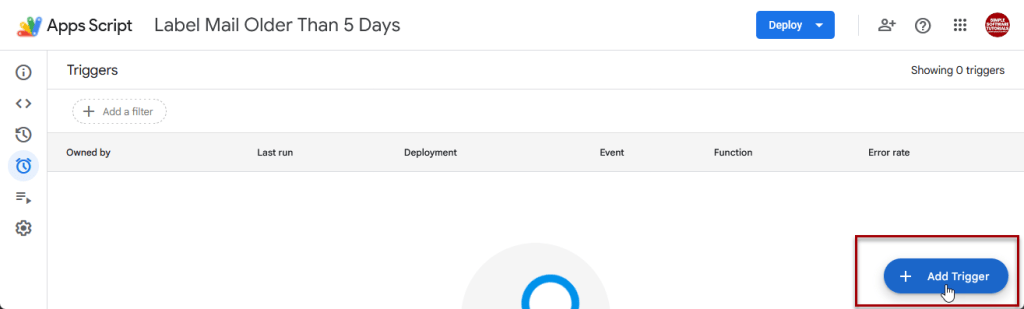
In the bottom-right corner of the Triggers page, click the blue + Add Trigger button.
Configure the trigger exactly like this:
- Choose which function to run:
labelOldEmails - Choose which deployment should run:
Head - Select event source:
Time-driven - Select type of time-based trigger:
Day timer - Select time of day: Choose your preferred window (e.g., Midnight to 1 AM)
Click Save.
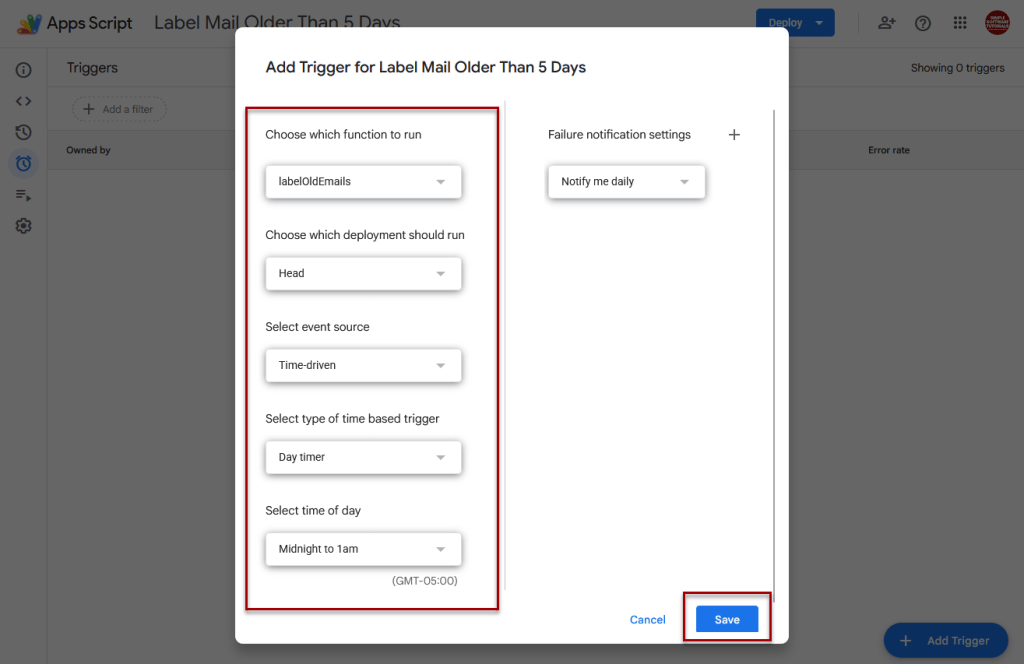
Your script will now silently run in the background once every day, catching any emails that cross the selected date threshold.
Related Tutorial
You may also like this similar Gmail function:
Related

How to Schedule an Email in Gmail
Learn how to schedule an email in Gmail so your message is sent at the right time. This tutorial covers how to schedule, view, cancel, and reschedule emails on desktop and mobile, plus practical uses, scheduling limits, time zone considerations, and other helpful tips.
How to Label Emails From a Specific Date Range in Gmail
Learn how to find Gmail emails from a specific date range using after: and before: search operators, then create and apply a label to organize those messages for easy access later. This tutorial also includes practical copy-and-paste date range examples for years, months, projects, travel, taxes, and more.
Stay Updated
There are two easy ways to get notified when new tutorials are published:
Subscribe on YouTube for new video tutorials: @SimpleSoftwareTutorials
or enter your email below to receive new blog posts directly in your inbox:

