

The Developer tab in Microsoft Excel provides access to advanced tools that aren’t shown by default. If you’re following a tutorial, working with macros, creating interactive forms, or using VBA, one of the first steps is often enabling the Developer tab.
In this tutorial, you’ll learn how to display the Developer tab in Excel in just a few clicks. Once enabled, you’ll have access to powerful tools for automation, form controls, macros, and other advanced Excel features.
What You’ll Learn
- How to show the Developer tab in Excel
- Where to find the Developer tab setting
- What the Developer tab is used for
- How to hide the Developer tab again if needed
- Which Excel features require the Developer tab
Common Uses
You may need the Developer tab if you want to:
- Record or run macros
- Create VBA (Visual Basic for Applications) code
- Insert buttons, checkboxes, and other form controls
- Create interactive Excel forms
- Work with ActiveX controls
- Open the Visual Basic Editor
- Import or export XML data
- Follow tutorials that reference the Developer tab
Requirements / Compatibility
This tutorial was originally recorded in 2020, and the steps remain accurate in current versions of Microsoft Excel, including:
- Microsoft 365
- Excel 2024
- Excel 2021
- Excel 2019
- Excel 2016
The Developer tab is hidden by default in these versions but can be enabled using the same Ribbon customization settings.
Practice & Resources
No downloadable files are required for this tutorial.
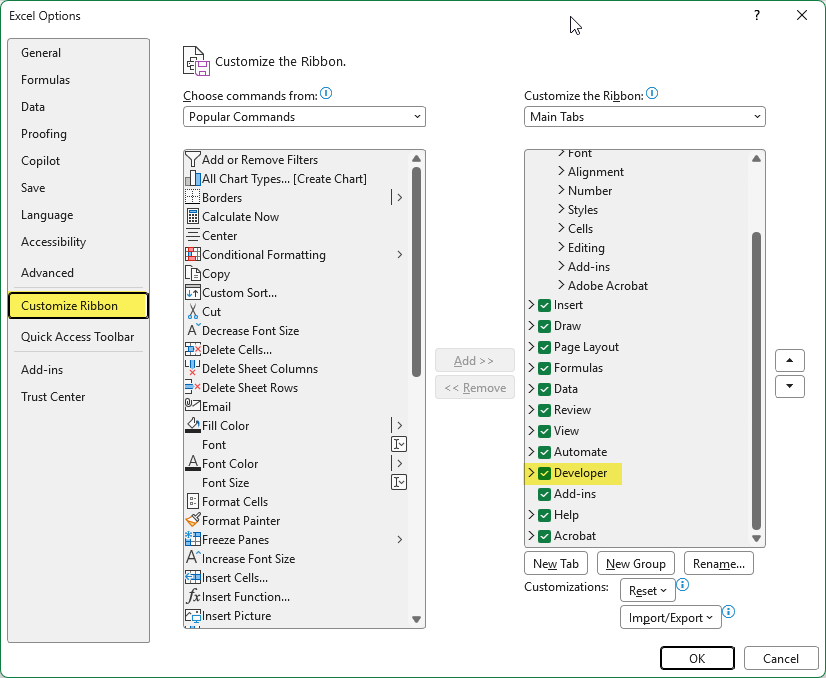
Simply open Microsoft Excel and follow the steps below. The included screenshots show exactly where to find the Customize Ribbon settings so you can enable the Developer tab in just a few clicks.
Video Tutorial
Breaking Down the Concept
The Developer tab is an optional Ribbon tab that gives you access to Excel’s advanced tools. Unlike the Home or Data tabs, it isn’t displayed by default because most users don’t need it for everyday spreadsheet tasks.
Once enabled, the Developer tab provides access to features such as:
- Macros – Automate repetitive tasks.
- Visual Basic (VBA) – Write or edit automation code.
- Form Controls – Add buttons, checkboxes, drop-down lists, and other interactive controls.
- Add-ins – Manage Excel add-ins and automation tools.
- XML Tools – Import, export, and map XML data.
Enabling the Developer tab doesn’t change your workbook—it simply makes these tools available on the Ribbon whenever you need them.
Step-by-Step Instructions
- Open Microsoft Excel.
- Click File.
- Select Options.
- Click Customize Ribbon.
- Under Main Tabs, check the box next to Developer.
- Click OK.
The Developer tab will now appear on the Ribbon.
Additional Tips
- You only need to enable the Developer tab once on each computer.
- If you’re following a macro or VBA tutorial, the Developer tab is usually the first thing you’ll need to enable.
- You can return to Customize Ribbon at any time to hide the Developer tab again.
- The Developer tab gives you access to advanced features but doesn’t affect existing workbooks unless you choose to use those tools.
Related Features
Once you’ve enabled the Developer tab, you may also want to learn about:
- Macros
- VBA (Visual Basic for Applications)
- Form Controls
- Checkboxes
- Option Buttons
- Combo Boxes
- Data Validation (for drop-down lists)
Related

How to Remove Extra Spaces in Excel
Learn how to remove extra spaces from text in Microsoft Excel using the TRIM function. This beginner-friendly tutorial explains what TRIM removes, when to use it, and why it’s one of the most useful functions for cleaning imported or inconsistent data.


How to Create an Order Form with Drop-Down Menus in Microsoft Excel
Learn how to create a professional order form in Microsoft Excel using drop-down menus, Data Validation, and named ranges. This step-by-step tutorial also covers formatting dates, ZIP codes, and credit card fields to build cleaner, more accurate spreadsheets for real-world business use.
Stay Updated
There are two easy ways to get notified when new tutorials are published:
Subscribe on YouTube for new video tutorials: @SimpleSoftwareTutorials
or enter your email below to receive new blog posts directly in your inbox:

