
Have you ever wanted a simple place in Gmail where you could click and see all of your unread email?
Gmail lets you search for unread messages with is:unread, but it doesn’t provide a dedicated Unread folder in the left-side menu like some other email programs do.
In this tutorial, I’ll show you how to create your own Unread Mail shortcut using a Gmail label and filter. It will appear in Gmail’s left-side navigation, display an unread count, and give you quick access to your unread messages.
There are two ways you can use this setup:
- Simple option: Create the label and filter and stop there. You’ll have an Unread Mail link with an unread count, but messages you’ve already read can remain in that label. You can use Gmail’s Is unread filter button to hide them.
- Automated option: Complete a few additional steps using Google Apps Script. A short script will periodically check the label and remove it from messages that have been read, giving you a much cleaner automatically updating Unread Mail view.
The automated setup may sound technical if you’ve never used Google Apps Script, but you don’t need to know JavaScript to follow along. I’ll walk through each step and explain what the script is doing so you can make an informed decision about whether you want to use it.
Video Tutorial
Before You Start: How This Works
Gmail doesn’t actually use traditional folders for organizing messages. Instead, it uses labels, which can be applied to messages without physically moving them somewhere else.
For simplicity, I’ll refer to the result we’re creating as an Unread Mail folder or view, but technically it is a Gmail label.
There is one important limitation we need to work around: A Gmail filter can apply our Unread_Mail label when mail arrives, but that label doesn’t automatically disappear later when you read the message. Reading an email changes its read/unread status; it doesn’t cause Gmail to run the original filter again and remove the custom label.
That’s why the basic version works only partially.
The optional Google Apps Script automation solves that problem by periodically looking for messages under the Unread_Mail label that have since been read and removing the label from them.
Part 1: Create Your Unread Mail Label and Filter
We’ll start by creating the Gmail filter that adds incoming messages to a custom Unread_Mail label.
Create the Filter
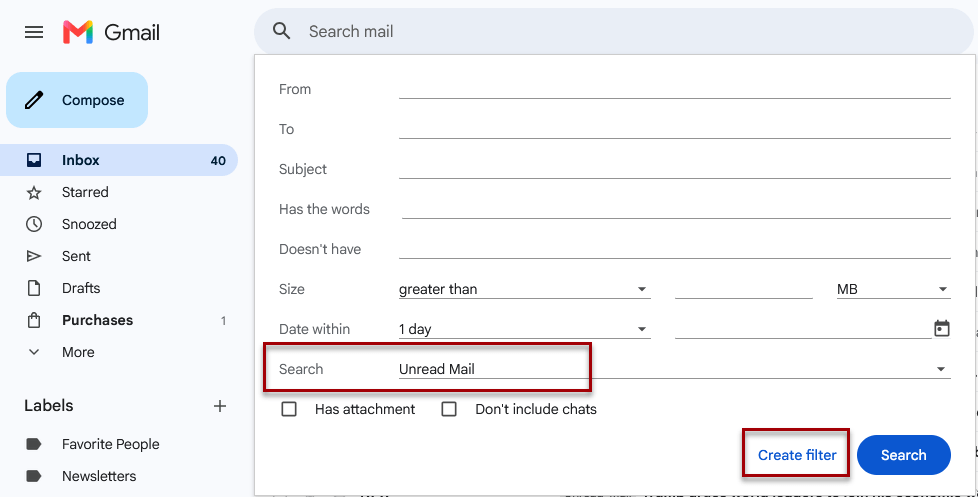
1. In Gmail, click the Show search options icon on the right side of the search box.

2. Open the Search menu and select Unread Mail. Click Create filter.
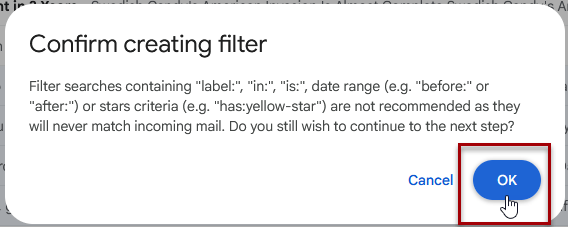
3. Gmail may display a warning about using criteria such as is: when creating a filter. Click OK to continue.
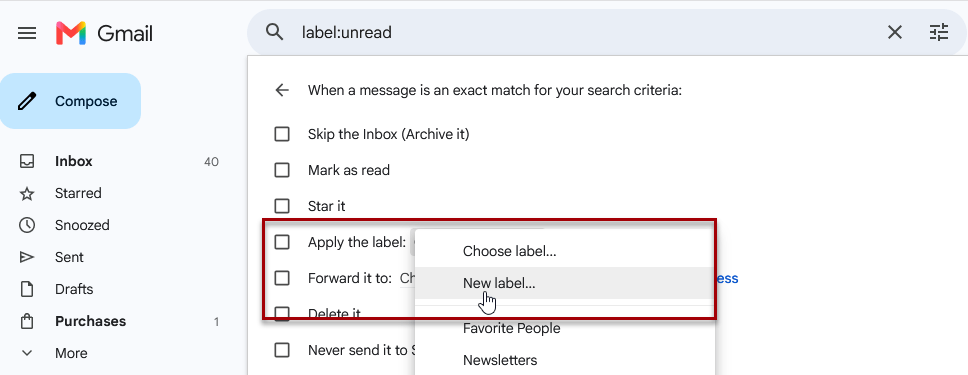
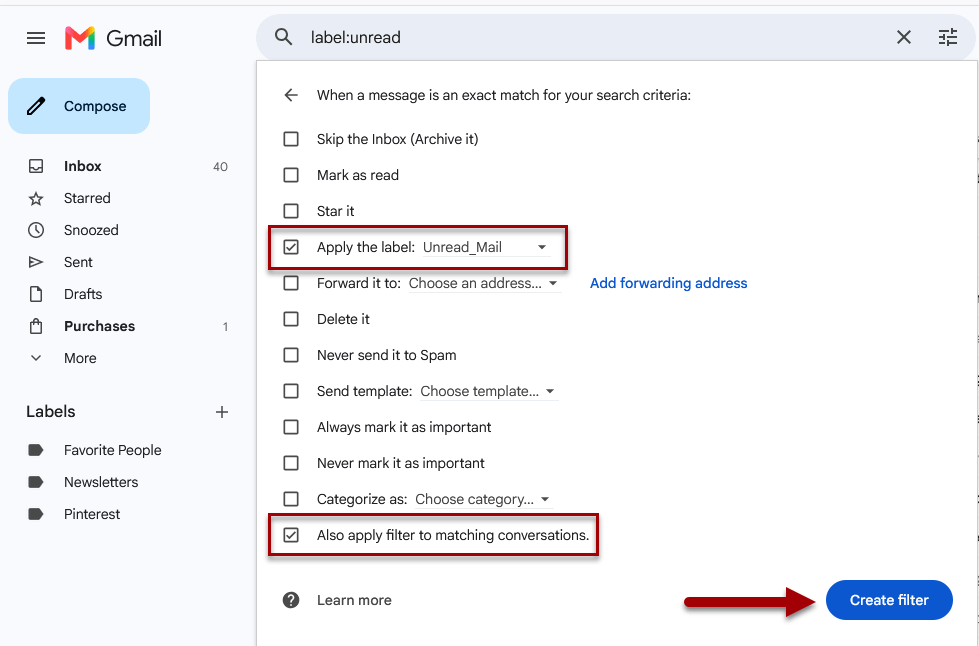
4. Next to Apply the label, choose New label.
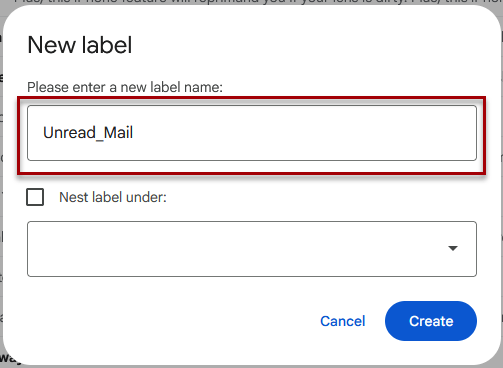
5. Give your label a name. I’m using Unread_Mail.
Tip: For this tutorial, I recommend naming the label Unread_Mail. Gmail labels can contain spaces, but using a simple label name without spaces makes it easier to reference consistently in Gmail searches and in the Apps Script code later in this tutorial.
If you choose a different label name, that’s fine – just make sure the name in your Apps Script code in part 2 exactly matches the label you created in Gmail.
6. If you want the label applied to existing matching messages as well, select Also apply filter to matching conversations. Click Create filter.
You should now see Unread_Mail in Gmail’s left-side navigation.
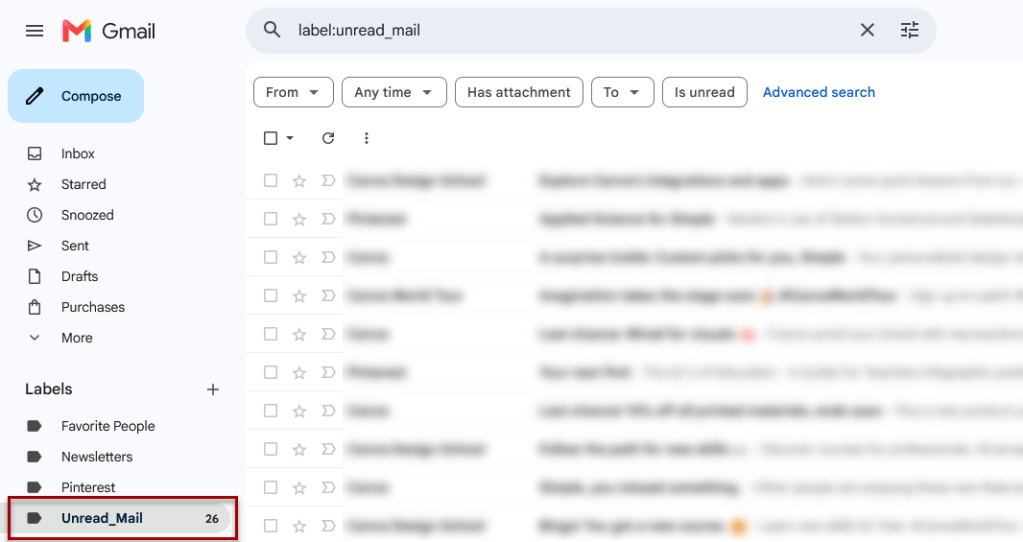
The number displayed beside the label represents unread mail associated with that label. Click the label whenever you want to open this view.
You Can Stop Here
If you only want a convenient shortcut for finding unread email, you can stop at this point.
There is one drawback: after you read a message, Gmail doesn’t automatically remove the Unread_Mail label that was applied when the message arrived. This means read messages can remain visible when you open the label.
When that happens, click the Is unread search filter shown above the message list to limit the view to messages that are still unread.
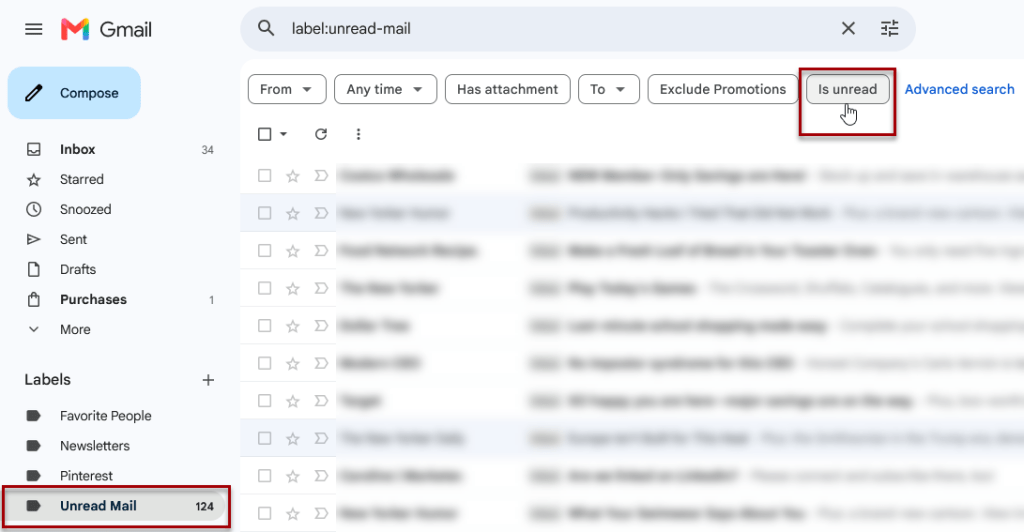
If you’re happy with that approach, you don’t need to do anything else.
If you want read messages to be automatically removed from this view, continue with the next section.
Part 2: Automatically Remove Read Messages
For the automated version, we’ll use Google Apps Script, Google’s browser-based scripting tool.
The script has one simple job: Find messages carrying the Unread_Mail label that have been read, and remove that label from them.
We’ll then create a time-based trigger so Google runs that cleanup automatically every few minutes.
Before Continuing: About Google Permissions and the “Unverified App” Warning
The script needs permission to work with Gmail because its job is to search your mail and change a Gmail label.
When you run it for the first time, Google may display an Authorization Required screen and an additional warning telling you that the app hasn’t been verified.
That warning can look intimidating, so it’s worth understanding what you’re doing before continuing.
In this tutorial, you are creating the Apps Script project inside your own Google account and pasting the code into it yourself. Because the script requests access to Gmail and hasn’t gone through Google’s verification process as a publicly distributed application, Google may display the unverified-app warning.
That doesn’t mean you should ignore security warnings whenever you see them.
Whenever you copy code from the internet:
- Review the code when possible.
- Pay attention to the permissions Google asks you to grant.
- Only continue if the requested access makes sense for what the script is supposed to do.
- Don’t authorize scripts from sources you don’t trust.
If you aren’t comfortable granting the script access to Gmail, you can stop here. The label and filter you created in Part 1 will continue to work; you’ll simply use the Is unread button when you want to hide messages you’ve already read.
Step 1: Create a Google Apps Script Project
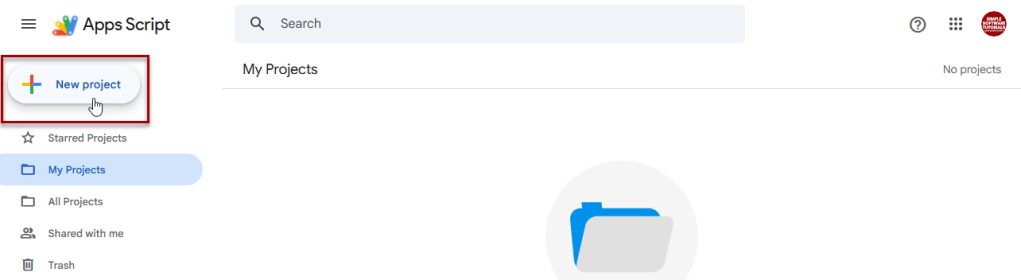
1. Go to Google Apps Script at https://script.google.com. Make sure you’re signed in with the same Google account you use for Gmail.
2. Click New project.
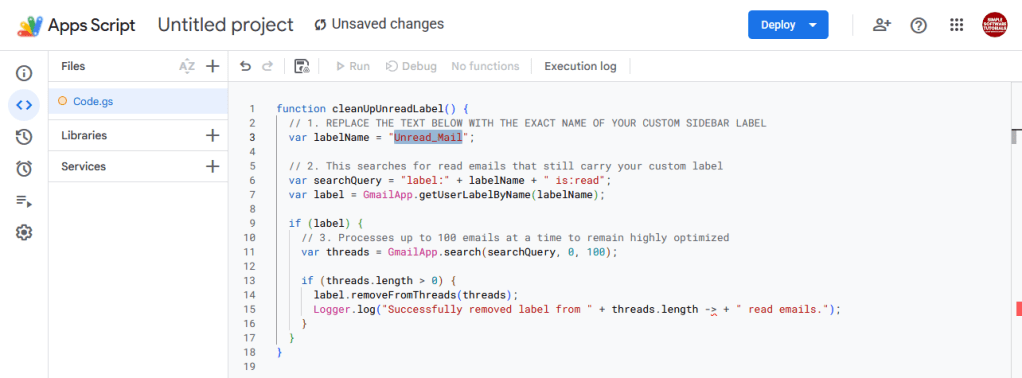
3. Delete the sample code that appears in the editor.

4. Copy and paste the following code:
function cleanUpUnreadLabel() { // Change this if you used a different name for your Gmail label. var labelName = "Unread_Mail"; // Find read messages that still have the custom label. var searchQuery = "label:" + labelName + " is:read"; var label = GmailApp.getUserLabelByName(labelName); if (label) { // Process up to 100 matching threads during each run. var threads = GmailApp.search(searchQuery, 0, 100); if (threads.length > 0) { label.removeFromThreads(threads); Logger.log( "Removed label from " + threads.length + " read threads." ); } }}
What Does This Code Do?
You don’t need to know JavaScript to use the script, but here’s the basic idea:
- It identifies your Unread_Mail Gmail label.
- It searches that label for mail that is now marked read.
- It removes the label from up to 100 matching Gmail threads each time it runs.
The lines beginning with // are comments. They are notes explaining the code and aren’t instructions that Apps Script executes.
If You Used a Different Label Name
Find this line:
var labelName = "Unread_Mail";
Replace Unread_Mail with the exact name of your Gmail label, keeping the quotation marks.
For example:
var labelName = "My_Unread_Email";
If you used Unread_Mail, you don’t need to change anything.
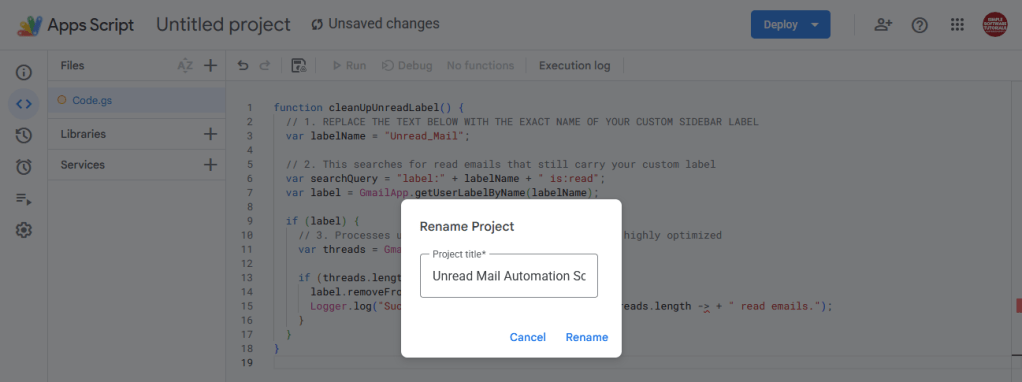
5. Give the project a recognizable name, such as Unread Mail Automation.
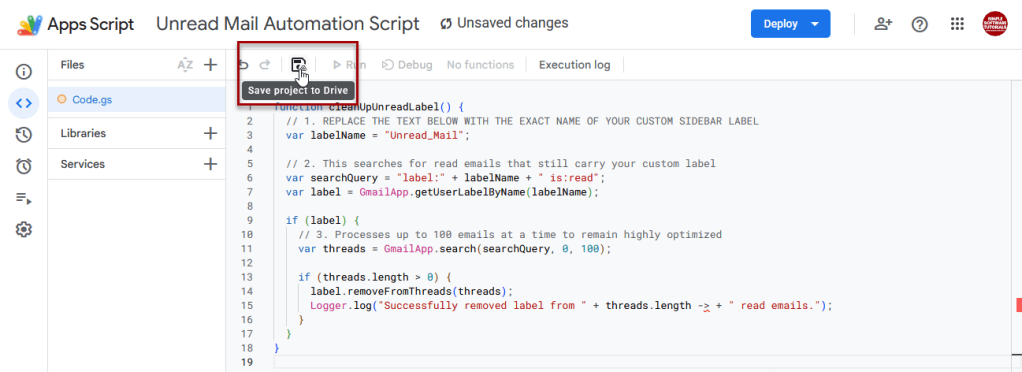
6. Click the Save icon.
Step 2: Run the Script and Grant Permission
Before we automate the script, we’ll run it once manually.
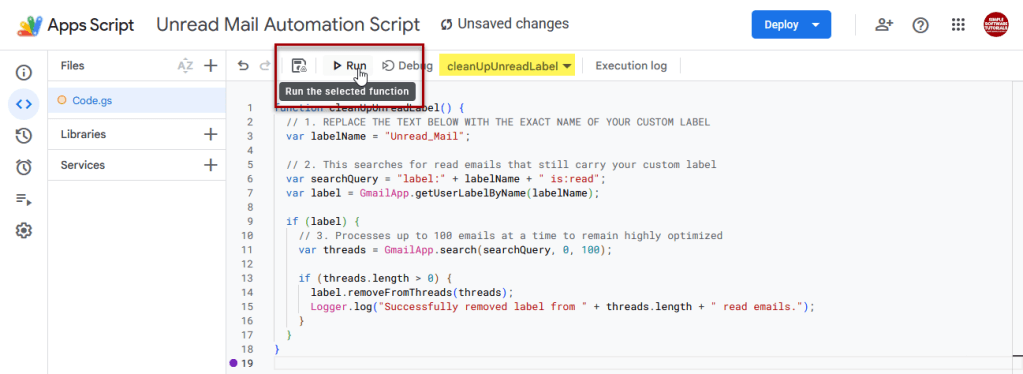
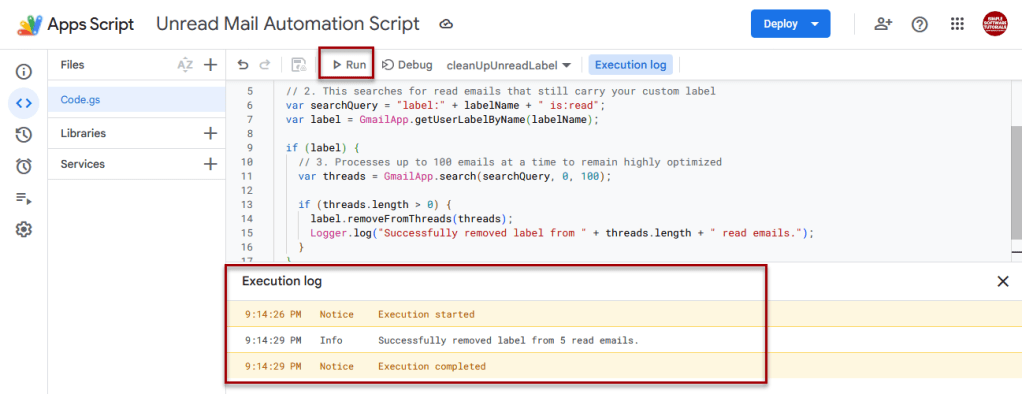
1. Make sure cleanUpUnreadLabel is selected as the function to run (highlighted in screenshot below). Then click the Run button at the top of the Apps Script editor.
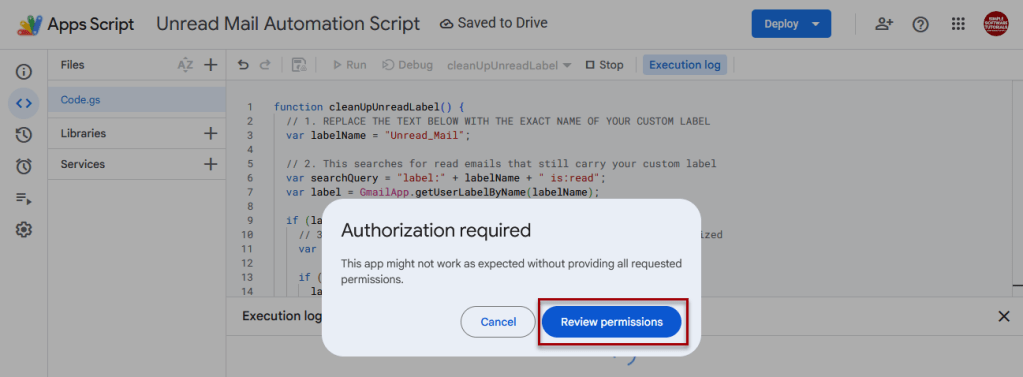
2. When Authorization Required appears, click Review permissions. Select the Google account connected to the Gmail account you’re using if prompted.
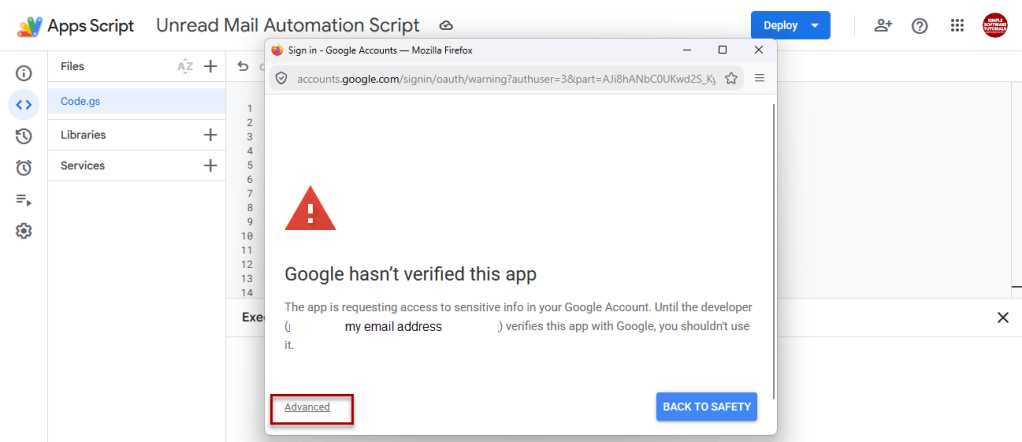
If Google displays a Google hasn’t verified this app warning:
- Click Advanced.
- Review the information shown.
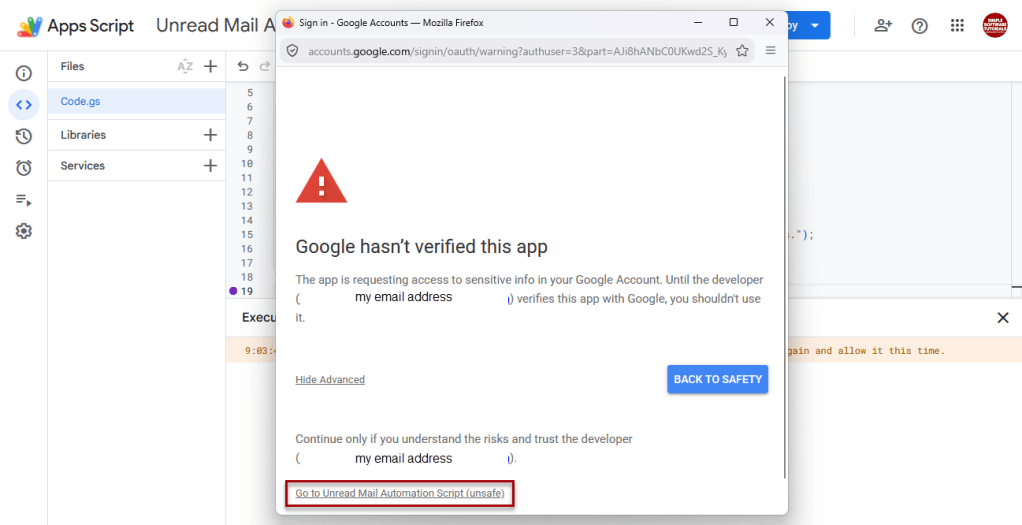
- If you’re comfortable continuing with the script you just created, choose the option to proceed to your project.
- Review the permissions Google is requesting.
- Continue only if you are comfortable granting those permissions.
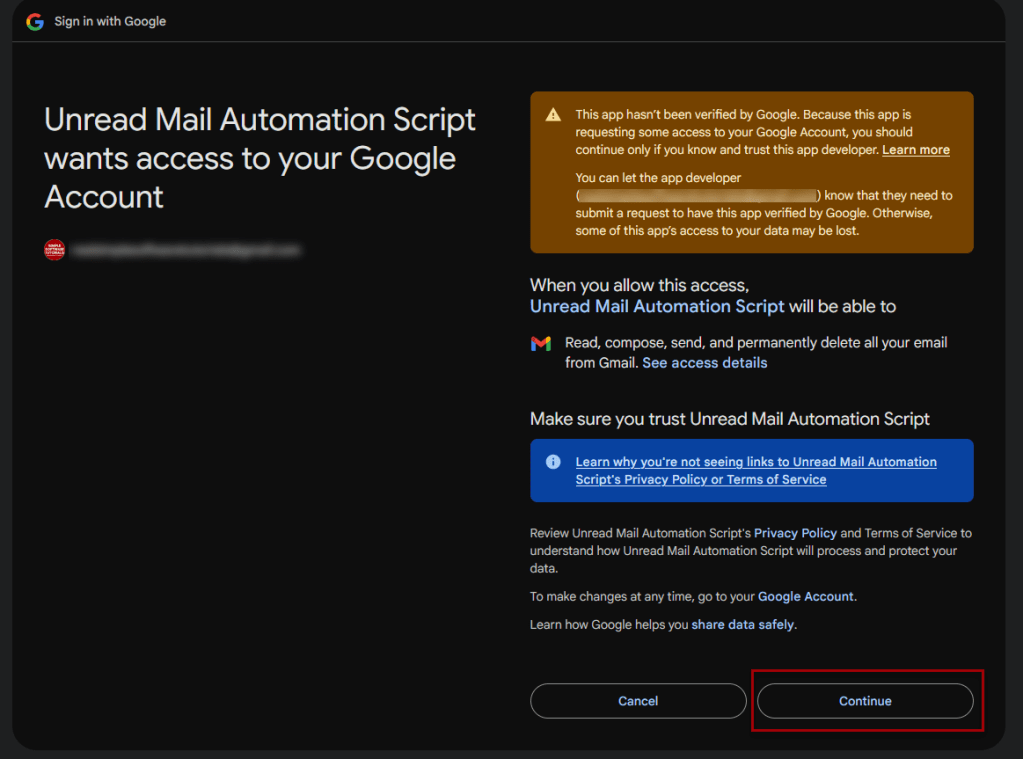
After authorization, Apps Script should run the function.
Look at the execution information at the bottom of the editor. If the script ran successfully, you should see that the execution completed. If you don’t see that the execution completed, click run again.
Step 3: Test the Cleanup
Before creating the automatic timer, I recommend checking that everything works.
- Go back to Gmail.
- Find a message under your Unread_Mail label.
- Open it so it becomes read.
- Return to Apps Script.
- Click Run again.
- Return to Gmail and refresh the page if necessary.
The read message should no longer appear under the Unread_Mail label.
Once you’ve confirmed that the script works, you can automate it.
Step 4: Create an Automatic Trigger
A trigger tells Google Apps Script to run your cleanup function on a schedule.
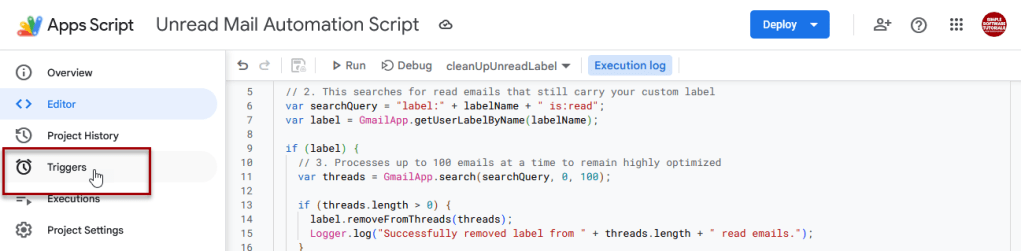
1. In Apps Script, click the Triggers icon in the left-side menu. It looks like a clock.
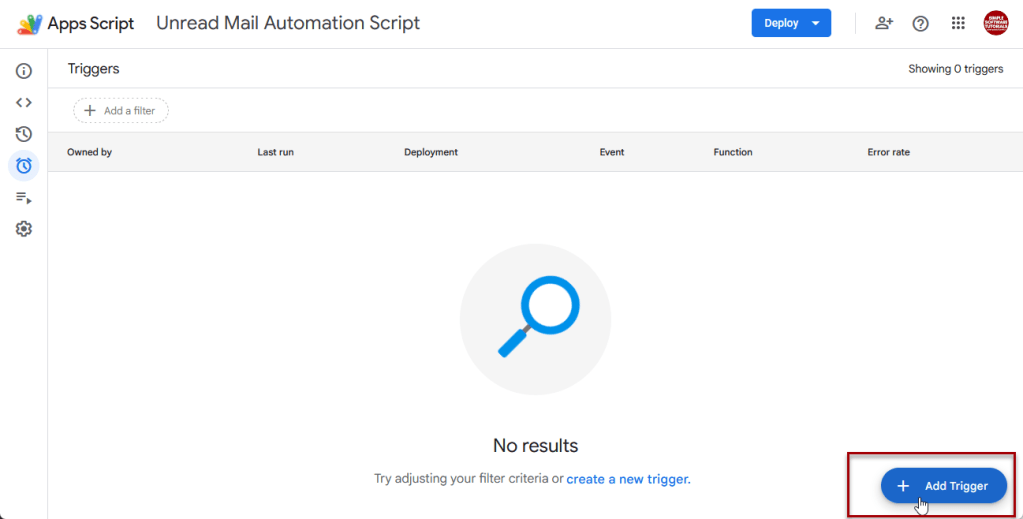
2. Click the blue Add Trigger button in the bottom-right corner of the screen.
3. Configure the trigger as follows:
- Choose which function to run:
cleanUpUnreadLabel - Choose which deployment should run:
Head - Select event source:
Time-driven - Select type of time-based trigger:
Minutes timer - Select minute interval:
Every 5 minutes
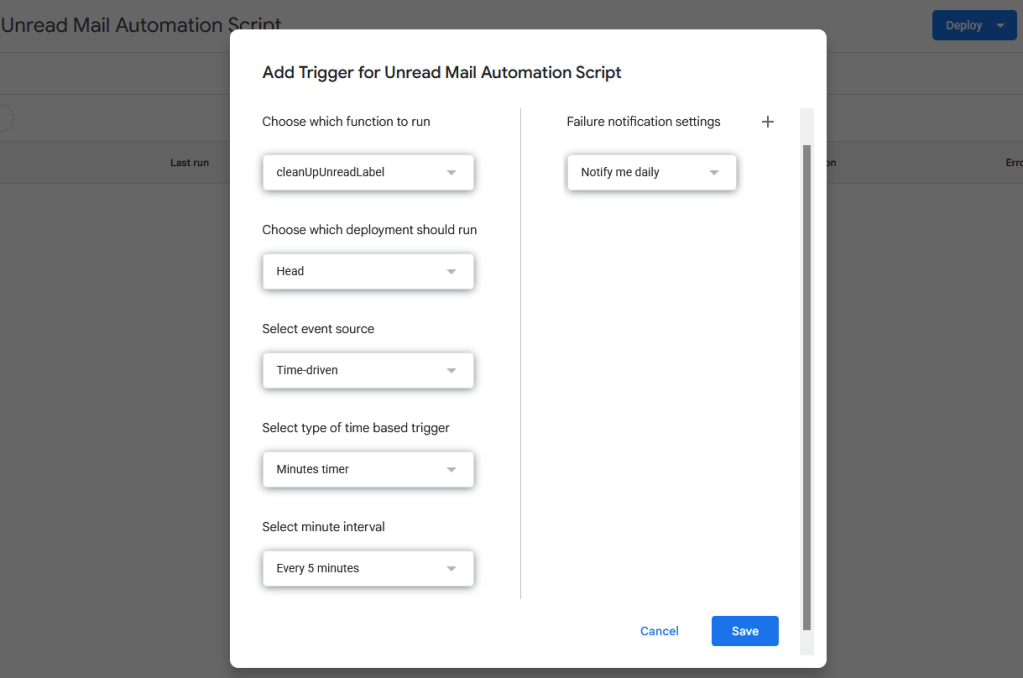
4. Click the blue Save button.
Note: You may need to repeat the authorization steps above, then click save again.
That’s it.
Your Gmail filter will continue applying the Unread_Mail label to incoming messages, while Apps Script will periodically remove that label after messages have been read.
Because the script runs on a timer rather than instantly, a message you just read may remain under the label briefly until the next scheduled cleanup runs.
What If You Receive a Script Failure Notification?
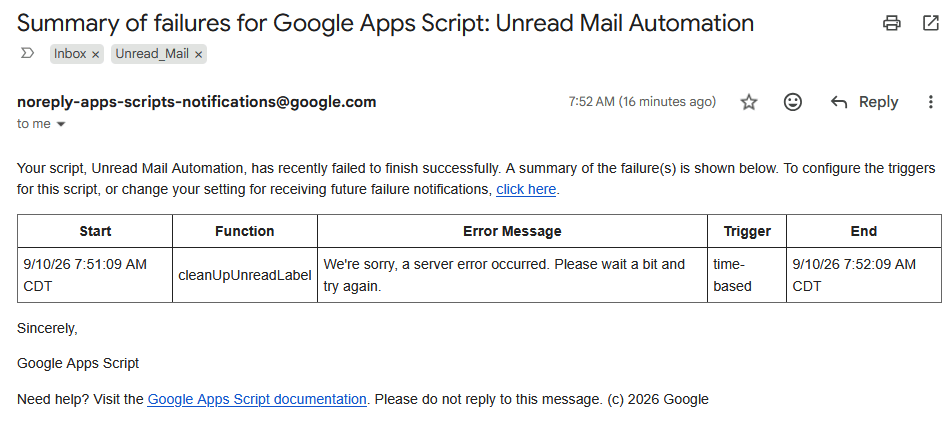
Google Apps Script may occasionally send an email saying that your automation failed to finish successfully. For example, you may see an error such as:
“We’re sorry, a server error occurred. Please wait a bit and try again.”
This type of message can occur when Google’s Apps Script service experiences a temporary server-side problem and does not necessarily mean there is something wrong with your script.
If your automation has been working normally, check your Apps Script Executions page to see whether later scheduled runs complete successfully. If they do, you generally do not need to change anything.
If the same error continues happening repeatedly, or you receive a different error related to authorization, quotas, or your code, then it is worth investigating further.
Optional: Start With a Clean Label
If you applied the Unread_Mail label to a large number of existing messages, you may already have read mail sitting under the label when you first set up the automation.
You can clean that up yourself before turning the automation loose.
Search Gmail for:
label:Unread_Mail is:read
Then select the matching messages and remove the Unread_Mail label.
This gives the automation a cleaner starting point.
Troubleshooting & Common Questions
Why do I still see a message I just read?
The cleanup isn’t instantaneous. If you chose a five-minute trigger, Apps Script checks periodically rather than the moment you read each email.
Wait until the next scheduled run and refresh Gmail.
Why are old read messages disappearing gradually?
The script processes up to 100 matching threads per run. If your label contains a large backlog of read messages, it may take multiple runs to clear them.
For a faster initial cleanup, search for:
label:Unread_Mail is:read
Then remove the label from those messages manually.
What if I use a different label name?
Change this line in the script so it contains the exact name of your label:
var labelName = "Unread_Mail";
The Apps Script name and Gmail label name need to match.
What if my label is nested under another label?
Use the full label path.
For example, if Unread_Mail is nested underneath a label named Email, use:
var labelName = "Email/Unread_Mail";
What if the script stops running?
Open your Apps Script project and check Executions and Triggers for errors.
Apps Script services have usage quotas, and Google can also require you to authorize access again in some circumstances. If you see an authorization error, run the function manually and follow Google’s prompts.
A Note About Google Apps Script Limits
Google places quotas and limits on Apps Script usage. For typical personal Gmail use, this is a very small automation: it runs periodically, searches for matching Gmail threads, and removes a label when needed.
If you’re processing an unusually large Gmail account or running many other Apps Script automations, you can review Google’s current Apps Script quotas for more information.
For most people, I recommend starting with the 5-minute trigger used in this tutorial rather than trying to make the automation run as frequently as possible.
The Result: A Much Easier Way to View Unread Gmail Messages
Once everything is set up, you’ll have an Unread_Mail link directly in Gmail’s left-side menu.
The label gives you a quick way to see your unread message count and open a view containing the mail that still needs your attention. If you complete the Apps Script portion, read messages are periodically removed from that view automatically.
Gmail may not provide a traditional Unread folder, but with a label, filter, and a small optional automation, you can create something that works surprisingly close to one.
Related

How to Schedule an Email in Gmail
Learn how to schedule an email in Gmail so your message is sent at the right time. This tutorial covers how to schedule, view, cancel, and reschedule emails on desktop and mobile, plus practical uses, scheduling limits, time zone considerations, and other helpful tips.
How to Label Emails From a Specific Date Range in Gmail
Learn how to find Gmail emails from a specific date range using after: and before: search operators, then create and apply a label to organize those messages for easy access later. This tutorial also includes practical copy-and-paste date range examples for years, months, projects, travel, taxes, and more.
Stay Updated
There are two easy ways to get notified when new tutorials are published:
Subscribe on YouTube for new video tutorials: @SimpleSoftwareTutorials
or enter your email below to receive new blog posts directly in your inbox:

