
If you’ve ever exchanged several emails just trying to find a meeting time that works for everyone, Google Calendar’s appointment schedules can make the process much easier.
With an appointment schedule, you can specify when you’re available and create a booking page that other people can use to choose an open time. When someone books an appointment, it is automatically added to your Google Calendar.
This can be useful for everything from job interviews and client meetings to training sessions, consultations, office hours, and service appointments.
In this tutorial, I’ll walk through how to create an appointment schedule in Google Calendar, explain the different scheduling options, and share some tips for choosing settings that make sense for the type of appointments you’re offering.
What Is a Google Calendar Appointment Schedule?
An appointment schedule allows you to create blocks of time when other people can schedule appointments with you.
You create the schedule in Google Calendar, configure your availability and booking preferences, and then share a booking page with the people who need to schedule time.
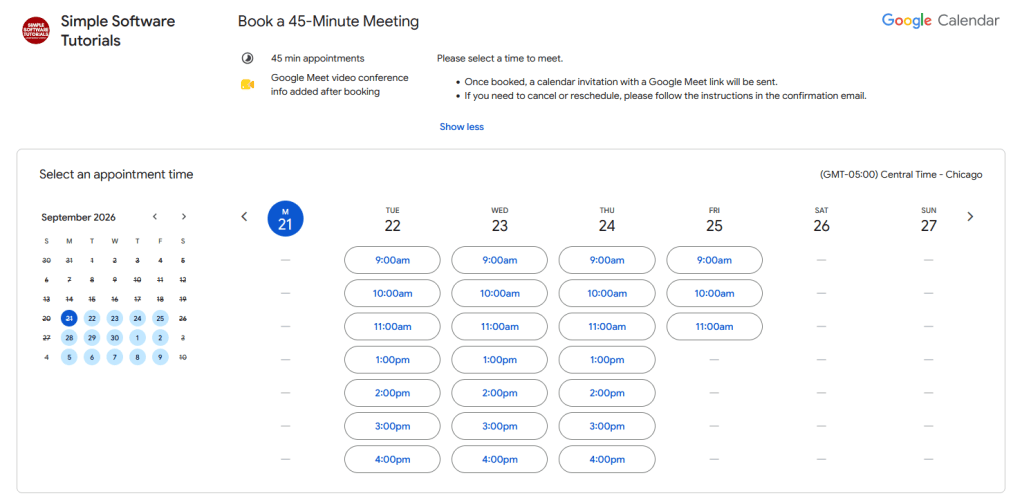
When someone visits the booking page, they see the appointment times that are currently available – not your entire calendar. After they choose a time and submit the booking form, the appointment is added to your calendar.
Google Calendar can also check your existing calendar events and remove times when you’re already busy, helping prevent scheduling conflicts.
Ways You Could Use an Appointment Schedule
Appointment schedules aren’t limited to traditional appointments. Any situation where people need to choose from your available times could potentially work.
For example, you could use a booking page for:
- Hiring: Let job applicants select an available interview time instead of exchanging emails about dates and times.
- Product demonstrations: Allow prospective customers to schedule a demo.
- Account reviews: Give clients a simple way to schedule time with their account manager.
- Training: Offer one-on-one training sessions or other scheduled learning opportunities.
- Customer onboarding: Let new customers choose an onboarding time.
- Consulting: Publish times available for consultations.
- Office hours: Professors, teachers, tutors, or managers could offer designated appointment times.
- Parent-teacher meetings: Give parents a selection of available conference times.
- Real estate: Schedule property viewings or consultations.
- Legal or professional consultations: Offer appointment times without manually coordinating every meeting.
- Personal services: Hair stylists, groomers, and similar businesses could use appointment schedules, although different services may require different appointment durations.
That last example highlights one limitation of the free version.
Is Google Calendar Appointment Scheduling Free?
You can create an appointment schedule with a personal Google account. As of September 2026, a personal Google account or Google Workspace Business Starter account can create one booking page. Eligible Google One and Google Workspace subscriptions provide additional appointment scheduling features.
One booking page may be enough if you primarily schedule one type of appointment, such as 30-Minute Interview or 60-Minute Consultation. However, businesses that need several different appointment types may find the one-page limitation more restrictive.
For example, a salon might need different durations for a haircut, color appointment, and consultation. A company might want separate schedules for product demos, customer onboarding, and account reviews.
Depending on your subscription, premium appointment scheduling features can include multiple appointment schedules, automatic email reminders, additional calendar availability checks, co-hosts, and paid appointments.
Tip: If you’re using the free version, think carefully about the one appointment schedule that will provide the most value.
How to Create an Appointment Schedule
Appointment schedules currently need to be created from Google Calendar on a computer rather than through the Google Calendar mobile app.
Go to Google Calendar at calendar.google.com and make sure you’re signed in to the Google account you want to use.
Then:
- Click + Create in the upper-left corner.
- Select Appointment schedule.
- Configure your appointment schedule and availability.
- Click Next.
- Configure your booking page, including the meeting location, description, and booking form.
- Click Save.
For a more thorough explanation of the appointment schedule configuration settings, I provide a start-to-finish walkthrough of setting up an appointment schedule in the video below, or keep scrolling for a written explanation below.
Video Tutorial
Prefer to watch the process? The video below walks through how to create and customize an appointment schedule in Google Calendar.
Appointment Schedule Settings
There are quite a few options during this process, so let’s look at what each one does.
Add a Title
Start by giving your appointment schedule a title.
Use something that will make sense not only to you, but also to the person booking the appointment. Google displays this title on your booking page and uses it for booked appointments.
For example:
- 30-Minute Job Interview
- Product Demo
- Account Review
- New Customer Onboarding
- One-on-One Training Session
- 60-Minute Consultation
Avoid vague internal names such as Appointments or Schedule 1 if people outside your organization will see them.
Choose the Appointment Duration
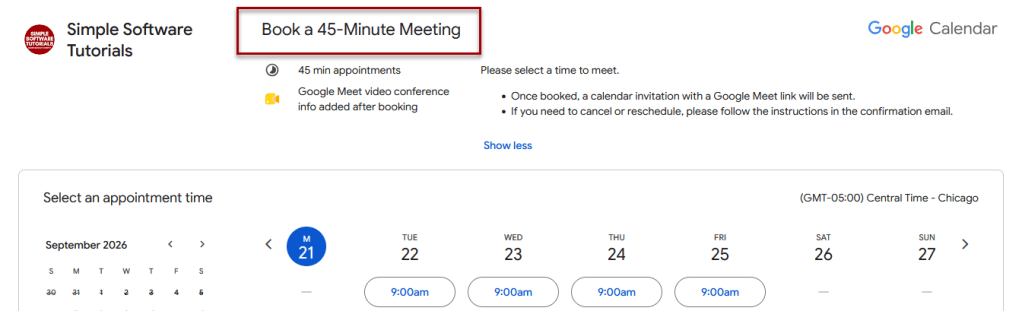
Next, determine how long each appointment should last. Google Calendar defaults to one hour, but that doesn’t mean one hour is necessarily the best choice. Think about how much time you actually need.
For example:
- A screening interview might require 20–30 minutes.
- A product demonstration might take 30–45 minutes.
- An account review could require an hour.
- A training session might need 60–90 minutes.
Also consider whether you need time between appointments.
Suppose the actual meeting normally takes about 45 minutes. You could create: 45-minute appointment + 15-minute buffer = one hour of calendar time. That gives you time to take notes, prepare for the next meeting, get a drink, or accommodate a meeting that runs slightly long.
We’ll set the actual buffer time separately later.
Set Your General Availability
The General availability section determines when people are normally allowed to book appointments.
Google gives you several ways to establish availability.
Repeat Weekly
Use Repeat weekly when your general availability is relatively consistent from week to week.
For example:
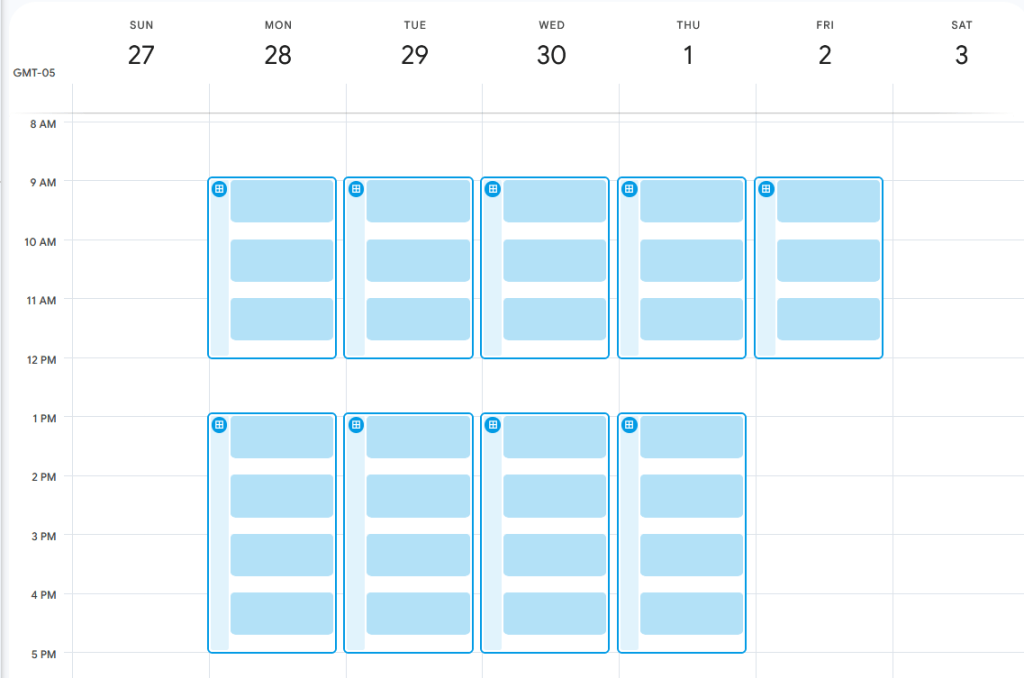
Monday-Thursday
9:00 AM-5:00 PM
Friday
9:00 AM-12:00 PM
This works well for an ongoing booking page that you plan to keep available indefinitely.
You can add more than one time period to a day, which is especially useful for regular breaks.
For example:
9:00 AM-12:00 PM
1:00 PM-5:00 PM
creates a one-hour lunch period when appointments cannot be booked.
You can also copy the same availability to other days instead of entering the hours repeatedly. To do this, set the schedule for one day, then click the copy time to all icon to the right of the scheduled time.
Does Not Repeat
Use Does not repeat when you only want to offer appointments on specific dates.
This can work well when you’re opening a small number of temporary appointment times.
For example, you might make interview appointments available only on:
Tuesday, October 6
Wednesday, October 7
Friday, October 9
This is especially useful for short-term scheduling rather than an ongoing appointment service.
Custom Availability
Custom scheduling provides more control when your availability follows a repeating pattern that isn’t simply the same every week.
For example, you might offer appointments every other week or during a limited recurring period.
This can be useful for schedules that turn on and off periodically rather than remaining continuously available.
Check Your Time Zone
Before continuing, verify that the displayed time zone is correct.
This is particularly important if you work remotely, travel, or schedule appointments with people in different locations.
Set the Scheduling Window
Your availability determines which days and hours people can schedule.
The Scheduling window determines how far into the future and how close to the appointment time they are allowed to book.
Using these settings in combination with general availability settings can prevent scheduling surprises.
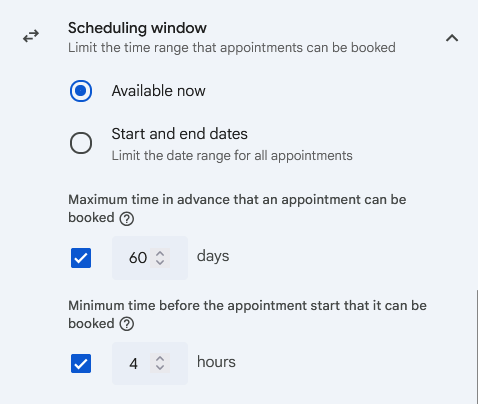
Available Now
Choose this option when you want the appointment schedule to begin immediately and remain available without a specific ending date.
This makes sense for ongoing services such as consultations, demos, office hours, or account reviews.
Even with an open-ended schedule, periodically review your availability to make sure it still reflects your working schedule.
Start and End Dates
You can instead specify a date range during which the appointment schedule is active.
This can be helpful for:
- Interview periods
- Seasonal services
- Temporary office hours
- Limited training programs
- Short-term projects
You can always edit the dates later if you decide to extend the schedule.
Maximum Time in Advance
You can also determine how far into the future someone is allowed to book. Google’s default is 60 days.
The appropriate window depends heavily on the type of appointment.
A job interview process usually moves relatively quickly, so allowing someone to schedule two months into the future probably wouldn’t make sense.
A hair appointment, on the other hand, might reasonably be booked several weeks in advance.
Minimum Time Before an Appointment
This setting determines how much notice you require before someone can book an available appointment. Google defaults to four hours.
Ask yourself whether you’re comfortable receiving:
- Same-day bookings
- Bookings with only a few hours’ notice
- Next-day bookings
- Appointments that require several days of preparation
For an informal consultation, a few hours of notice might be fine.
For an interview, training session, or account review that requires preparation, you may want at least one business day.
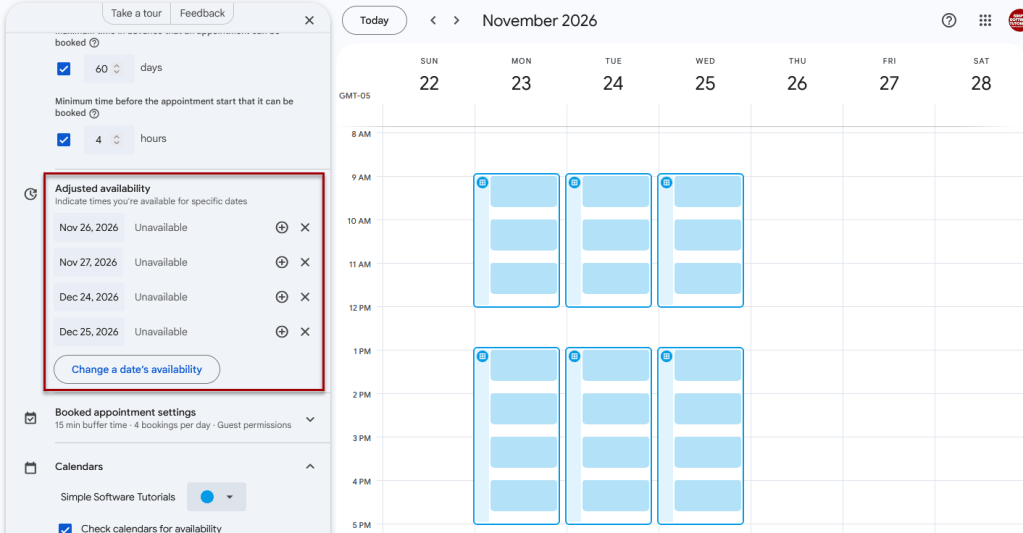
Use Adjusted Availability for Exceptions
Adjusted availability lets you change your schedule for specific dates without changing your normal recurring availability.
This is ideal for exceptions such as:
- Holidays
- Vacation days
- Conferences
- Company events
- Personal appointments
- A day when you’re working different hours
For example, your regular schedule might allow appointments every Tuesday from 9:00 AM–4:00 PM. If you’re unavailable one particular Tuesday, you can mark that date unavailable without changing every future Tuesday.
Adjusted availability is best for exceptions. For recurring breaks such as lunch every day, adjust your General availability instead.
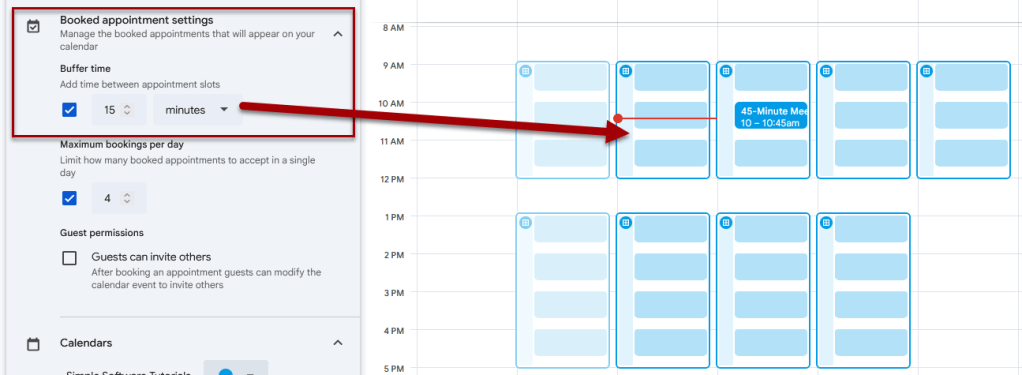
Booked Appointment Settings
Add Buffer Time
Buffer time creates additional space between appointments.
For example, if you offer 45-minute appointments and add a 15-minute buffer, another person cannot immediately book the next 45-minute period.
Buffers can be useful when you need time to:
- Take notes
- Prepare for your next appointment
- Travel between meetings
- Complete follow-up tasks
- Allow for conversations that occasionally run long
Even a 10- or 15-minute buffer can keep several appointments in one day from feeling back-to-back.
Set a Maximum Number of Bookings Per Day
You can also limit how many appointments people can book on a single day. This can be surprisingly useful.
Suppose you’re technically available from 9:00 AM-5:00 PM, but you don’t want to spend the entire day in interviews.
Instead of restricting all interviews to only mornings or afternoons, you could leave the larger scheduling window available while limiting yourself to three interviews per day.
That gives applicants more flexibility while protecting some of your workday for other responsibilities.
Choose Guest Permissions
Guest permissions determine whether the person booking the appointment can invite additional people. Whether you enable this depends on the type of appointment.
Allowing additional guests may make sense for:
- Training sessions
- Account reviews
- Collaborative consultations
- Meetings involving multiple stakeholders
You may prefer not to allow additional guests for:
- Job interviews
- Private consultations
- One-on-one meetings
Choose the setting based on the purpose and privacy expectations of the appointment.
Check Your Calendar for Conflicts
One of the most important settings is Check calendars for availability.
When enabled, Google Calendar removes appointment times that conflict with events on the selected calendar so people can’t book you when you’re already busy. Google recommends using availability checking to avoid scheduling conflicts.
I recommend leaving this enabled unless you have a specific reason not to.
For example, suppose your appointment availability is normally Monday, 9:00 AM–4:00 PM but you already have a meeting on your calendar from 10:00-11:00 AM.
With calendar availability checking enabled, the booking page will not offer appointments that conflict with that meeting.
This lets your normal appointment schedule remain flexible without requiring you to continually edit it whenever another calendar event is added.
Customize Your Booking Page
After configuring your appointment availability, click Next.
The next section controls what the person scheduling an appointment will see and what information Google collects from them.
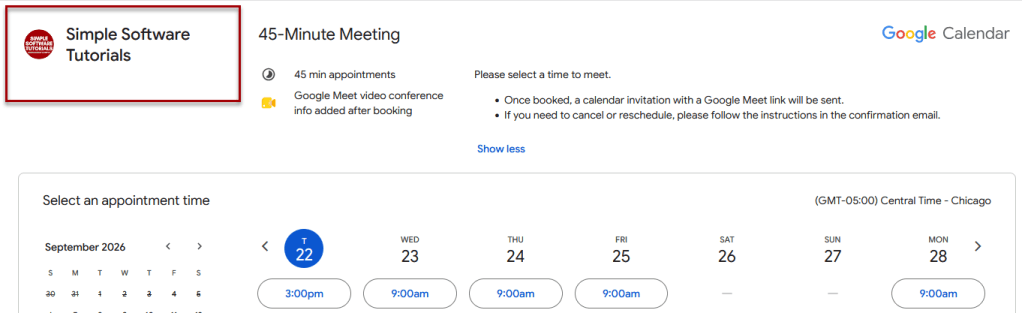
Check Your Booking Page Name and Photo
Google shows your account name and profile information on the booking page. Take a moment to review how your identity appears before sharing the page publicly.
If your name or profile photo needs to be changed, those changes are managed through your Google Account settings.
This is especially important if you’re using an account that was originally created for personal use but are now using the booking page professionally.
Select a Location or Conferencing Option
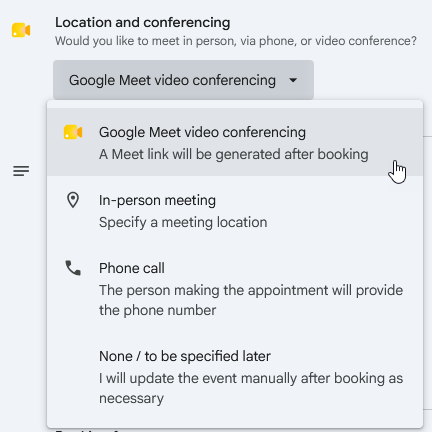
Choose how the appointment will take place. Google currently provides four options.
Google Meet
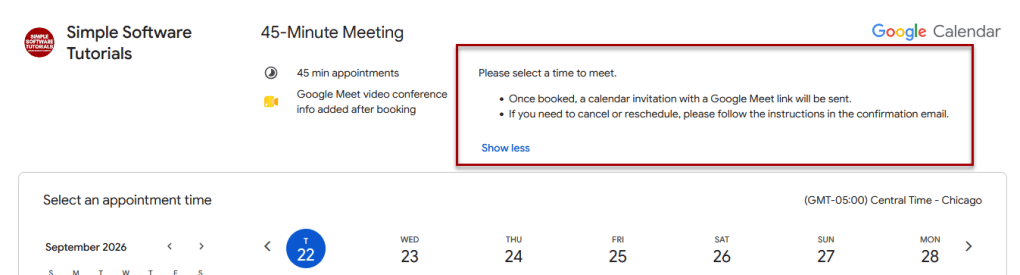
Google automatically creates a Google Meet link when the appointment is booked.
This works well for:
- Remote interviews
- Online training
- Consultations
- Account reviews
- Virtual meetings
In-Person Meeting
Enter the physical location where the appointment will take place.
This might be an:
- Office
- Conference room
- Store
- School
- Other meeting location
Make sure the location is specific enough that the person booking knows where to go.
Phone Call
The person booking the appointment provides the phone number they want you to call. This can be useful for phone interviews or consultations.
None / To Be Specified Later
Choose this when you plan to determine the meeting method after the appointment is booked. This option can be useful if those booking could be either local or remote.
Tip: If those booking could be either local or remote, you could add a custom item asking them to confirm whether they’re local or remote on the booking form.
You can later edit the calendar event and add additional information, including a different videoconferencing service if necessary.
Add a Description
The description explains what the appointment is for and provides any information the person should know before booking. Google displays this description on the booking page, in confirmation emails, and in the calendar event description. Keep it useful but reasonably concise.
For example, an interview schedule might say:
“Use this page to select an available time for your interview. Interviews are approximately 30 minutes and will take place through Google Meet. You’ll receive the meeting link with your calendar invitation.”
A consultation might include instructions about what the client should prepare before the meeting.
Because this information appears in several places, review the formatting and wording carefully before publishing your booking page.
Customize the Booking Form
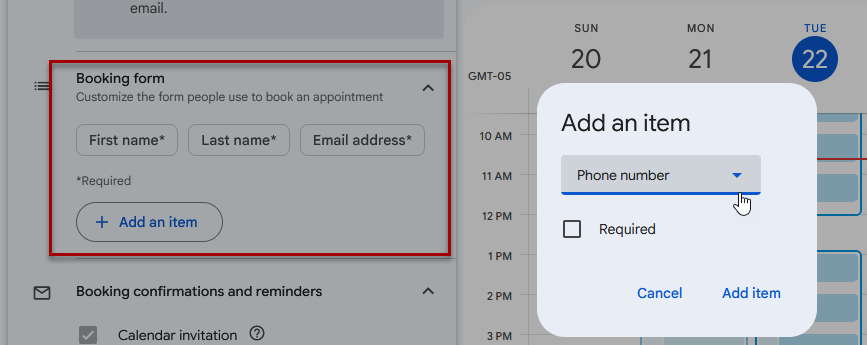
Google automatically asks the person booking the appointment for:
- First name
- Last name
- Email address
You can add additional fields when more information would be useful. Google currently allows additional items such as a phone number or custom questions.
For example, you might ask for:
- Job interview: Position you’re interviewing for
- Account review: Company name
- Training: Product or topic you’d like help with
- Consultation: Briefly describe what you’d like to discuss
You can determine whether additional questions are required.
The booking form is useful for collecting a small amount of information needed for the appointment, but don’t try to turn it into a full application, registration form, or intake questionnaire.
If you need substantial information, use a dedicated form instead and reserve the booking form for the details necessary to identify and prepare for the appointment.
Booking Confirmations and Reminders
When an appointment is booked, both you and the person who scheduled it receive information about the appointment, and the appointment is added to the calendar.
Google also offers additional confirmation and reminder functionality, although some reminder features require an eligible paid subscription.
Review the options available for your account and consider how much communication your appointment requires.
Save and Preview Your Appointment Schedule
Once you’ve finished configuring the booking page, click Save.
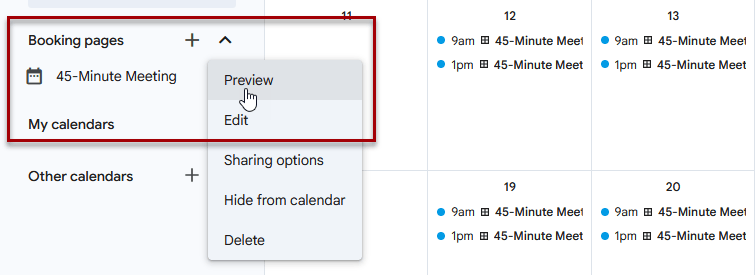
Your new schedule should appear in the Booking pages section on the left side of Google Calendar.
Before sharing it with anyone, preview it: Hover over your booking page and open the additional options menu, then select the option to preview the booking page.
I strongly recommend doing this every time you create or significantly change an appointment schedule.
Check:
- The title
- Your name and profile information
- Available dates
- Available appointment times
- Time zone
- Appointment duration
- Description
- Location or meeting method
- Booking form questions
Think about the page from the perspective of someone who has never seen your calendar setup before.
- Can they tell what they’re booking?
- Do the available times make sense?
- Do they have everything they need to complete the appointment?
Fix anything that looks confusing before sharing the link.
Managing Your Booking Page
Under Booking pages, hover over an appointment schedule to access its controls.
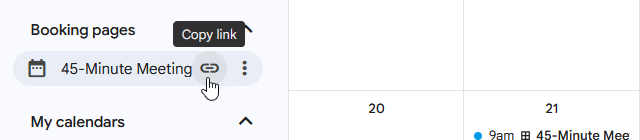
Copy Link
Hover over the booking page and click on the link icon to copy the link to your booking page. It can now be pasted in an email or wherever you want to use it.
Booking Page Options
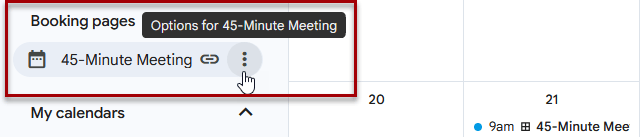
The options for your booking page can be accessed by hovering your mouse over the booking page in the left-side menu, then clicking on the 3 dots.
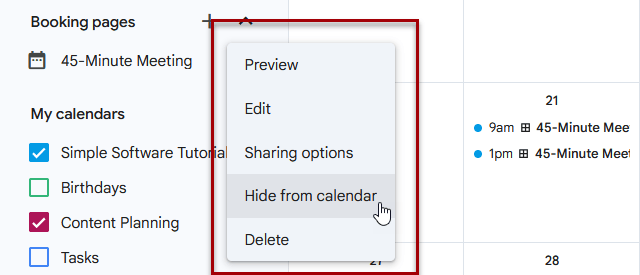
Depending on your account and current Google Calendar interface, you’ll find options for tasks such as:
- Previewing the booking page
- Editing the appointment schedule
- Accessing sharing options
- Showing or hiding the appointment schedule on your calendar
- Deleting the schedule
Preview
Clicking on preview opens the booking page in a new tab or window so you can see what your booking page looks like. I highly recommend previewing the booking page before sharing it to ensure it looks exactly as expected. If any changes need to be made, the page can be edited through the booking page options.
Edit
Clicking on edit opens the appointment schedule editor used to create the event. Make any changes needed, then save the changes. As a best practice, preview the page to ensure your edits appear as expected.
If you need to change your schedule later, I generally recommend editing the existing appointment schedule rather than creating another one – particularly if you’re using a free Google account that only allows one booking page.
Sharing Options
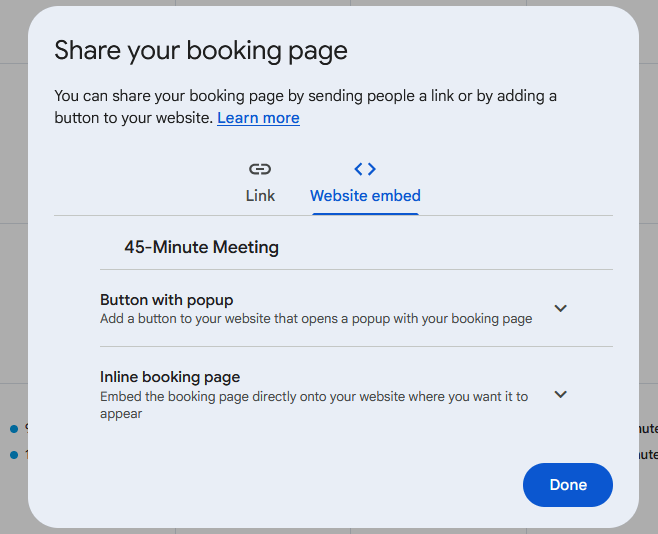
The sharing options provide two ways to share your booking page: link or website embed.
The link tab displays your booking page link and has a copy link button so you can easily copy the link to paste wherever desired.
The website embed tab presents two options for embedding a button with a popup or the booking page directly onto your website.
Hide From Calendar/Show on Calendar
Showing the schedule on your own calendar can be helpful because it gives you a visual reminder of when you’ve made yourself available, even when no appointments have been booked yet. For example, seeing appointment availability on your calendar may remind you that a holiday, vacation, or other schedule change needs to be added as an exception.
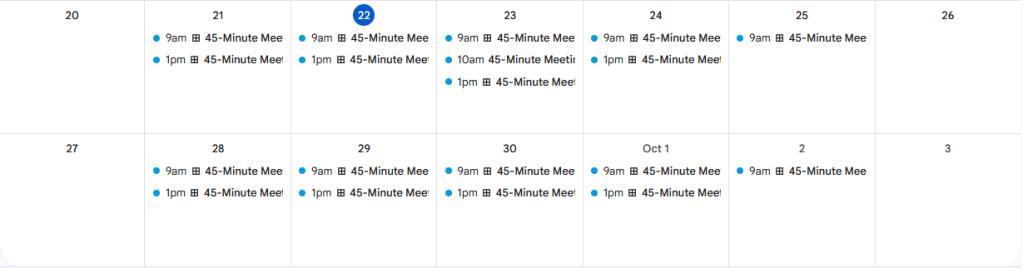
However, if it’s overwhelming to see the available slots on your calendar, they can be hidden so only scheduled appointments are shown.

Delete
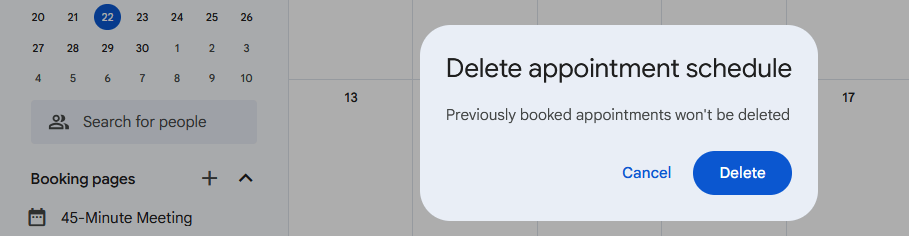
If you no longer need the appointment schedule, it can be deleted by clicking delete from the booking page options. A confirmation message will appear to ensure you want to delete the appointment schedule.
Note: Deleting an appointment schedule does not delete booked appointments; any appointments booked prior to deleting the appointment schedule will remain on your calendar after deleting the appointment schedule.
How to Share Your Google Calendar Booking Page
Once you’ve tested the booking page, you need to get it in front of the people who need to schedule with you.
Under Booking pages, hover over the schedule and click the link icon to copy its booking link. Google also provides sharing and website embedding options.
Here are a few places you could use the link:
Email Messages
Instead of proposing several meeting times, send the booking link and let the recipient select one.
This can be especially useful when scheduling interviews, demonstrations, consultations, or training.
Gmail Templates
If you frequently send the same type of scheduling message, include the booking link in a Gmail template.
For example, a hiring template could say:
“We’d like to schedule an interview with you. Please use the link below to choose an available time that works for you.”
This can eliminate much of the back-and-forth normally involved in interview scheduling.
Email Signature
If appropriate for your role, include a scheduling link in your email signature.
For example: Schedule a meeting with me
This works particularly well for sales, consulting, customer success, or other roles in which people regularly need to schedule meetings with you.
Company Directory or Internal Resources
Organizations could include booking links in internal directories, knowledge bases, or team documentation.
An employee looking for one-on-one training, for example, could select an available time without contacting the trainer first.
Your Website
Google lets you share a direct link or embed the booking experience into a website.
Website embedding options include a button with a popup or an inline booking page. Google currently lists support for inline appointment booking pages on platforms including WordPress.com, WordPress.org, Wix, Squarespace, Shopify, and others.
This can be particularly useful for businesses that want customers to schedule appointments directly from their website.
A Few Tips Before You Share Your Booking Page
Before publishing your scheduling link widely, consider these final best practices.
Don’t make your availability broader than necessary.
Just because you’re technically working from 8:00 AM–5:00 PM doesn’t mean you need to make all nine hours available for appointments.
Use buffer time when meetings require preparation or follow-up.
A small break can keep your schedule from becoming overwhelming.
Set a reasonable minimum notice period.
Consider how much preparation you need before someone can place an appointment on your calendar.
Use a maximum daily booking limit when appropriate.
This can give people flexible appointment choices without allowing your entire day to fill with meetings.
Use adjusted availability for exceptions.
Add holidays, vacations, and unusual workdays rather than changing your regular schedule.
Keep your calendar current.
Availability checking only helps prevent conflicts if your other commitments are actually on the calendars being checked.
Keep booking form questions focused.
Collect what you need for the appointment, not everything you could possibly ask.
Preview the booking page before sharing it.
This is the easiest way to spot confusing descriptions, incorrect hours, or other problems before someone tries to schedule.
Appointment Scheduling Without the Back-and-Forth
Google Calendar appointment schedules won’t replace a full scheduling or appointment-management system for every business. The free version’s one-booking-page limitation can be particularly important if you offer several different services.
But for someone who needs a straightforward way to let people choose from available meeting times, the feature can eliminate a surprising amount of manual coordination.
And because the booking page connects directly to Google Calendar, changes to your schedule can automatically affect which appointment times remain available.
Whether you’re scheduling job interviews, customer meetings, consultations, training sessions, or office hours, setting up a thoughtful appointment schedule can make the process easier for both you and the people trying to meet with you.
Related

How to Schedule an Email in Gmail
Learn how to schedule an email in Gmail so your message is sent at the right time. This tutorial covers how to schedule, view, cancel, and reschedule emails on desktop and mobile, plus practical uses, scheduling limits, time zone considerations, and other helpful tips.

How to Label Emails From a Specific Date Range in Gmail
Learn how to find Gmail emails from a specific date range using after: and before: search operators, then create and apply a label to organize those messages for easy access later. This tutorial also includes practical copy-and-paste date range examples for years, months, projects, travel, taxes, and more.
Stay Updated
There are two easy ways to get notified when new tutorials are published:
Subscribe on YouTube for new video tutorials: @SimpleSoftwareTutorials
or enter your email below to receive new blog posts directly in your inbox:

