
Job searching can quickly become a job of its own. Between applications, resumes, job descriptions, recruiter emails, interviews, follow-ups, and notes, it’s easy for important information to get scattered across different places.
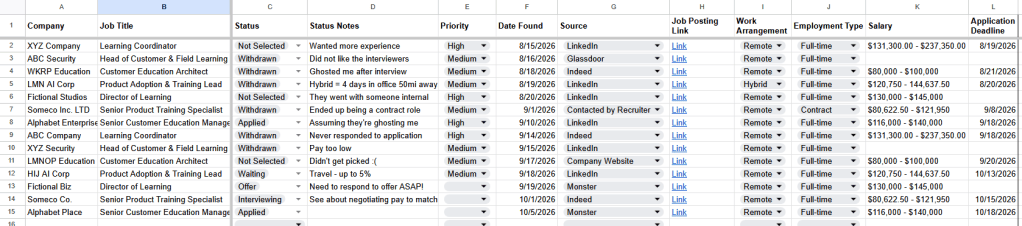
To make that easier, I created a free, ready-to-use Job Tracker in Google Sheets with built-in reporting, sample data, guides, a contacts sheet, and other tools so you can start tracking your job search immediately.
You don’t need to build anything from scratch. You can make a copy of the tracker, start adding opportunities, and use the rest of this guide to organize your files and get more value from the system.
Get the Free Job Tracker
The Job Tracker is designed to be usable as-is and includes:
- A ready-to-use job opportunity and application tracker
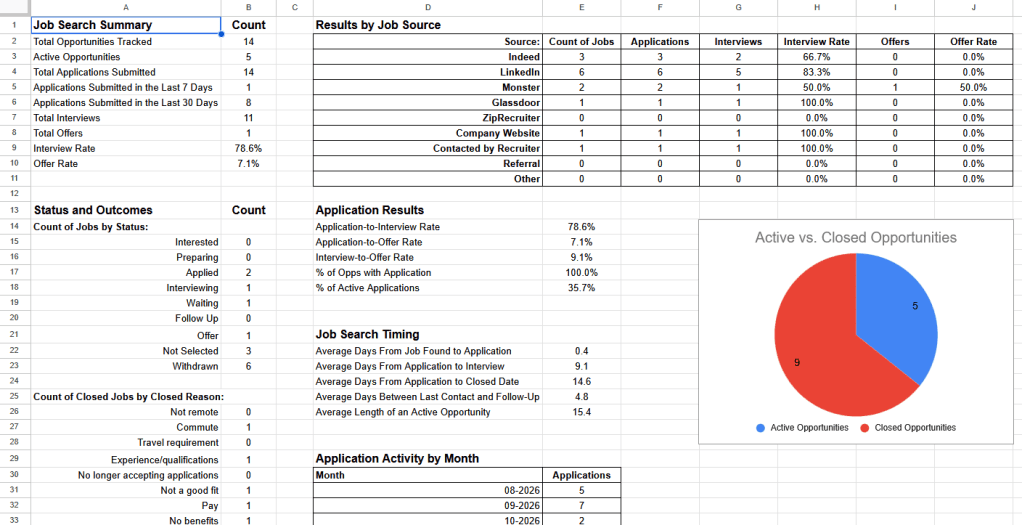
- Built-in reporting and charts
- A Contacts tab
- A Tracker Guide
- A Reporting Guide
- Sample tracker data and sample reports
- A Job Notes template
Some calculated cells, reports, and sample sheets are protected with warnings to help prevent accidental changes to formulas or demo content.
If you just want a simple way to start tracking your job search, you can make a copy and begin adding opportunities right away.
Prefer Excel? You can download the tracker as a Microsoft Excel file. The dropdowns, formulas, and reporting should still work, but some Google Sheets settings may not carry over exactly. For example, cell and sheet protections may not be preserved, and some formatting may need minor adjustment after download.
To use the tracker in Excel, choose File → Download → Microsoft Excel (.xlsx).
Set Up a Simple Job Search Folder in Google Drive
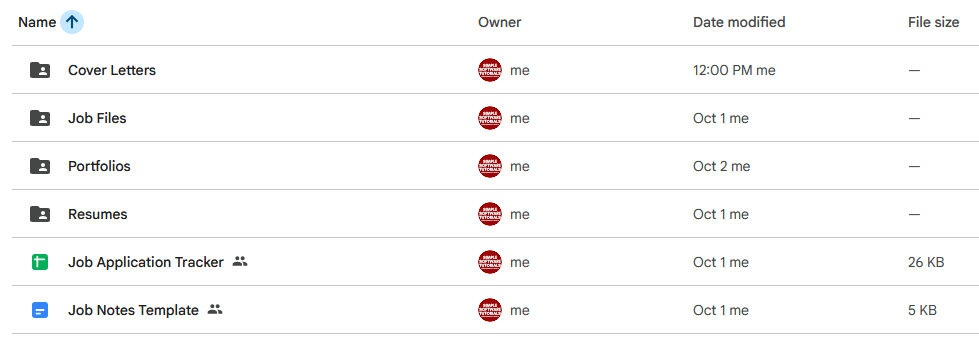
A basic Google Drive folder can help keep resumes, applications, job descriptions, and notes together.
A simple structure might look like this:
Job Search├── Resumes├── Job Files│ ├── Job Title - Company (MM-YYYY)│ └── Archive├── Job Notes Template└── Job Tracker
Resumes
Use the Resumes folder to store your starting or master resumes. If you maintain different versions for different types of roles, you can keep them all here and customize them as needed for individual applications.
Job Files
Inside Job Files, create a separate folder for each opportunity.
A consistent naming format can make folders easier to find later: Job Title – Company (MM-YYYY)
For example: Learning Experience Designer – Example Company (10-2026)
Each job folder might include:
- A copy of the job description
- The resume you submitted
- A cover letter
- Portfolio or work samples
- A Job Notes document
- Any other related files
Archive
When an opportunity is no longer active, move its folder into Archive rather than deleting it.
Moving a folder in Google Drive does not change its existing link, so if the folder is linked from the Job Tracker, you do not need to update that link after archiving it.
Optional folders
Depending on how you prefer to work, you may also want folders for:
- Cover Letters
- Portfolios
- Templates
You can keep the structure as simple or detailed as you need.
View the Example Job Search Folder
I also created an example Job Search folder so you can see one possible setup.
The example contains fictional and demonstration files. It is intended mainly as a reference so you can see how the folders and files might be organized.
Save Job Descriptions Before They Disappear
Job postings can change or disappear after an application closes, so it’s a good idea to save a copy when you decide to pursue a role. One simple option is to print or save the job posting as a PDF and place it in the corresponding job folder. That way, you still have the original job description available later when preparing for an interview or reviewing the requirements.
Use the Job Notes Template When You Need More Detail
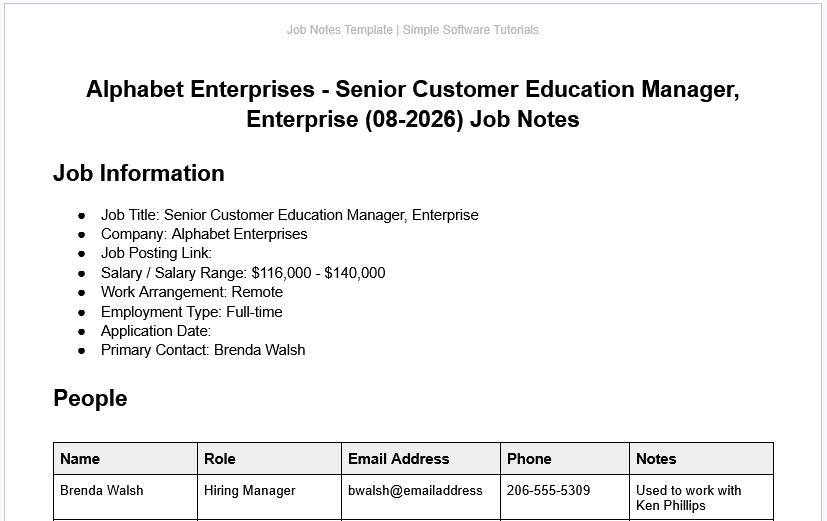
The included Job Notes template can help you keep detailed information about roles that progress further in the hiring process.
You do not need to create a notes document for every job. It may be most useful when you begin researching a company, preparing for an interview, or keeping detailed notes from conversations.
The template includes sections for:
- Job information
- Why you are interested
- Company and role research
- People and contacts
- Interview preparation
- Interview notes
- Follow-up
When you need it, make a copy of the template and save it in the corresponding job folder.
A consistent name can help prevent notes from getting mixed up: Job Title – Company (MM-YYYY) Job Notes
A Simple Job Search Workflow
A basic process can be summarized as:
Find → Track → Save → Prepare → Apply → Follow Up → Archive
1. Find and track an opportunity
When you find an interesting job, add it to the Job Tracker even if you have not decided whether to apply. You might opt to simply set the status to Interested.
This can take some pressure off the process. Finding and saving a promising opportunity is still progress, even if you have not submitted an application yet.
2. Add basic information to the tracker
Enter whatever information is available, such as:
- Company
- Job title
- Status
- Priority
- Date found
- Source
- Job posting link
- Work arrangement
- Employment type
- Salary
- Application deadline
You can add more information later as the opportunity progresses.
3. Create a job folder
When you decide to work on the application, create a folder for it inside Job Files. Then add the folder link to the Job Files Link field in the tracker.
This gives you a direct path from the spreadsheet to all of the files related to that opportunity.
4. Prepare your application
Save the job description and prepare the documents you need, such as:
- Resume
- Cover letter
- Portfolio
- Work samples
- Other requested documents
Save the versions you actually submit so you always know exactly what the employer received.
5. Apply and update the tracker
After submitting the application:
- Enter the Date Applied
- Update the Status
- Add contact information if available
- Add a Next Follow-Up date when appropriate
Keeping fields such as Status, Date Applied, Next Follow-Up, Closed Date, and Closed Reason current will also keep the reporting accurate.
6. Keep track of contacts
The optional Contacts tab can be used for:
- Recruiters
- Hiring managers
- Interviewers
- Referrals
- Networking contacts
You can search, sort, or filter the sheet when you need to quickly identify someone who calls or emails.
7. Follow up
Use the tracker together with Google tools as needed.
For example:
- Use Google Tasks for reminders and deadlines
- Use Gmail Schedule send for messages you want delivered later
- Use Gmail Snooze to bring an email back to your inbox when you want to revisit it
- Use Gmail templates for reusable follow-up messages, then personalize them before sending
8. Close and archive the opportunity
When a job is no longer active:
- Update the status if needed
- Enter the Closed Date
- Select the appropriate Closed Reason
- Move the job folder into Archive
Keep the tracker row in place rather than deleting it. This preserves your history and allows the reports to continue using that information.
Review Your Job Search Reports
The built-in reporting dashboard can help you see more than a list of applications.
It includes information such as:
- Total opportunities tracked
- Applications submitted
- Applications in the last 7 and 30 days
- Active opportunities
- Interview and offer rates
- Opportunities by status
- Closed reasons
- Results by job source
- Application activity by month
- Timing metrics
The Reporting Guide explains how each metric is calculated. Rather than focusing only on totals, look for patterns.
For example:
- Which sources are leading to interviews?
- Are opportunities you save actually turning into applications?
- Why are jobs most often being closed?
- Are your applications producing interviews?
- Are follow-ups being completed?
Optional Ways to Stay Organized
You don’t need to use all of these, but they can make the system even easier to manage.
Use a dedicated job-search email account
A separate Gmail account can keep job-search communication separate from personal email. You can also use Gmail labels and filters to organize messages by company, job, or type. If you prefer to use your regular email account, labels and filters can still provide much of the same organization.
Bookmark frequently used resources
Bookmark the Job Tracker and your main Job Search folder so they are easy to open.
Star important files and folders
Google Drive’s Starred feature can make frequently used files and folders easier to find.
You might star:
- The main Job Search folder
- The Job Tracker
- The Job Notes template
- Other files you use regularly
Create filter views in Google Sheets
If you want, you can create filter views for things such as:
- Active opportunities
- High-priority jobs
- Interviews
- Follow-ups
- Closed opportunities
This is optional. The tracker works without them.
Using the Tracker for Unemployment Work-Search Records
Because the tracker records information such as company, job title, dates, sources, and application activity, it may also be helpful for keeping records required for unemployment work-search reporting.
Work-search requirements vary by state and program, so check the requirements that apply to your unemployment claim to make sure you are recording and reporting the information you need.
Final Thoughts
You don’t need to use every field or feature right away. Start by tracking opportunities as you find them, keep related files together, and update the tracker as each job progresses.
The system is designed to be flexible. You can keep it simple or use the additional reporting, notes, contacts, and Google Workspace tools when they become useful.
The goal is to make your job search easier to manage, not give you another complicated system to maintain.
Related

How to Schedule an Email in Gmail
Learn how to schedule an email in Gmail so your message is sent at the right time. This tutorial covers how to schedule, view, cancel, and reschedule emails on desktop and mobile, plus practical uses, scheduling limits, time zone considerations, and other helpful tips.

How to Turn on and Use Gmail Templates
Learn how to turn on and use Gmail templates to save and reuse messages you send regularly. This tutorial covers how to enable templates, create and name a template, insert it into an email, edit or delete saved templates, and find ideas for using templates in personal and professional communication.
Stay Updated
There are two easy ways to get notified when new tutorials are published:
Subscribe on YouTube for new video tutorials: @SimpleSoftwareTutorials
or enter your email below to receive new blog posts directly in your inbox:

