

Gmail makes it easy to save contacts you email regularly, but your contacts are actually stored in Google Contacts and connected to your Google account.
In this tutorial, I’ll explain how Gmail works with Google Contacts, show you how to check whether someone is already saved before adding them, and walk through two ways to create a new contact: adding someone directly from an email they sent you or creating a contact manually in Google Contacts.
Checking first is a helpful best practice because Google can allow duplicate contact entries. By taking a moment to see whether someone is already saved, you can help keep your contact list cleaner and easier to manage.
Video Tutorial
How Gmail Works With Google Contacts
Gmail does not keep a separate contact list of its own. Instead, it uses Google Contacts, which is connected to your Google account.
When you save someone as a contact from Gmail, that person is added to Google Contacts. You can then access that contact information from Gmail and other Google services that use the same account.
This is why you may see your saved contacts appear when you start typing an email address in Gmail, even though the contacts themselves are managed through Google Contacts.
Before You Start: Check Whether the Contact Already Exists
Before adding someone as a new contact, it’s a good idea to check whether they’re already saved in Google Contacts.
Google can allow you to add the same person more than once, which may create duplicate contact entries. Since it only takes a moment to check, doing this first can help keep your contact list cleaner and easier to manage.
Google Workspace provides two instant visual cues directly inside your email view so you never have to scroll through your entire contact list to check.
Method 1: The Hover Card (Fastest)
You can check a sender’s status without clicking a single button.
- Open the email from the sender you want to verify.
- Hover your cursor directly over the sender’s profile picture or name at the top of the email message.
- Analyze the pop-up card that appears after a brief second:
- Already Saved: You will see a Pencil icon (Edit contact) on the card.
- Not Saved: You will see a Person icon with a plus sign (+) (Add to contacts).
- To add the contact from here, simply click on the add to contacts icon.

Method 2: The Contacts Side Panel
If you prefer using the right-side vertical panel in Gmail, use this targeted approach instead of browsing the global list.
- Open the email from the sender you want to verify.
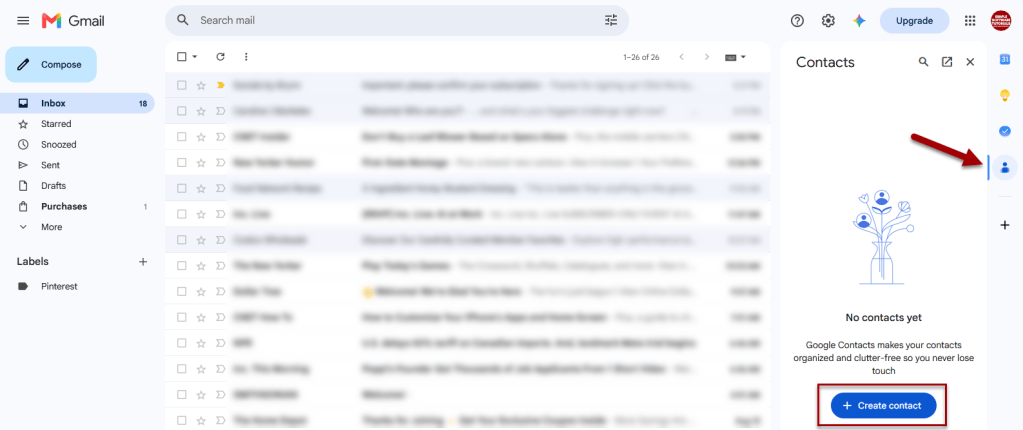
- Click the Contacts icon (blue circle with a person icon) in the right-side panel to open it.
- Look at the “In this thread” section at the top of the panel.
- Click directly on the sender’s name within that specific section.
- Identify the action button in the individual profile view that opens:
- If they have been saved as a contact, you will see several contact management icons: edit, star, delete, open in new tab.
- If they have not been saved as a contact, a prominent “Save contact” button will display at the bottom and only the edit icon will appear at the top.
- To add the contact from here, simply click on the save contact button.

Step-by-Step Instructions
Method 1: Add a Contact From an Email
To add a new contact from an email they’ve sent you:
- Open the email from the sender you want to add.
- Hover your cursor directly over the sender’s profile picture or name at the top of the email message.
- Click the add to contacts icon

Method 2: Create a Contact in Google Contacts
To add a contact by manually adding their contact information:
- While in Gmail, click on the contacts icon on the right side of the page
- Click on Create contact
- Add the contact’s information in the various fields
- Click Save

Related

How to Schedule an Email in Gmail
Learn how to schedule an email in Gmail so your message is sent at the right time. This tutorial covers how to schedule, view, cancel, and reschedule emails on desktop and mobile, plus practical uses, scheduling limits, time zone considerations, and other helpful tips.
How to Label Emails From a Specific Date Range in Gmail
Learn how to find Gmail emails from a specific date range using after: and before: search operators, then create and apply a label to organize those messages for easy access later. This tutorial also includes practical copy-and-paste date range examples for years, months, projects, travel, taxes, and more.
Stay Updated
There are two easy ways to get notified when new tutorials are published:
Subscribe on YouTube for new video tutorials: @SimpleSoftwareTutorials
or enter your email below to receive new blog posts directly in your inbox:

