
If you regularly send emails with the same or similar information, Gmail templates can save time and help you keep those messages consistent.
With templates, you can save the content of an email and reuse it whenever you need it instead of starting from scratch. They can be useful for everything from meeting confirmations and follow-ups to customer responses, invitations, reminders, and other personal or professional messages you send repeatedly.
In this tutorial, I’ll show you how to enable the Templates feature in Gmail, create and name a template, insert it into a new email, make changes to an existing template, and delete templates you no longer need. You’ll also find a video walkthrough, step-by-step written instructions, and a list of Gmail template ideas to help you think of ways you might use the feature yourself.
Video Tutorial
Step-by-Step Instructions
Ensure you are logged in to your Gmail account, for example, viewing your Gmail inbox.
Step 1: Enable the templates feature in Gmail
By default, templates are not enabled, but it’s pretty simple to do so:
- Click on the Settings icon toward the top right to open quick settings
- Click on see all settings
- Click on advanced
- Locate Templates and click the radio button next to enable
- Click on save changes
The page will reload and you will be returned to your Inbox.


Step 2: Create a template
Templates are created while composing an email message, even if you don’t need to send the message right now.
- Click the Compose button
- Create your template message:
- Type the message as you want it
- Copy and paste a message
- Click on the pencil icon (“Help me write” or press Alt + H) to use Gemini AI to assist with writing a message
- When you’re ready to save your template:
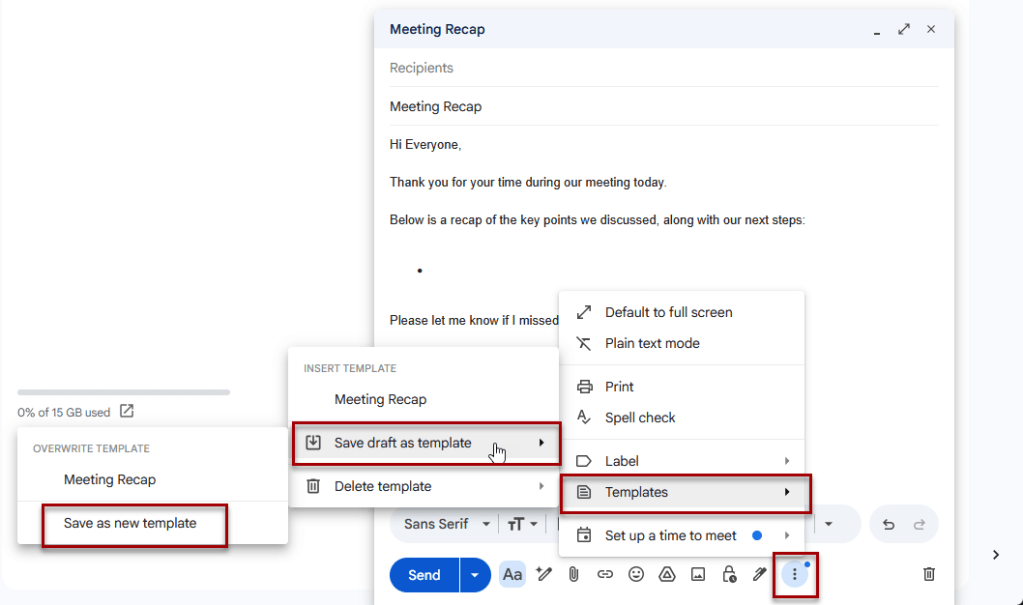
- Click on the 3 dots below your message to open more options
- Click on Templates > Save draft as template > Save as new template
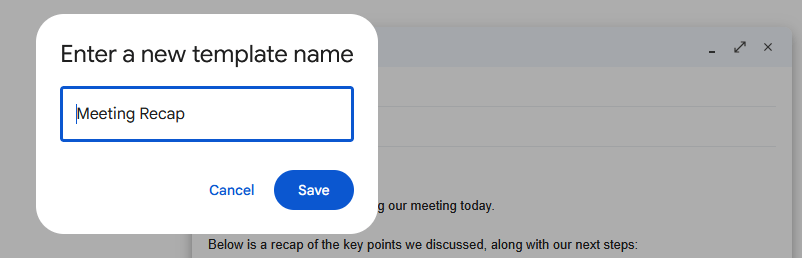
- Enter a name for your template
- Name the template so it is easy to know what this template is and to find it
- This template name will be the default email subject when using it for new messages
- Click Save
Once saved, you can close and/or delete the message you created. Deleting this message will not delete the template.
Step 3: Using a Gmail template
Once your Gmail template has been created and saved, it’s easy to use it:
- Click on compose to start a new email message
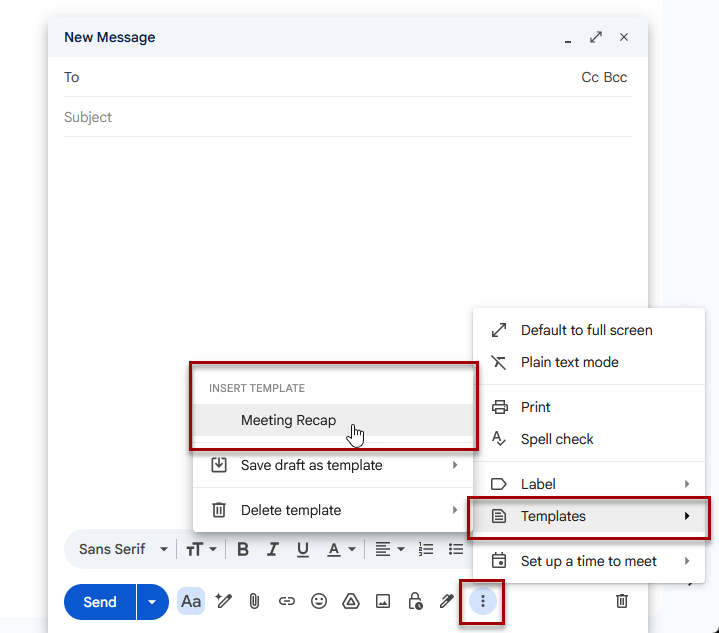
- Click on the 3 dots below your message to open more options
- Click on Template then click the template name you want to use
Your template message will now appear in the body of the email and the name of the template will appear as the subject.
Now you can make any necessary changes or additions, select the recipients, then send the message.
Step 4: Editing a Gmail template
It’s easy to update a Gmail template:
- Open the template following step 3 above
- Change your template as needed
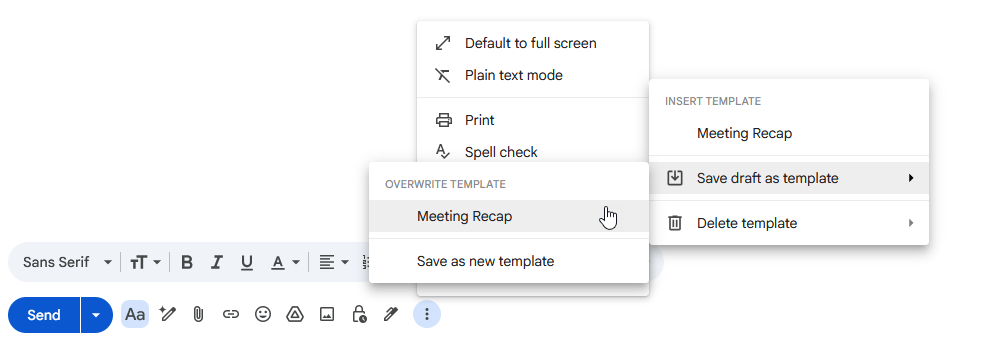
- Overwrite your existing template:
- Click on the 3 dots below your message to open more options
- Click on Templates > Save draft as template then click on the template you want to save as
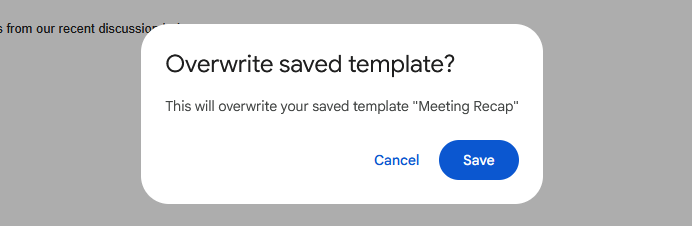
- A message will appear asking if you want to overwrite the saved template – click Save
Step 5: Deleting a Gmail template
Deleting a Gmail template can also be done from the more actions menu:
- Click on compose to start a new email message (you don’t need to open or use any templates for this)
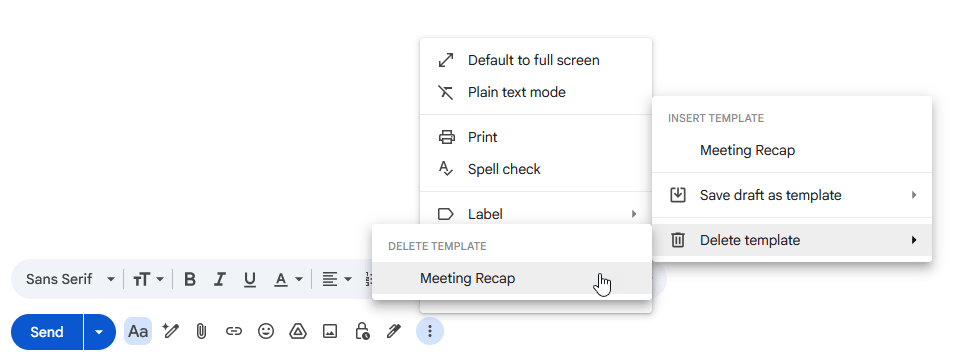
- Click on the 3 dots below your message to open more options
- Click on Templates > Delete template then click on the template you want to delete
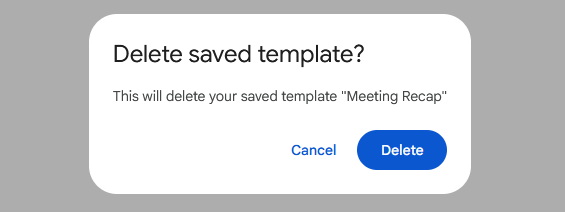
- A message will appear asking if you want to delete the saved template – click Delete
Template Use Ideas
Below are some ideas for how templates can be used for both personal and professional messages.
For personal use, common templates could include:
- Event invitation: birthday party, cookout, holiday gathering, reunion
- RSVP response: accepting or declining an invitation
- Thank-you message: after receiving a gift, favor, referral, or help
- Appointment request: contacting a service provider to schedule something
- Appointment cancellation or rescheduling
- House/pet-sitting instructions: especially useful if someone travels regularly
- Travel information: sending family members flight, hotel, or itinerary details
- School communication: contacting a teacher about an absence, assignment, or meeting
- Volunteer communication: availability, scheduling, or event information
- Marketplace inquiry: a reusable response when buying or selling items online
- Recommendation/referral request
- Introduction message: connecting two people by email
For business use, common templates could include:
- Meeting request
- Meeting confirmation
- Meeting follow-up / recap
- Request for information
- Response to a common customer question
- Customer inquiry acknowledgement
- Project status update
- Project kickoff message
- Request for feedback or approval
- Deadline reminder
- Invoice/payment reminder
- New client welcome message
- Client onboarding instructions
- Proposal follow-up
- Sales inquiry response
- Lead follow-up
- Thank-you after a meeting or sales call
- Outreach / introduction email
- Referral request
- Review or testimonial request
- Support response with troubleshooting steps
- Internal process reminder
- Document or file request
Related

How to Schedule an Email in Gmail
Learn how to schedule an email in Gmail so your message is sent at the right time. This tutorial covers how to schedule, view, cancel, and reschedule emails on desktop and mobile, plus practical uses, scheduling limits, time zone considerations, and other helpful tips.
How to Label Emails From a Specific Date Range in Gmail
Learn how to find Gmail emails from a specific date range using after: and before: search operators, then create and apply a label to organize those messages for easy access later. This tutorial also includes practical copy-and-paste date range examples for years, months, projects, travel, taxes, and more.
Stay Updated
There are two easy ways to get notified when new tutorials are published:
Subscribe on YouTube for new video tutorials: @SimpleSoftwareTutorials
or enter your email below to receive new blog posts directly in your inbox:

